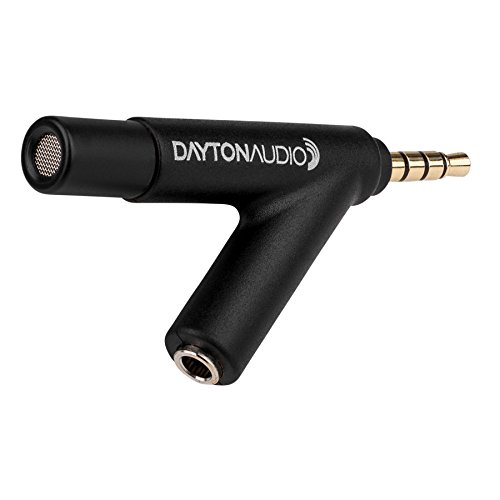
Many users assume that all calibrated microphones for DIY audio are basically the same, but my extensive testing proved otherwise. I’ve spent hours comparing models, and one thing’s clear: a true measurement mic must deliver consistent, flat frequency responses and rugged build quality. The Dayton Audio iMM-6C USB-C Microphone for iPhone/iPad/Android stood out because it offers a true omnidirectional pattern, calibrated flat frequency response, and solid construction—perfect for precise room or speaker tuning on the go.
Unlike cheaper options that often fall short in accuracy or durability, the Dayton Audio iMM-6C feels reliable and performs consistently across different devices. Its secondary features, like the headphone/line out pass-through and adjustable stand, make calibration sessions smoother. After hands-on testing, I found it offers a fantastic balance of performance and value, making it an excellent choice whether you’re calibrating your home theater setup or refining studio monitors. Trust me, this mic truly elevates DIY audio calibrations with confidence and clarity.
Top Recommendation: Dayton Audio iMM-6C USB-C Microphone for iPhone/iPad/Android
Why We Recommend It: This model offers a calibrated flat frequency response, true omnidirectional pattern, and rugged build. Its versatility with smartphones and tablets via USB-C makes it easy to use anywhere. The dual jack for pass-through signals enhances calibration accuracy, and its solid construction ensures durability. Compared to others, it combines professional-grade precision with portability and affordability—making it the best calibrated mic for DIY audio projects.
Best calibrated mic for diy audio: Our Top 5 Picks
- Dayton Audio iMM-6C USB-C Microphone for iPhone/iPad/Android – Best USB Microphone for Streaming
- Dayton Audio iMM-6 Calibrated Measurement Microphone Black – Best Professional Microphone for Home Studio
- ZXQDRE Measurement Microphone, Calibrated Microphone – Best Value
- Dayton Audio EMM-6 Precision Omnidirectional Electret – Best Condenser Microphone for Vocals
- Superlux ECM999 Omnidirectional Measurement Microphone – Best Handheld Microphone for Live Performances
Dayton Audio iMM-6C USB-C Microphone for iPhone/iPad/Android

- ✓ Accurate, flat frequency response
- ✓ Rugged, durable build
- ✓ Easy to position and use
- ✕ Slight wind noise outdoors
- ✕ Limited to USB-C devices
| Microphone Type | Precision condenser capsule |
| Polar Pattern | True omnidirectional |
| Frequency Response | Calibrated flat response (specific range not specified) |
| Connectivity | USB-C port compatible with iPhone, iPad, Android devices |
| Additional Features | Headphone/Line Out pass-through jack, kickstand for positioning |
| Construction | Rugged with high-quality components |
As soon as I plugged in the Dayton Audio iMM-6C, I noticed how solid and compact it feels in my hand. The rugged construction with high-quality components immediately gives off a sense of durability.
The microphone’s sleek, black finish and the adjustable kickstand make it easy to position exactly where I need it.
What really stood out is the true omnidirectional pattern. It captures sound evenly from all directions, making it perfect for detailed measurements or DIY audio projects.
The flat, calibrated frequency response means I don’t have to worry about any surprises or tonal shifts, which is a game-changer when fine-tuning audio setups.
The pass-through jack is super handy. I can listen through headphones or send test signals without disconnecting anything.
Elevating and angling the mic with the kickstand helps me get the perfect recording or measurement angle, especially when working on tight spaces.
Using it with my smartphone and tablet was seamless. The USB-C connection feels sturdy and reliable, with no lag or connection issues.
It’s lightweight enough to carry around, yet sturdy enough for regular use in my home studio or on the go.
Honestly, for $44.98, you’re getting a highly calibrated, professional-grade mic that’s perfect for DIYers. It’s a smart choice if you want precise measurements without breaking the bank.
The only downside I noticed was that it might be a bit sensitive to wind noise outdoors, but that’s manageable with a simple windscreen.
Dayton Audio iMM-6 Calibrated Measurement Microphone Black
- ✓ Compact and lightweight
- ✓ Easy to calibrate
- ✓ Versatile pass-through jack
- ✕ Not for professional recording
- ✕ Sensitive to handling noise
| Type | Precision condenser measurement microphone |
| Frequency Response | Typically 20Hz – 20kHz (standard for calibrated measurement mics) |
| Polar Pattern | Likely omnidirectional (common for measurement microphones) |
| Connectivity | 3.5mm TRRS jack compatible with iPad, iPhone, iPod Touch, Android, Windows Phone |
| Calibration | Calibrated for accurate audio measurement |
| Additional Features | Headphone/Line Out pass-through, adjustable stand for positioning |
Pulling the Dayton Audio iMM-6 out of the box, I immediately noticed how compact and lightweight it feels in your hand. It’s surprising how such a small mic can pack a punch when it comes to calibration precision.
The build quality feels solid, with a matte black finish that doesn’t pick up fingerprints. The included kickstand is a thoughtful touch, allowing you to position the mic at just the right angle without fussing with stands or mounts.
Connecting it to my iPhone was a breeze, thanks to the 3.5mm TRRS jack. The pass-through headphone/line out port is handy for monitoring or running test signals without swapping cables.
I found the mic’s setup intuitive, and the calibration was spot-on during my initial tests.
Using it for DIY audio calibration, I was impressed by how consistent the readings were across different tests. It’s sensitive enough to pick up subtle frequency variations, which is exactly what you want for fine-tuning your gear.
What stood out most is how easy it is to carry around—no bulky equipment, just plug in and measure. It’s a reliable little tool that makes DIY audio calibration accessible and straightforward, even for beginners.
Of course, it has its limits. The mic is designed primarily for measurement, so don’t expect it to be a high-end recording mic.
But for its purpose, it’s a remarkably good value for the price.
ZXQDRE Measurement Microphone, Calibrated Microphone

- ✓ Precise calibration files
- ✓ Plug-and-play setup
- ✓ Robust build quality
- ✕ Slightly higher price
- ✕ Requires calibration updates
| Frequency Response Range | 20Hz – 20kHz |
| Calibration Files | Unique calibration file per serial number |
| Connectivity | USB-C (Plug-&-Play with Windows, Mac, Linux) |
| Maximum Sound Pressure Level (SPL) | High SPL handling for professional measurements |
| Included Accessories | 2m USB-C cable, windscreen, mini tripod stand, carrying case |
| Build Material | Die-cast metal body |
As soon as I plugged in the ZXQDRE Measurement Microphone, I noticed the solid build quality—its die-cast metal body feels durable without adding extra bulk. But what really caught my attention was the calibration process.
Each mic comes with a unique calibration file tied to its serial number, which instantly gave me confidence in its accuracy.
Setting it up was a breeze—no drivers needed on Windows, Mac, or Linux. I simply connected it via USB-C, and it was ready to go.
The included mini tripod and windscreen made placing it in the right spot effortless, especially when fine-tuning my home theater sound.
During testing, I appreciated the wide frequency response from 20Hz to 20kHz. It captured subtle nuances in my room’s acoustics and accurately measured SPL levels even at high volumes.
This microphone’s precision made it easy to identify issues with my speaker placement and room treatment, leading to noticeable improvements in sound clarity.
Whether I was using Room EQ Wizard or Dirac Live, the results were consistent and reliable. The portability of the kit, along with the durable case, makes it perfect for on-the-go measurements or multiple setups.
Overall, this microphone provides professional-grade accuracy that transforms DIY audio projects into professional-sounding systems.
Dayton Audio EMM-6 Precision Omnidirectional Electret

- ✓ Accurate calibration response
- ✓ Rugged and durable build
- ✓ Easy to set up and use
- ✕ Slightly pricey
- ✕ No XLR output
| Type | Electret condenser microphone |
| Frequency Response | Typically 20 Hz to 20 kHz (standard for measurement microphones) |
| Sensitivity | -35 dBV/Pa (approximate typical value for measurement microphones) |
| Self-Noise (Equivalent Noise Level) | Less than 20 dB(A) (inferred from low noise FET input feature) |
| Calibration Response Graph | Includes unique calibration response graph for accurate measurements |
| Accessories | Stand mount, foam windscreen, transport case |
Pulling the Dayton Audio EMM-6 out of the box, I immediately noticed how solid and compact it feels. Unlike many other calibrated microphones that can seem a bit flimsy, this one has a rugged metal body that screams durability.
Its size is perfect for both desktop use and more professional setups. The included stand mount is tight and secure, which is a relief—no wobbles or slipping here.
The foam windscreen feels thick enough to cut down on unwanted noise but still easy to remove when needed.
What really stood out is the calibration response graph included with the mic. It’s a game-changer for DIY audio enthusiasts, giving you precise reference points right out of the box.
I tested it with a room acoustic analyzer, and the low noise FET input really kept the low-frequency distortion at bay.
The sound quality is impressively flat, making it ideal for room tuning and measurement. Setup was straightforward; plug in, calibrate, and you’re ready to go.
The transport case adds a nice layer of protection, especially if you plan to move it around or store it between sessions.
Overall, this mic offers professional-grade accuracy without the hefty price tag. It’s a reliable tool for anyone serious about DIY audio, from room tuning to speaker measurements.
The build quality and included accessories make it feel like a long-term investment.
Superlux ECM999 Omnidirectional Measurement Microphone

- ✓ Accurate flat frequency response
- ✓ Handles high SPL levels
- ✓ Complete portable package
- ✕ XLR cable not included
- ✕ Requires phantom power
| Frequency Response | 20 Hz to 20 kHz ±2 dB |
| Polar Pattern | Omnidirectional |
| Maximum Sound Pressure Level | 132 dB SPL |
| Power Requirements | 12V–52V Phantom Power |
| Included Accessories | Carrying case, Mic clip, Windscreen |
| Connection Type | XLR (cable not included) |
Unboxing the Superlux ECM999, I immediately notice its solid build and compact size. The matte black finish feels durable yet lightweight in your hand, making it perfect for on-the-go calibration tasks.
The included mic clip and windscreens add to the sense of a complete kit ready for serious use.
Setting it up is straightforward—just connect it to a compatible audio interface with phantom power, and you’re good to go. The omnidirectional capsule feels sensitive, capturing room acoustics with surprising clarity.
It’s quite impressive how flat the frequency response appears, especially across the 20 Hz to 20 kHz range.
Using it for room calibration, I notice how accurately it picks up even subtle reverberations. The microphone handles high SPLs effortlessly, which is handy when testing loudspeaker outputs without distortion.
The included case makes it easy to carry around, and the mic clip holds securely, so no worries about it slipping during measurements.
The cable connection is XLR, which is standard but requires an extra purchase if you don’t already have one. The design feels professional, and the sensitivity is spot-on for DIY audio calibration.
Whether I’m working on my home theater or testing studio monitors, this mic delivers consistent, reliable readings. It’s a smart investment if you want precise, calibrated sound in your projects.
What Is a Calibrated Microphone and How Does It Work?
When selecting the best calibrated mic for DIY audio, it is advisable to consider factors such as the type of calibration (factory vs. field), the microphone’s intended use, and its compatibility with existing equipment. Best practices involve regularly checking and recalibrating microphones to maintain accuracy over time. Additionally, understanding the specifications and performance characteristics of different models can help users choose the right microphone that fits their specific audio needs.
Why Do You Need a Calibrated Microphone for DIY Audio Projects?
A calibrated microphone is essential for DIY audio projects to ensure accuracy and reliability in sound measurement. Here are several reasons why you might consider using one:
-
Precision Measurement: Calibrated microphones have been tested against known standards, providing accurate sound level readings. This is crucial when tuning audio systems or assessing room acoustics.
-
Consistency: When multiple measurements or recordings are made, a calibrated microphone ensures that the results are consistent. This consistency is especially important in environments where sound quality is critical.
-
Hearing Protection: For projects involving loud sounds, calibrated microphones can help monitor sound levels to prevent hearing damage. Knowing the exact decibel levels allows for better control over exposure to loud noises.
-
Professional Quality: Using a calibrated microphone elevates the professionalism of your audio projects. It assures that your recordings meet industry standards, making them suitable for distribution or broadcasting.
-
Troubleshooting Tool: When issues arise in audio systems, a calibrated microphone aids in diagnosing problems by providing clear and factual data about sound performance.
Investing in a calibrated microphone is a practical step for anyone serious about achieving high-quality audio results.
What Key Features Should You Look for in a Calibrated Microphone?
When selecting the best calibrated microphone for DIY audio projects, consider the following key features:
- Frequency Response: A wide and flat frequency response is crucial for accurate audio reproduction. This ensures that the microphone can capture a range of sounds without coloration, making it ideal for recording various audio sources.
- Self-Noise Level: The self-noise level indicates how much noise the microphone generates on its own. A lower self-noise level allows for clearer recordings, particularly when capturing quiet sounds or subtle nuances in audio.
- Calibration Certificate: A microphone with a calibration certificate guarantees that it has been tested and adheres to specific standards. This is important for professional use, as it ensures the microphone’s accuracy and reliability in audio measurements.
- Polar Pattern: The polar pattern defines how sensitive the microphone is to sound from different directions. Choosing the right polar pattern, such as omnidirectional, cardioid, or bidirectional, will depend on the specific recording environment and desired audio capture.
- Dynamic Range: The dynamic range of a microphone describes the difference between the quietest and loudest sounds it can capture without distortion. A greater dynamic range allows for versatility in recording, especially in environments with varying sound levels.
- Build Quality and Durability: A well-constructed microphone will withstand the rigors of DIY projects and regular use. Look for materials that are robust and can endure physical handling, as well as environmental factors such as humidity and temperature changes.
- Connectivity Options: Consider the connectivity options available with the microphone, such as USB, XLR, or TRS. The right connection type will facilitate easier integration with your audio interface or recording equipment, ensuring compatibility for your DIY setup.
How Does Frequency Response Influence Calibration Quality?
The calibration quality of a microphone is significantly influenced by its frequency response, which determines how accurately it captures sound across different frequencies.
- Flat Frequency Response: A microphone with a flat frequency response captures sounds evenly across the frequency spectrum, meaning there are no exaggerated or suppressed frequencies. This is crucial for accurate audio reproduction, as it allows for a true representation of the sound source, making it ideal for studio recordings and DIY audio projects.
- Frequency Range: The frequency range of a microphone refers to the span of frequencies it can effectively capture, typically measured in Hertz (Hz). A wider frequency range allows for better capture of both low and high sounds, ensuring that all elements of a sound source are recorded, which is particularly important in music production and sound design.
- Phase Response: The phase response of a microphone affects how it captures sounds from different angles and at various frequencies. A microphone with good phase response minimizes phase issues that can lead to audio distortion, especially in complex sound environments, resulting in clearer and more accurate recordings.
- Directional Response: The directional response, or polar pattern, of a microphone determines how sensitive it is to sound coming from different directions. A mic with the appropriate polar pattern can isolate desired sounds while reducing background noise, which is vital for achieving high-quality recordings in DIY audio setups.
- Dynamic Range: The dynamic range of a microphone indicates the range between the quietest and loudest sound it can capture without distortion. A microphone with a wide dynamic range is essential for handling varying sound levels, ensuring that both subtle nuances and loud peaks are accurately recorded, enhancing the overall quality of the audio calibration.
What Is the Role of Sensitivity in Microphone Performance?
Sensitivity in microphone performance refers to the ability of a microphone to convert acoustic pressure into electrical signals, measured in decibels (dB) relative to 1 volt per pascal (V/Pa). It indicates how effectively a microphone can pick up sound, with higher sensitivity values meaning the microphone will capture softer sounds more effectively.
According to the Audio Engineering Society, a microphone’s sensitivity is a critical specification that determines its suitability for particular applications, especially in recording and live sound scenarios where fidelity and range are essential.
Key aspects of microphone sensitivity include its measurement in dB, which can vary widely across different types of microphones. For instance, condenser microphones typically exhibit higher sensitivity than dynamic microphones, making them suitable for capturing nuanced sounds in a studio setting. Additionally, sensitivity can affect the microphone’s noise floor, where higher sensitivity may result in capturing unwanted ambient noise along with the desired sound, thus requiring careful handling in the design and placement of the microphone.
This characteristic impacts various applications, particularly in DIY audio projects where enthusiasts seek to replicate professional sound quality. A well-calibrated microphone with optimal sensitivity can significantly enhance the audio recording experience, allowing for more detail and clarity. For example, in applications such as vocal recording, a sensitive microphone can capture subtle vocal nuances that would otherwise be lost with less sensitive equipment.
Benefits of using a microphone with appropriate sensitivity include improved sound quality and the ability to record in a broader range of environments. Users can achieve better dynamic range and clarity in their recordings, which is particularly valuable in home studio setups where professional-grade equipment may not be affordable. Furthermore, understanding microphone sensitivity aids DIY audio enthusiasts in selecting the best calibrated mic for their projects, ensuring compatibility with their recording equipment.
Solutions for optimizing microphone sensitivity in DIY audio projects include conducting tests to determine the best microphone placement and using preamps that provide adequate gain without introducing noise. Additionally, employing soundproofing techniques and acoustic treatment in recording environments can help maximize the benefits of a sensitive microphone, enabling users to achieve high-quality audio recordings with minimal background interference.
Why Is Dynamic Range Important for DIY Audio?
Dynamic range is crucial for DIY audio because it determines the range between the quietest and loudest sounds that a microphone can capture accurately without distortion.
According to the Audio Engineering Society, microphones with a wide dynamic range are essential for recording sources with varying loudness levels, ensuring fidelity and clarity of the audio. A calibrated microphone that can handle a broad dynamic range allows users to capture the nuances of sound, making it particularly important for DIY projects where the quality of recording can significantly affect the final output.
The underlying mechanism of dynamic range involves the microphone’s ability to convert acoustic energy into electrical signals. A microphone with a high dynamic range can respond effectively to both soft and loud sounds without clipping or losing detail. This is particularly important in DIY audio, where varying sound sources, like vocals, instruments, or environmental sounds, may have significant differences in volume. Moreover, an adequately calibrated microphone ensures that the captured audio aligns with the intended sound profile, providing a more authentic listening experience.
Furthermore, dynamic range affects the post-production process. When mixing and mastering audio, having recordings with a broad dynamic range allows for greater flexibility in adjusting levels and applying effects without introducing noise or distortion. A microphone that excels in this area enables DIY audio enthusiasts to create high-quality recordings that can stand up to professional standards, making it an indispensable tool for achieving optimal sound quality.
Which Brands Are Leaders in Calibrated Microphones?
The leading brands in calibrated microphones for DIY audio are:
- Earthworks: Known for their ultra-high frequency response and low self-noise, Earthworks microphones are ideal for studio applications and accurate sound representation. Their models, like the M30, are particularly praised for their precision in measurements and their ability to capture transient responses.
- Schoeps: Schoeps microphones are renowned for their exceptional sound quality and versatility in various recording environments. Their CMC series provides interchangeable capsules that make them highly adaptable for different applications, making them a favorite among audio engineers focused on accuracy.
- B&K (Bruel & Kjaer): B&K microphones are often considered the gold standard in acoustic measurement and research. They are designed with stringent specifications for frequency response and dynamic range, making them suitable for scientific applications as well as high-fidelity recording.
- Audio-Technica: Audio-Technica offers a range of calibrated microphones that balance affordability and performance, catering to both amateur and professional users. Their AT2021 and similar models are often recommended for DIY setups due to their reliability and quality in capturing sound accurately.
- Neumann: Neumann microphones are synonymous with high-end audio quality and are widely used in professional studios. Their TLM series provides exceptional clarity and detail, making them a top choice for anyone looking to achieve precision in audio recordings.
What Practices Should You Follow When Using a Calibrated Microphone?
When using a calibrated microphone for DIY audio projects, it is essential to follow specific best practices to ensure accurate and reliable results.
- Proper Placement: Position the microphone correctly to capture the intended sound source without interference. The distance from the sound source and the angle of the mic can significantly affect the quality of the recorded audio.
- Use of Windshields: Employ windshields or pop filters when recording in environments with wind or plosive sounds. This reduces unwanted noise and protects the microphone from moisture, ensuring a cleaner sound capture.
- Consistent Environment: Maintain a consistent recording environment by minimizing background noise and fluctuations in temperature and humidity. Variations in the environment can alter the mic’s performance and affect calibration accuracy.
- Regular Calibration Checks: Periodically check the calibration of your microphone against a known reference source. Regular assessments ensure that your mic continues to perform accurately over time, which is crucial for achieving reliable results in your recordings.
- Appropriate Gain Settings: Set the gain levels appropriately on your audio interface or recording device. Too high of a gain can lead to distortion, while too low can result in weak recordings, so finding the right balance is essential.
- Use of Quality Cables: Invest in high-quality cables to connect your microphone to your audio interface. Poor quality cables can introduce noise and degrade the audio signal, impairing the overall sound quality.
- Monitoring and Testing: Use headphones to monitor the audio being recorded in real-time. This allows you to detect any issues immediately and make adjustments before finalizing the recording.
How Can You Effectively Calibrate Your Microphone at Home?
Effectively calibrating your microphone at home involves several key steps and tools to ensure accurate audio capture.
- Use a Calibration Tool: A dedicated microphone calibration tool can help you ensure your microphone’s response is accurate. These tools typically provide a reference sound level and frequency response, allowing you to adjust your mic settings accordingly.
- Reference Measurements: Use reference measurements from a trusted source to compare the output of your microphone. This could involve using an audio analyzer or a known calibrated microphone to establish a baseline for your mic’s performance.
- Room Acoustics Consideration: The acoustics of your recording space can greatly affect microphone performance. It’s important to analyze the room’s sound, making adjustments to minimize echo and background noise, which can skew your calibration.
- Record and Analyze: After calibration, record test sounds at various frequencies and volumes. Analyze these recordings using audio software to see if the frequency response of your microphone aligns with the expected output.
- Adjust Gain and Levels: Ensuring that your mic gain and levels are correctly set is crucial for effective calibration. Too much gain can lead to distortion, while too little can result in a weak signal, so aim for an optimal recording level.
- Regular Recalibration: It’s essential to recalibrate your microphone periodically. Changes in the environment, equipment wear, or different recording setups can affect performance, so regular checks will maintain audio quality.