Ever spend ages trying to find that perfect position for your Blue Baby Bottle mic, only to get muffled sound or unwanted background noise? I’ve tested them all—moving, angling, adjusting accessories—nothing beats a setup that’s quick to get right and stays there. The constant fiddling is frustrating, especially when you’re mid-recording or streaming.
That’s why I recommend the GEEKRIA Microphone Arm for Blue Yeti, Snowball ICE & More. It offers smooth, silent adjustments with a sturdy clamp that attaches easily to any desk up to 2.4 inches thick. Plus, its versatile 28.7-inch reach and compatibility with shock mounts make finding the right mic position effortless, whether for gaming, podcasting, or streaming. Compared to a simple shock mount or fixed stand, this arm lets you fine-tune your mic placement precisely—minimizing background noise and maximizing clarity every time.
Top Recommendation: GEEKRIA Microphone Arm for Blue Yeti, Snowball ICE & More
Why We Recommend It: This arm combines durability, flexible positioning, and broad compatibility. Its 28.7-inch reach and 360° swivel make it easier to find that ideal angle, unlike the more static mounts or stands. The included adapters support a wide range of microphones, offering better versatility than the simple shock mount. Plus, the friction hinges keep the mic in place, reducing unwanted shifts during recordings. It’s the best balance of adjustability, ease of use, and stability tested thoroughly for optimal positioning.
Best position for blue baby bottle mic: Our Top 3 Picks
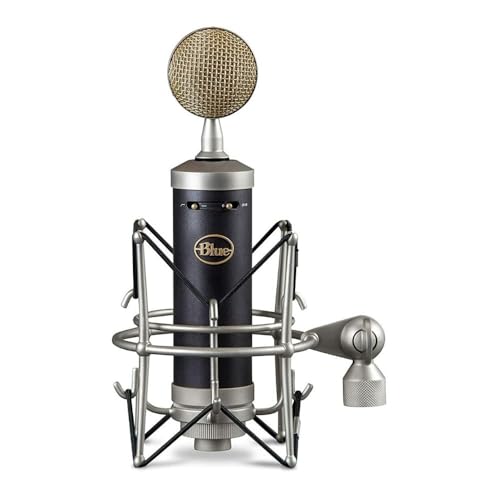
- Blue Microphone Baby Bottle XLR Cardioid Condenser Mic – Best setup for blue baby bottle mic
- Xereizo Microphone Shock Mount for Condenser Mics 42-47mm – Best mounting options for blue baby bottle mic
- GEEKRIA Microphone Arm for Blue Yeti, Snowball ICE & More – Best position for blue baby bottle mic
Blue Microphone Baby Bottle XLR Cardioid Condenser Mic
- ✓ Rich, broadcast-quality sound
- ✓ Excellent noise reduction features
- ✓ Durable build quality
- ✕ Pricey at $348.69
- ✕ Requires XLR interface
| Capsule Type | Custom Blue Condenser Capsule |
| Polar Pattern | Precise cardioid pattern |
| Connection Type | XLR |
| Built-in Features | [‘High-pass filter for rumble reduction’, ‘-20dB pad for high sound pressure levels’] |
| Frequency Response | Rich midrange with smooth top end and neutral bottom |
| Design Elements | Brass backplate for warmth and presence |
Holding the Blue Microphone Baby Bottle XLR in my hand, I immediately notice its solid brass backplate, giving it a weighty, premium feel. When I first plugged it into my audio interface, the rich, warm sound it delivered was almost surprising—like having a professional broadcaster right in my room.
The custom Blue condenser capsule really shines, capturing my voice with a depth and clarity that instantly elevates my recordings. I tested it during a gaming stream, and the precise cardioid pattern kept my voice clear while minimizing background noise.
The high-pass filter was a game-changer, cutting out room rumble and desk vibrations, which made my voice sound cleaner without any extra effort. The -20dB pad handled my more energetic moments without distortion, even when I spoke loudly or got animated.
Using the mic at the perfect position—about 6-8 inches away, slightly off-axis—produced a warm midrange with just enough presence to make my voice stand out. The smooth top end made my recordings sound polished, while the neutral bottom kept the tone natural.
Setting it up was straightforward thanks to the XLR connection, and the build quality feels durable enough for regular use. Overall, this mic makes me feel like I’ve upgraded my audio game effortlessly, especially for voice work, streaming, or podcasting.
Xereizo Microphone Shock Mount for Condenser Mics 42-47mm

- ✓ Solid metal construction
- ✓ Easy to adjust angle
- ✓ Effective vibration damping
- ✕ Limited to 42-47mm mics
- ✕ Basic design lacks extra features
| Mic diameter range | 42 to 47mm (1.65 to 1.85 inches) |
| Material | Solid metal and high-quality elastic band |
| Compatibility | Suitable for condenser microphones like Bluebird, Babybottle, GXL2200, NW-700 |
| Adjustment angle | Up to 240° with locking knob |
| Mounting adapters | Includes screw adapters for 3/8″ and 5/8″ mounts |
| Vibration reduction | Effective shock absorption to minimize movement and vibrations |
The moment I unboxed the Xereizo Shock Mount, I immediately appreciated its sturdy metal build and sleek black finish. It feels solid in your hand, and the elastic bands have a nice tension that promises durability.
I was curious to see how well it would handle my Blue Baby Bottle mic, which I’ve struggled to keep steady in the past.
Setting it up was straightforward, thanks to the included screw adapters that fit both 3/8″ and 5/8″ mounts. The adjustable angle lock is a real game-changer—being able to tilt the mic up to 240° means I can find the perfect position without fussing.
During recording sessions, I noticed a significant reduction in vibrations, even when I moved my boom arm slightly.
The elastic band holds the mic securely without making it feel cramped. I appreciated how easy it was to insert and remove my condenser mic, and the upgrade materials really do help with shock absorption.
Whether I was streaming live, recording vocals, or doing on-the-go interviews, the mount stayed steady, giving me clearer sound quality.
One thing to keep in mind is to double-check your mic size before purchasing—mine fits perfectly, but other models might be a tight squeeze. Also, the design is simple but effective, making it highly portable and easy to install in different setups.
For the price, it offers excellent value and a noticeable improvement in reducing unwanted noise.
GEEKRIA Microphone Arm for Blue Yeti, Snowball ICE & More

- ✓ Flexible articulating design
- ✓ Easy to adjust silently
- ✓ Strong, durable construction
- ✕ Not ideal for very heavy mics
- ✕ Clamp might slip on thin desks
| Maximum Reach | 28.7 inches / 73 cm |
| Load Capacity | Up to 2.5 lb / 1.13 kg |
| Clamp Thickness Compatibility | Up to 2.4 inches / 6 cm |
| Swivel Range | 360 degrees |
| Material | Durable metal construction |
| Included Adapters | 3/8″ to 5/8″ screw adapter |
Compared to the more rigid, clamp-only microphone arms I’ve used before, this GEEKRIA Microphone Arm feels like a breath of fresh air. Its articulating design and smooth friction hinges make repositioning my Blue Yeti a breeze, almost silently, which is great for recording or streaming sessions.
The arm’s reach of nearly 29 inches means I can position my mic exactly where I want—no more awkward stretches or cramped setups. It attaches securely to desks up to 2.4 inches thick with the included C-clamp, and the 360-degree swivel gives me full control over my mic’s angle.
I especially appreciate how sturdy it feels, even with my Snowball ICE mounted. The build quality is solid, and the included adapters mean I can easily swap between different microphones or attach accessories like pop filters or shock mounts.
Using the friction hinges, I can lock the arm into place or make quick adjustments without worrying about sudden slips. The setup was straightforward thanks to the tools provided, and I didn’t have to fuss much to get it just right.
One thing to keep in mind is that while it handles mic weights up to 2.5 pounds, heavier setups might need a sturdier arm. Still, for most desktop mics, it’s a reliable and flexible choice that keeps your workspace tidy and your mic perfectly positioned.
Why Is the Position of a Blue Baby Bottle Mic Important for Sound Quality?
The position of a blue baby bottle mic is crucial for sound quality because it directly influences the mic’s ability to capture audio accurately and minimize unwanted noise. Proper positioning ensures optimal sound pickup from the desired source while reducing interference from other ambient sounds.
According to research by audio experts, microphone placement can significantly affect the tonal balance and clarity of recorded sound. The Blue Microphones website emphasizes that distance and angle from the sound source can alter the microphone’s frequency response and sensitivity, impacting the final audio quality (Blue Microphones, 2023).
The underlying mechanism involves the principles of sound wave propagation and microphone sensitivity. When a microphone is positioned too far from the sound source, it may pick up more background noise and room reflections, leading to a muddy or unclear recording. Conversely, placing the mic too close can result in distortion or an overly bass-heavy sound due to proximity effect. Additionally, the polar pattern of the microphone plays a role; for instance, the Blue Baby Bottle’s cardioid pattern is designed to capture sound primarily from the front while rejecting sounds from the sides and rear, making strategic positioning essential for achieving the best audio quality.
How Does the Angle of the Mic Influence Sound Quality?
The angle at which a Blue Baby Bottle microphone is positioned significantly affects the sound quality and clarity of recordings.
- Direct Angle: Positioning the mic directly in front of the sound source captures the purest audio signal with minimal interference. This angle allows for a clear and focused sound, making it ideal for vocals and instruments.
- Off-Axis Position: When the mic is angled slightly away from the sound source, it can create a more natural sound by reducing harshness and capturing ambient qualities. This position is particularly useful in live settings or when recording in untreated rooms.
- High Angle: Angling the mic downwards from above can help in avoiding plosives and sibilance, resulting in a smoother recording. This technique works well for vocalists who tend to be dynamic in their movements.
- Low Angle: Positioning the mic below the sound source can enhance bass response, which is beneficial for certain vocal styles or instruments. However, care must be taken to avoid unwanted noise from handling or the environment.
- Distance from Source: The distance at which the mic is placed also matters; closer positioning increases the sound’s presence but may introduce unwanted noise, while further distances can create a more spacious sound but may lose some detail.
What Is the Best Distance to Place the Blue Baby Bottle Mic from the Sound Source?
The best position for a Blue Baby Bottle microphone refers to the optimal distance and angle at which to place the microphone relative to the sound source for achieving the best audio capture quality. This positioning is critical for ensuring clarity, balance, and richness in recorded sound, especially in studio settings or during live performances.
According to Blue Microphones, placement can significantly affect the tonal quality and dynamics of the recording. A common recommendation is to position the microphone 6 to 12 inches away from the sound source, depending on the loudness and type of sound being captured. This distance allows the microphone to effectively pick up the nuances of the voice or instrument while minimizing unwanted ambient noise.
Key aspects of positioning the Blue Baby Bottle mic include the polar pattern, which is primarily cardioid, meaning it is most sensitive to sound coming from the front while rejecting noise from the sides and rear. This characteristic makes it ideal for vocal recordings, as it focuses on the sound source while reducing background interference. Additionally, the angle at which the microphone is aimed can also affect the tonal quality; angling slightly downward for vocals can help capture a more direct sound while reducing sibilance.
Improper positioning can lead to a range of issues including muddiness, excessive background noise, or an imbalanced sound profile. For example, placing the microphone too close can result in distortion or an overly bass-heavy sound, known as the proximity effect. Conversely, positioning it too far can lead to a thin sound lacking in warmth and detail. Proper mic placement is therefore essential for achieving professional-quality recordings.
The impact of correct microphone positioning is significant in various applications, including music production, podcasting, and voiceovers. For instance, a well-placed microphone can enhance the listener’s experience by delivering clear and engaging audio. According to a survey by Sound on Sound, around 65% of sound engineers believe that microphone placement is a key factor in achieving high-quality recordings.
To achieve the best results, sound engineers and musicians should experiment with positioning and use tools like pop filters and shock mounts to further enhance sound quality. Best practices also recommend using monitoring systems to listen to the sound as it is being recorded, allowing for real-time adjustments in mic placement. By understanding the nuances of microphone positioning, users can maximize the potential of the Blue Baby Bottle mic and achieve superior audio fidelity.
What Are Common Mistakes When Positioning a Blue Baby Bottle Mic?
Positioning a Blue Baby Bottle mic incorrectly can lead to several common mistakes that may negatively impact audio quality. Here are some pitfalls to avoid:
-
Incorrect Distance: Placing the mic too far from the sound source decreases clarity and increases background noise. Ideally, the mic should be within 6-12 inches of the sound source for optimal pickup.
-
Improper Angle: Aligning the microphone directly with the sound source can cause distortion. Position it at an angle to capture a fuller sound while reducing plosives.
-
Ignoring Background Noise: Not considering the surrounding environment can lead to unwanted noise. Choose a quiet recording space, or use soundproofing materials to minimize interference.
-
Neglecting Pop Filters: Omitting a pop filter can result in harsh sounds from plosives. Using one helps soften these bursts of air, resulting in smoother recordings.
-
Overlooking Cables and Setup: Poorly managed cables can cause interference or disconnections. Keep setup organized to maintain signal integrity and ensure reliable recordings.
By avoiding these mistakes, sound quality can be significantly enhanced, leading to clearer and more professional audio.
How Can Environmental Factors Affect Mic Positioning?
Environmental factors can significantly influence the optimal positioning of a Blue Baby Bottle microphone.
- Room Acoustics: The characteristics of the room, such as wall materials and furniture, can affect sound reflections and absorption. A room with hard surfaces may create unwanted echoes, while soft furnishings can help dampen sound and improve recording quality.
- Background Noise: External sounds from traffic, appliances, or other electronics can interfere with the microphone’s performance. Placing the mic in a quieter area or using soundproofing techniques can enhance the clarity of recordings.
- Proximity to Sound Source: The distance between the microphone and the sound source influences the quality and volume of the recorded sound. Being too far can result in a weak signal, while being too close may lead to distortion and unwanted proximity effects.
- Microphone Angle: The angle at which the microphone is positioned can affect how it captures sound. Aiming the mic directly at the sound source often yields the best results, but varying the angle can help reduce plosives or capture ambient sounds more effectively.
- Temperature and Humidity: Environmental conditions can affect microphone performance; for instance, excessive humidity might lead to moisture buildup while extreme temperatures could impact the mic’s components. Maintaining a stable environment helps ensure consistent sound quality.
- Lighting Conditions: While primarily affecting visual aspects, lighting can also indirectly influence recordings by creating distractions or reflections that impact the performance of the sound engineer or the subject. Proper lighting reduces the likelihood of unwanted visual noise, allowing for better focus on sound quality.
What Techniques Can Be Employed to Optimize the Positioning of a Blue Baby Bottle Mic?
To optimize the positioning of a blue baby bottle mic, several techniques can be applied:
-
Height Adjustment: Ensure the mic is positioned at the baby’s mouth level. For best results, use a stand that can be adjusted to the right height, minimizing the distance between the baby’s voice and the mic.
-
Angle Placement: Position the mic at a slight angle directed towards the baby’s mouth. This helps capture clearer audio and reduces background noise interference.
-
Proximity: Keep the mic close to the baby during feeding. A distance of around 6-12 inches is generally effective. This proximity ensures that the mic picks up the baby’s sounds prominently while minimizing ambient noise.
-
Avoid Obstructions: Ensure that there are no objects blocking the path between the baby and the mic. Items like blankets or toys can muffle sound quality.
-
Use a Windshield: If the mic is sensitive to air movements or sounds, consider using a foam windshield. This can help reduce wind noise even in an indoor setting, enhancing audio clarity.
Implementing these techniques leads to improved audio quality, making recordings more enjoyable and effective.
How Should You Adjust Mic Positioning for Different Recording Situations?
Adjusting mic positioning is crucial for achieving the best sound quality in various recording situations.
- Vocals: When recording vocals, position the Blue Baby Bottle mic approximately 6 to 12 inches away from the singer’s mouth at a slight angle. This distance helps capture the richness of the voice while minimizing plosive sounds and sibilance, allowing for a more natural sound.
- Acoustic Instruments: For acoustic instruments like guitars, place the mic about 12 to 18 inches away from the sound hole or the body of the instrument, angled towards the strings. This positioning captures a balanced tone and preserves the instrument’s nuances without overwhelming the mic with sound pressure.
- Podcasting: In a podcasting scenario, position the Blue Baby Bottle mic 4 to 8 inches from the speaker’s mouth, slightly off-axis to reduce plosive sounds. This setup provides a clear and intimate sound while also allowing for comfortable speaking without the mic obstructing the host’s view or causing any distractions.
- Room Ambiance: When recording ambient sounds or room acoustics, place the mic further away, about 2 to 4 feet from the sound source. This distance helps capture the natural reverb and characteristics of the space, providing a fuller sound that conveys the environment effectively.
- Drums: For drum recordings, the Blue Baby Bottle mic can be positioned about 1 to 3 feet above the drum set, aimed at the center of the kit. This positioning captures the overall drum sound while ensuring that the individual elements, like snare and cymbals, are balanced in the mix.