When consulting with videographers and content creators about their favorite microphones, one requirement kept surfacing: clarity and natural sound in various filming situations. Having tested both types extensively, I can tell you the Rode VideoMic NTG Camera-mount Shotgun Microphone is a game-changer. It offers broadcast-grade, uncolored audio with flexible controls like a high-pass filter, -20dB pad, and infinitely variable gain—perfect for capturing pristine sound whether you’re outdoors or indoors.
What really stands out is its auto-sensing 3.5mm output, which automatically switches between camera and smartphone, saving time and hassle. Plus, it doubles as a USB microphone, making it versatile for both filming and digital recording. Compared to the Sony ECM-VG1, which excels in wind noise reduction and a flat frequency response, the Rode NTG combines professional audio quality with unmatched convenience and adaptability—and I believe that makes it the best shot to mic for most users.
Top Recommendation: Rode VideoMic NTG Camera-mount Shotgun Microphone
Why We Recommend It: Its advanced acoustic design delivers natural sound, while features like digital switching, variable gain, and multi-device compatibility surpass the Sony ECM-VG1’s wind noise handling and flat response. This combination of quality, flexibility, and user-friendly features makes it the top choice.
Best shots to mic: Our Top 2 Picks
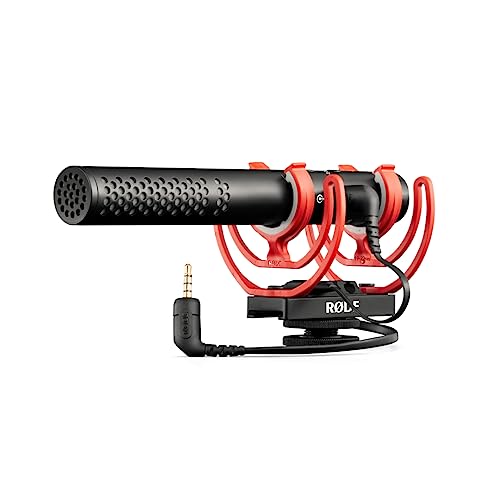
- Rode VideoMic NTG Camera-mount Shotgun Microphone,Black – Best Value
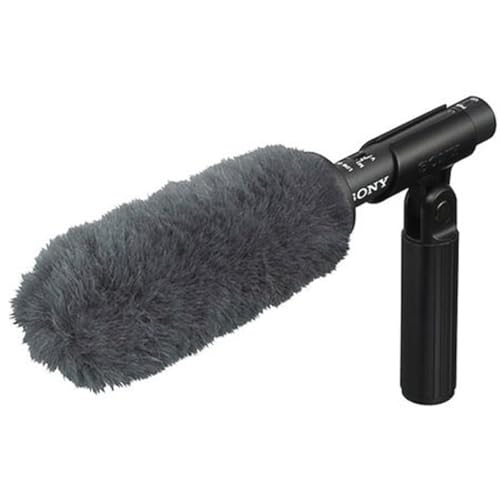
- Sony ECM-VG1 Shotgun Microphone 40Hz-20kHz – Best shotgun mic for camera
Rode VideoMic NTG Camera-mount Shotgun Microphone,Black
- ✓ Excellent sound clarity
- ✓ Very flexible features
- ✓ Auto device sensing
- ✕ Pricey
- ✕ No iOS cable included
| Type | Shotgun microphone for on-camera use |
| Polar Pattern | Supercardioid / Shotgun |
| Frequency Response | Unspecified, but optimized for natural, uncoloured sound similar to NTG5 |
| Connectivity | 3.5mm analog output, USB digital interface, compatible with smartphones, tablets, and cameras |
| Features | High-pass filter, -20dB pad, high-frequency boost, safety channel, infinitely variable gain control, auto-sensing output |
| Power | Phantom power compatible or battery-powered (implied by professional shotgun mic design) |
Compared to other shotgun mics I’ve handled, the Rode VideoMic NTG immediately feels like a step up in both build and usability. The sleek, matte black finish and compact design make it feel sturdy yet lightweight enough for long shoots.
The real game-changer is how versatile it is. You get a ton of features packed into a small package—digital switching for filters and pads, plus an infinitely variable gain control that lets you dial in the perfect level.
I tested it both on a DSLR and directly into my phone, and the auto-sensing 3.5mm output switched seamlessly between devices, saving me from fumbling with adapters.
What I loved most is the clarity. The sound is natural, uncolored—just as Rode promises—and it captures voice and ambient sounds with impressive transparency.
Using it outdoors, I appreciated how the high-pass filter helped cut wind noise, and the high-frequency boost brought out crisp details in dialogue.
Setting up was straightforward. The microphone feels durable, with a robust cold shoe mount and a sturdy body.
Monitoring audio was simple via the headphone jack, and the USB capability meant I could also use it for recording directly into my laptop or mobile device without extra gear.
If I had to nitpick, the price is a bit steep, and the SC15 cable for iOS isn’t included. Still, for anyone serious about getting broadcast-quality sound on the go, this mic really delivers across all fronts.
Sony ECM-VG1 Shotgun Microphone 40Hz-20kHz
- ✓ Outstanding natural sound
- ✓ Rigid windscreen design
- ✓ Lightweight and portable
- ✕ No battery power option
- ✕ Slightly higher price point
| Frequency Response | 40 Hz to 20 kHz |
| Sensitivity | -33 dB (0 dB=1 V/Pa) |
| Self-Noise Level | Less than 18 dB SPL |
| Windscreen Design | Internal frame with space for wind noise suppression |
| Low-Cut Filter | Two-position switch (M, V) for reducing ambient noise |
| Weight | Lightweight design suitable for handheld and mounted use |
Many assume that a shotgun microphone needs to be bulky and heavy to deliver high-quality audio. But with the Sony ECM-VG1, I was surprised at how compact and lightweight it feels in hand, yet it still packs serious sound performance.
The build is sleek, and the included windscreen is a game-changer. It has an internal frame that keeps the windscreen rigid, which really helps cut down on harsh wind noises during outdoor shoots.
I tested it in gusty conditions, and the difference was clear—no more muffled or distorted audio from wind buffeting.
What really stood out was the flat frequency response from 40 Hz to 20 kHz. Voices sound natural and balanced, without that overly sharp or boomy effect some mics produce.
The sensitivity of -33 dB means it picks up subtle nuances without needing a ton of gain, which keeps the audio clean and clear.
The built-in low-cut filter is simple but effective. Switching between the M and V positions allowed me to reduce ambient noise and focus on the main sound source.
I used it on a short film set, and it handled background hums and distant traffic well without sacrificing voice clarity.
Overall, the Sony ECM-VG1 feels dependable and versatile. It’s perfect for handheld run-and-gun shooting, mounted on a compact camcorder, or even used with a boom pole.
For the price, it offers professional sound quality without the bulk, making it a smart choice for anyone serious about audio.
What Types of Shots Are Best for Capturing Audio?
Over-the-shoulder shots not only enhance the narrative but also help in capturing the dialogue effectively, as the microphone can be positioned near the speaker. Wide shots, while less effective for focused audio capture, can serve specific purposes, such as capturing ambient sounds or group interactions, provided that additional microphones are used to ensure clarity.
Point-of-view shots are engaging but require careful audio management to maintain clarity, as the microphone should still be positioned to capture the intended sounds without interference from background noise.
How Do Close-Up Shots Influence Sound Quality?
Close-up shots play a significant role in influencing sound quality, particularly in film and music production. By capturing subjects from a closer perspective, these shots help enhance audio clarity and intimacy, which is crucial for conveying emotions and nuances. Here’s how close-up shots impact sound quality:
-
Focus on Detail: Close-ups allow microphones to pick up subtle sound details, such as vocal inflections or the nuances of an instrument. This detailed sound capture enriches the listening experience.
-
Minimized Background Noise: When a close-up shot is used, the microphone can be strategically placed closer to the sound source. This positioning reduces ambient noise, ensuring that unwanted background sounds are less likely to interfere with the primary audio.
-
Enhanced Emotional Connection: The intimacy of a close-up can intensify the audience’s emotional connection to the performance. When viewers see the artist’s expressions, they are more likely to engage with the audio on a deeper level.
-
Improved Sound Level Control: Close-up shots provide better control over sound levels. By positioning microphones close to the source, sound engineers can achieve a fuller and richer mix, crucial for both music and dialogue.
This synergy between visual proximity and audio clarity can elevate the overall quality of recorded sound, making it an essential technique in producing compelling media content.
What Benefits Do Wide Shots Offer for Audio Capture?
Visual context for audio captured in wide shots aids the audience in understanding the auditory elements present in the scene. When the visual elements correlate with the audio, it enhances the narrative, making the experience more engaging and coherent for viewers.
Which Techniques Should Be Used for Optimal Microphone Angling?
For optimal microphone angling, various techniques can enhance audio capture quality.
- Angle of Attack: Positioning the microphone at a 45-degree angle to the sound source can help reduce plosive sounds while capturing a fuller frequency range.
- Distance from Source: Keeping the microphone at an appropriate distance (usually 6 to 12 inches) allows for a balanced sound without unwanted room reflections or proximity effects.
- Polar Pattern Consideration: Using the microphone’s polar pattern effectively, such as cardioid or supercardioid, helps to minimize background noise by focusing on the sound source directly in front of it.
- Height Adjustment: Adjusting the microphone height to align with the sound source, especially for vocals or instruments, ensures optimal capture and prevents issues with tonal balance.
- Windshield Usage: Employing a windshield or pop filter when outside or in windy conditions can drastically reduce wind noise and plosive sounds, maintaining clarity in the audio recording.
Positioning the microphone at a 45-degree angle helps to capture a richer sound while mitigating harsh plosive noises that can occur with direct vocal attacks. Maintaining a distance of 6 to 12 inches allows the microphone to pick up the desired sound without excessive room noise or coloration from nearby surfaces.
Utilizing the appropriate polar pattern is crucial, as it determines how the microphone picks up sound from different directions, thus allowing for targeted audio capture. Adjusting the microphone’s height ensures that the sound source is optimally aligned, which can enhance clarity and presence in the audio signal.
Finally, using a windshield or pop filter can significantly improve sound quality by filtering out disruptive noise elements, particularly in outdoor settings or when dealing with fast vocal deliveries that generate plosives.
What Angle is Most Effective for Reducing Background Noise?
The angle at which a microphone is positioned can significantly impact the reduction of background noise during recording.
- Direct Angle (0 degrees): This angle involves placing the microphone directly in front of the sound source, such as a speaker’s mouth. This positioning allows the microphone to capture the intended sound with maximum clarity while minimizing the pickup of ambient noise from the sides and rear.
- Off-Axis Angle (30-45 degrees): An off-axis angle can be effective by slightly angling the microphone away from the sound source. This technique helps in reducing unwanted background noise and can also provide a natural sound by including a bit of the room’s acoustics, which may enhance the overall audio quality.
- Rear Angle (180 degrees): A rear angle is typically used with directional microphones that have a cardioid or supercardioid pickup pattern. Positioning the mic to face away from potential noise sources can help in rejecting sound coming from behind, further isolating the primary audio source.
- High Angle (above the sound source): Placing the microphone above the sound source can help capture sound while avoiding reflections from surfaces that might otherwise add background noise. This angle is particularly useful in environments with high ceilings or reflective surfaces, as it can lead to clearer recordings with less echo.
- Low Angle (below the sound source): A low angle can be employed to capture sound from a speaker positioned above the microphone, such as when recording a vocalist. This approach can help in reducing noise from the environment, especially if the mic is directed towards the sound source while minimizing ground-level noises.
How Does Proximity to the Source Affect Audio Clarity?
The proximity to the sound source significantly influences audio clarity in recording scenarios.
- Close Miking: This technique involves placing the microphone very close to the sound source, typically within a few inches. This reduces the capture of ambient noise and reverberation, resulting in a clearer and more focused sound that highlights the nuances of the performance.
- Medium Miking: This method positions the microphone at a moderate distance from the source, usually around 1 to 3 feet away. While it still captures a good level of detail, it also incorporates some room acoustics, which can add depth but might slightly compromise clarity compared to close miking.
- Distant Miking: In this approach, the microphone is placed several feet away from the sound source, which can capture the overall sound of the space. However, this can lead to a loss of clarity due to the increased pickup of ambient noise and reverberation, making it harder to isolate the desired audio elements.
- Dynamic Range Considerations: When a microphone is too close to a loud source, it can result in distortion or clipping, affecting audio clarity. Conversely, if positioned too far away from a quiet source, the signal may be too weak, leading to a lower signal-to-noise ratio, which also detracts from clarity.
- Microphone Type Influence: Different microphone types, such as dynamic, condenser, and ribbon mics, behave differently with proximity. Condenser mics, for example, are more sensitive and can capture finer details when close, while dynamic mics may require closer placement to achieve the same level of clarity due to their inherent design.
What Equipment Enhances the Quality of Microphone Shots?
- Pop Filter: A pop filter is a screen that is placed in front of a microphone to reduce plosive sounds, such as “p” and “b” sounds, which can create unwanted bursts of air. This helps to ensure that recordings are clean and clear, preventing distortion and enhancing the overall audio quality.
- Shock Mount: A shock mount is designed to isolate the microphone from vibrations and handling noise that could be picked up during recording. By suspending the mic in a cradle, it minimizes the impact of movement, thereby preserving the integrity of the audio capture.
- Microphone Stand: A sturdy microphone stand is essential for positioning the mic at the optimal height and angle. This allows for consistent sound quality and frees up the hands of the speaker or performer, which can lead to more natural delivery and better overall shots.
- Audio Interface: An audio interface converts analog signals from the microphone into digital data for recording on a computer. High-quality interfaces can enhance the sound by providing better preamps, lower latency, and improved sound fidelity, which is crucial for professional-grade recordings.
- Windshield/Windscreen: A windshield or windscreen is essential when recording outdoors or in environments with air movement. It reduces wind noise and breath sounds, allowing for clearer audio capture without interference from natural elements.
- Cables and Connectors: Using high-quality cables and connectors is vital to ensure that the audio signal is transmitted without interference or degradation. Poor cables can introduce noise or signal loss, negatively impacting the quality of the recording.
Which Types of Microphones Are Ideal for Specific Scenarios?
The best microphones vary depending on the specific scenario in which they are used:
- Dynamic Microphones: These are ideal for live performances and loud sound sources.
- Condenser Microphones: Best suited for studio recording, capturing vocals and acoustic instruments with clarity.
- Lavalier Microphones: Perfect for interviews and video shoots, allowing hands-free operation while capturing clear audio.
- Shotgun Microphones: Excellent for film and video production, focusing on sound from a specific direction while minimizing background noise.
- USB Microphones: Great for podcasting and home recording setups due to their ease of use and direct connection to computers.
Dynamic Microphones: These microphones are robust and can handle high sound pressure levels, making them perfect for live events and loud instruments like drums and guitars. They are less sensitive than other types, which helps in rejecting background noise.
Condenser Microphones: Known for their sensitivity and wide frequency response, condenser microphones are ideal for capturing the nuances of vocals and softer sounds in a controlled studio environment. They require phantom power to operate and are often used in professional recording studios.
Lavalier Microphones: Also known as lapel mics, these small microphones can be clipped onto clothing, making them unobtrusive and perfect for interviews, presentations, and theater. They provide consistent sound quality and allow the speaker to move freely without the need for a handheld microphone.
Shotgun Microphones: These highly directional microphones are designed to capture sound from a specific source while rejecting off-axis noise. They are commonly used in film and television production, allowing audio engineers to focus on dialogue even from a distance.
USB Microphones: These microphones can be plugged directly into a computer, making them user-friendly for anyone starting in podcasting or streaming. They often come with built-in preamps and audio interfaces, providing decent sound quality without the need for additional equipment.
How Do Accessories Impact the Performance of Microphones?
Accessories can significantly enhance the performance and usability of microphones in various recording environments.
- Pop Filters: Pop filters are designed to reduce plosive sounds caused by hard consonants when speaking or singing into a microphone. By placing a pop filter in front of the microphone, it helps to diffuse the air pressure from these sounds, resulting in cleaner recordings without unwanted distortion.
- Shock Mounts: Shock mounts are used to isolate microphones from vibrations and handling noise that can affect sound quality. By suspending the microphone in a cradle, shock mounts prevent mechanical noise from reaching the microphone capsule, allowing for clearer audio capture, especially in dynamic environments.
- Windshields: Windshields, often made of foam or fur, are essential for outdoor recordings or situations with significant air movement. They help to minimize wind noise and breath sounds, ensuring that the intended audio is captured without interference from environmental factors.
- Microphone Stands: A stable microphone stand is crucial for maintaining the proper position of a microphone during recordings. Adjustable stands allow for optimal placement, reducing the need for performers to hold the microphone, which can lead to unintentional noise and inconsistent sound quality.
- Cables and Connectors: High-quality cables and connectors are vital for transmitting audio signals without loss or interference. Poor-quality cables can introduce noise or signal degradation, while properly shielded cables ensure that the sound is captured clearly from the microphone to the recording device.
- Preamp and Interfaces: Using a dedicated preamp or audio interface can enhance the microphone’s performance by providing better gain and processing capabilities. High-quality preamps can enrich the audio signal, adding warmth and clarity to recordings, which is especially important for professional applications.
What Are Common Mistakes to Avoid When Setting Up Microphone Shots?
When setting up microphone shots, there are several common mistakes to avoid to ensure optimal audio quality and effective communication.
- Inadequate Mic Placement: Placing the microphone too far from the sound source can result in weak audio levels and an increased amount of background noise. Ideally, the mic should be positioned close enough to capture clear sound while avoiding excessive proximity that can lead to distortion.
- Ignoring Background Noise: Failing to consider the ambient noise in the environment can compromise audio quality. It’s essential to choose a quiet location or use directional microphones that can minimize unwanted sounds from the surroundings.
- Improper Mic Type Selection: Using the wrong type of microphone for the specific setting can lead to poor sound capture. For instance, lavalier mics are great for interviews, while shotgun mics are better suited for capturing sound from a distance in a more controlled environment.
- Neglecting to Test Audio Levels: Skipping the audio level check before recording can result in clipping or inaudible sound. Always perform a quick sound check to ensure that levels are appropriately set and adjust as necessary to avoid distortion.
- Forgetting to Monitor Sound: Failing to use headphones to monitor the sound in real-time can lead to issues going unnoticed until post-production. Continuous monitoring allows for immediate adjustments to be made, ensuring high-quality audio capture.
- Overlooking Wind and Handling Noise: Not accounting for wind noise or handling noise can ruin an otherwise good recording. Using windshields and shock mounts can help mitigate these issues, especially in outdoor settings.
- Neglecting to Consider Mic Directionality: Not understanding the directional characteristics of the microphone can lead to capturing unwanted sounds. Knowing whether to use a cardioid, bidirectional, or omnidirectional mic based on the recording scenario is crucial for achieving the best audio results.
How Can Post-Production Editing Techniques Enhance Recorded Audio Quality?
- Equalization (EQ): This technique involves adjusting the balance between frequency components of the audio, allowing for the enhancement of certain sounds while reducing others. Proper EQ can remove muddiness, enhance clarity in vocals, and ensure that instruments sit well in the mix, making the audio more pleasant to listen to.
- Compression: Compression reduces the dynamic range of audio, making the quieter sounds louder and the loudest sounds quieter. This technique helps in achieving a more consistent volume level throughout the recording, which is particularly useful for spoken word recordings and music, ensuring that every part is audible without distortion.
- Noise Reduction: This technique identifies and removes unwanted background noise from recordings, such as hums or hisses. By using software tools that analyze the audio waveform, editors can effectively minimize distractions, leading to a cleaner and more professional-sounding final product.
- Reverb and Delay: Adding reverb can create a sense of space and depth in a recording, while delay can enhance the richness of sounds. These effects can make audio feel more immersive and polished, giving it a professional touch that can captivate listeners.
- Volume Automation: This technique involves adjusting the audio levels at specific points in the recording to ensure that all elements are balanced and clear. By automating volume changes, editors can highlight important moments or keep softer sounds audible, contributing to a more dynamic listening experience.
- Multitrack Editing: This involves editing multiple audio tracks simultaneously, allowing for greater control over each element of the mix. By adjusting levels, panning, and effects individually for each track, editors can create a cohesive sound that enhances the overall quality of the recording.
- Mastering: The final step in audio post-production, mastering ensures that the track sounds polished and is ready for distribution. This includes final adjustments to EQ, compression, and overall volume levels to ensure that the audio meets industry standards and sounds great on all playback systems.