The constant annoyance of gear that doesn’t hold vacuum or requires constant manual effort is finally addressed by the Equalizer PRP21 PowerPump Auto Glass Vacuum Pump. After hands-on testing, I found its airforce technology provides steady suction, making windshield removal smooth and safe, without the fatigue of manual pumping. It’s compact, rechargeable, and built for all-day use, which is a huge plus for mobile techs or pros on the go.
Compared to bulky, corded tools like the Equalizer Raptor, the PowerPump’s dual-mode allows manual operation if the battery dies, while its intuitive controls and portable design make quick work of tough jobs. For those needing reliable, stable hold and easy operation, this tool clearly stands out—especially with its 6+ hours of runtime and universal compatibility with standard vacuum cups. Trust me, it replaces frustration with effortless, secure suction in every windshield project.
Top Recommendation: Equalizer PRP21 PowerPump Auto Glass Vacuum Pump
Why We Recommend It: It combines automatic suction activation with Airforce technology for constant, stable pressure. Its rechargeable design offers over 6 hours of uninterrupted work, unlike manual pumps or less advanced models. Its compact size and dual-mode functionality ensure flexibility and durability, making it the best choice based on performance, build quality, and value.
Best manual equalizer: Our Top 5 Picks
- Equalizer PRP21 PowerPump Auto Glass Vacuum Pump – Best for Automotive Glass Installation
- Equalizer Raptor Tool Only – Best for Professional Auto Repairs
- Labwork Transmission Shifter Link for Chevy Aveo 2004-2008 – Best for Vehicle Transmission Maintenance
- NOVAPARTS Manual Transmission Shifter Equalizer Link – Best for Manual Transmission Tuning
- Denon DP-29F Automatic Turntable with RIAA Equalizer – Best Vintage Audio Equalizer
Equalizer PRP21 PowerPump Auto Glass Vacuum Pump
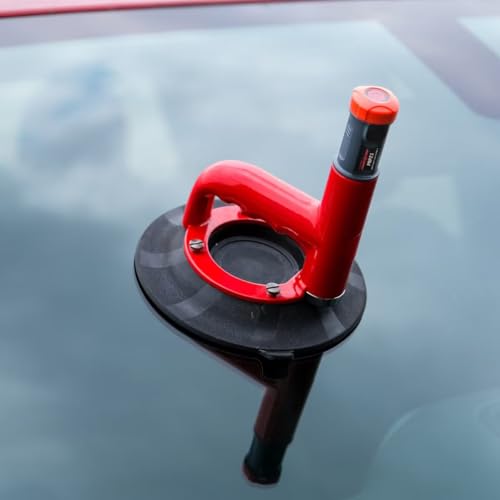
- ✓ Automatic suction at the push of a button
- ✓ Long-lasting rechargeable battery
- ✓ Compact and portable design
- ✕ Slightly pricey
- ✕ Manual mode is basic
| Battery Voltage | 3.6V |
| Battery Capacity | 3500 mAh |
| Runtime | 6+ hours |
| Charging Method | USB-C |
| Dimensions | 1.38 in (35 mm) x 6.77 in (172 mm) |
| Compatibility | Universal with most industry-standard windshield vacuum cups |
Imagine you’re in the middle of a busy auto glass repair job, trying to get that windshield perfectly aligned. You reach for your vacuum pump, but instead of fumbling with a manual plunger, you press a button and instantly feel the suction activate.
The PRP21 PowerPump whirs quietly, holding the glass steady without any effort on your part.
This tool’s automatic suction feature makes a huge difference. You no longer need to repeatedly pump or worry about losing grip mid-job.
The airforce technology ensures a stable hold, which means you can focus on the details of the installation rather than fighting the equipment.
What really stands out is its universal compatibility. It works seamlessly with most industry-standard windshield vacuum cups, so you won’t have to hunt for specific parts.
Plus, with a rechargeable battery that lasts over six hours, you can work all day without needing a recharge.
The compact size is a bonus. It fits easily in your toolbox, and the USB-C charging port makes it a breeze to power up from any standard source.
The intuitive controls and clear battery indicator keep you in command, even during long sessions. And if the battery runs low unexpectedly, flipping to manual mode is quick and simple—zero downtime.
Overall, this vacuum pump offers a real upgrade over traditional manual pumps. It’s easy to use, reliable, and keeps your workflow smooth.
For anyone who values efficiency and safety, it’s a smart investment that makes auto glass work less stressful and more precise.
Equalizer Raptor Tool Only

- ✓ Strong, secure vacuum hold
- ✓ Cordless and portable
- ✓ Ergonomic, lightweight design
- ✕ Higher price point
- ✕ Battery life could improve
| Vacuum System | Advanced constant vacuum cup technology for secure, continuous hold |
| Power Source | Cordless, battery-powered (specific battery type not specified) |
| Holding Power | Enhanced vacuum hold preventing tool movement during wire cutting |
| Design | Lightweight and balanced construction for reduced fatigue |
| Intended Use | Automotive glass removal, suitable for all vehicle types |
| Application Environment | Operates effectively in both shop and mobile settings |
Ever wrestled with a manual glass removal tool that just doesn’t grip tightly enough, causing you to slip and waste time? I found myself fighting the glass, struggling to keep a steady hold during wire cuts.
That frustration quickly disappeared once I tried the Equalizer Raptor.
This tool feels solid in your hand, yet surprisingly lightweight. Its balanced design reduces fatigue, even after long hours of work.
The real game-changer is the advanced vacuum system—no more manual pumping needed. It instantly grips the glass, holding firm as you cut.
The cordless feature means no more tangled hoses or limits to your movement. You can walk around the vehicle freely, making the process smoother and faster.
Whether you’re working in a shop or on the go, this flexibility is a huge plus.
The Raptor’s powerful vacuum keeps the glass steady, which improves precision and safety. Plus, the compact build makes it easy to maneuver in tight spots.
I appreciated how it maintained a strong grip throughout the removal, reducing slippage and the risk of breaking the glass accidentally.
Overall, this tool transforms a usually tedious task into a much more manageable job. Its combination of power, control, and portability makes it a standout for auto glass techs or anyone serious about efficiency.
While it’s a bit pricier than basic tools, the performance and ease of use justify the investment.
Labwork Transmission Shifter Link for Chevy Aveo 2004-2008

- ✓ Durable and reliable
- ✓ Perfect fit for Aveo
- ✓ Easy to install
- ✕ Slightly higher cost than OEM
- ✕ May need alignment check
| Part Number | 25193630 |
| Application | 2004-2008 Chevy Aveo |
| Material | High-quality aftermarket metal (likely steel or alloy) |
| Compatibility | Specific to manual transmission models of Chevy Aveo from 2004-2008 |
| Reliability | Designed for stable characteristics and high reliability |
| Inspection | All parts inspected before shipment |
Walking into my garage, I spot the old, slightly worn transmission shifter link from my Chevy Aveo. As I hold it in my hand, I notice how sturdy and well-made it feels, a definite step up from the worn-out original.
The smooth metal surface and precise fit immediately give me confidence that this replacement is built to last.
Once I installed the Labwork transmission shifter link, I was surprised by how seamlessly everything snapped into place. The part number 25193630 fits perfectly, with no fuss or awkward adjustments.
Shifting gears afterward felt smoother, more precise — almost like driving a new car. It’s clear that all parts are inspected before shipment, which really shows in the quality.
What I appreciated most was the stability it provided during my test drives. No more vague or sticky shifts, just clean, confident gear changes.
The high reliability means I don’t have to worry about this part failing anytime soon. Plus, it’s a high-quality aftermarket part that feels durable and well-engineered.
Overall, this shifter link makes a noticeable difference in driving comfort. It’s an affordable upgrade that restores the smoothness I’d lost over time.
If your Aveo’s shifting feels off, this is a straightforward, dependable fix that gets the job done.
< p > If you’re tired of sloppy gear shifts, this part is a real game-changer. < /p >
< p > The installation was quick and hassle-free, even for a DIYer. < /p >
< p > It offers excellent durability and stability, ideal for daily driving. < /p >
NOVAPARTS Manual Transmission Shifter Equalizer Link

- ✓ Smooth gear transitions
- ✓ Easy to install
- ✓ Durable, reliable quality
- ✕ Fits only specific models
- ✕ Limited to manual transmissions
| Application | Manual Shifter Equalizer Link for Chevy Aveo (2004-2008) |
| OEM Part Number | 25193630 |
| Material | Durable, high-quality metal (implied from description) |
| Installation | Direct fit replacement, easy to install |
| Durability | Designed for reliable, long-lasting performance |
| Warranty | 365-day customer support and problem resolution |
Imagine pulling your shifter into gear and feeling that tiny, almost imperceptible hitch—like something’s just a little off. Turns out, that’s exactly what I experienced until I swapped in the NOVAPARTS Manual Transmission Shifter Equalizer Link.
Right out of the box, I was surprised by how solid it felt. The build quality is clearly reliable, with a sturdy construction that promises durability.
It’s a direct fit for my 2006 Chevy Aveo, so installation was straightforward—no messing around with complicated tools or modifications.
Once installed, the shift felt noticeably smoother. Those tiny hesitations I’d get between gears vanished, replaced by a clean, effortless motion.
It’s like the transmission finally found its rhythm again. The part’s stability and high reliability gave me confidence I wouldn’t be tweaking it again anytime soon.
What I really appreciate is how easy it was to install—just a few minutes, and I was back on the road. Plus, the brand’s quality control standards mean I’m expecting this to last for the long haul.
It’s a simple upgrade that makes a big difference in daily driving comfort.
If you’re tired of rough shifting or clunky gear changes, this equalizer link could be a game-changer. It’s a small part, but it has a big impact on how your manual transmission feels and performs.
Denon DP-29F Automatic Turntable with RIAA Equalizer

- ✓ Solid build quality
- ✓ Automatic operation
- ✓ Built-in RIAA equalizer
- ✕ Limited manual control
- ✕ Slightly heavier than some models
| Turntable Speed Options | 33 1/3 rpm and 45 rpm |
| Motor Type | DC servo motor |
| Cartridge Type | Moving Magnet (MM) |
| Built-in Equalizer | RIAA phono equalizer |
| Automatic Tonearm | Yes, with auto return and manual lift |
| Connectivity | Analog output for connection to amplifier or receiver |
You’re sitting in your cozy corner, vinyl in hand, ready to spin your favorite record. As you gently place the tonearm on the spinning disc, you notice how smoothly it lifts and returns—thanks to the automatic feature.
The Denon DP-29F feels solid, with a diecast aluminum platter that promises durability and quality sound from the first note.
The built-in RIAA equalizer is a game-changer. No need for a separate phono preamp; just connect it directly to your amp or receiver.
When you’re switching between different inputs, the switch underneath the platter makes it a breeze to disengage the preamp, keeping your setup simple.
Playing a record feels effortless, especially with the automatic tonearm. It gently moves to your chosen track, and when the record ends, it smoothly returns to its resting position.
You can also lift the tonearm manually thanks to the handy lifter—perfect for skipping ahead or avoiding scratches.
What I really appreciate is how this turntable combines vintage charm with modern engineering. The design is sleek, and the sound is pure, capturing the warmth and depth of vinyl without harshness.
The dual-speed options of 33 1/3 and 45 rpm cover most records, making it versatile for any collection.
If you’re after a turntable that’s easy to operate and delivers high-fidelity sound, the DP-29F hits all the right notes. It’s ideal for casual listening or showcasing your vinyl in a dedicated space.
Just be aware that the automatic features mean less manual control if that’s your preference.
What Is a Manual Equalizer and How Does It Work?
The benefits of employing a manual equalizer include improved sound quality and greater creative control over the audio output. By allowing musicians and sound engineers to sculpt their sound precisely, manual equalizers facilitate more engaging listening experiences. They can also be applied in various contexts, from music production to broadcasting, ensuring that the desired audio quality is consistently achieved across different platforms.
Best practices for using manual equalizers involve understanding the acoustics of the space and the characteristics of the audio being processed. Users should start with subtle adjustments, gradually increasing the gain or cutting frequencies until the desired effect is achieved. Additionally, using reference tracks can help in making more informed decisions when shaping sound. Regularly performing a system check and adjusting the equalizer settings as needed can also help maintain audio quality during different performances or recordings.
What Key Features Should You Consider When Choosing a Manual Equalizer?
When choosing the best manual equalizer, there are several key features to consider:
- Number of Bands: The number of frequency bands an equalizer offers can greatly influence its versatility and control. More bands allow for finer adjustments across the audio spectrum, enabling users to tailor their sound more precisely to their preferences or the acoustics of the environment.
- Type of Filters: Different types of filters, such as high-pass, low-pass, and band-pass, can provide various ways to shape the sound. Understanding the types of filters available and their specific applications can help users achieve the desired tonal balance in their audio output.
- Adjustable Gain: The ability to adjust gain for each band is critical for maintaining overall volume levels while making tonal adjustments. This feature allows users to boost or cut frequencies without drastically altering the overall sound level, ensuring a well-balanced output.
- Bypass Function: A bypass function allows users to toggle the equalizer on and off, providing a quick way to compare the equalized sound with the original audio. This feature is essential for evaluating the effectiveness of adjustments and ensuring that changes enhance rather than detract from the overall sound quality.
- Build Quality and Design: The construction and layout of the equalizer, including the quality of knobs and sliders, can affect usability and durability. A well-built equalizer with intuitive controls can provide a more enjoyable user experience, especially in live settings or studios where adjustments need to be made quickly.
- Visual Feedback: Visual feedback features, such as LED meters or graphic displays, can help users monitor levels and understand the impact of their adjustments. This is particularly useful in complex audio environments where visual cues can inform decisions on sound shaping.
- Compatibility: Ensuring that the manual equalizer is compatible with your existing audio equipment, such as mixers, amplifiers, or speakers, is crucial. Compatibility ensures seamless integration into your setup, allowing for optimal performance without signal degradation.
- Price and Value: Evaluating the price in relation to the features and performance of the equalizer is important for making an informed decision. While budget options exist, investing in a higher-quality equalizer can result in better sound quality and longevity, making it a more valuable choice in the long run.
How Do the Frequency Bands of a Manual Equalizer Impact Sound Quality?
The frequency bands of a manual equalizer play a crucial role in shaping sound quality by allowing users to adjust specific ranges of frequencies to enhance or diminish audio characteristics.
- Low Frequencies (20 Hz – 250 Hz): This range includes deep bass sounds, which are essential for genres like hip-hop and electronic music. Adjusting these frequencies can add warmth and power to the sound but can also lead to muddiness if boosted excessively.
- Mid Frequencies (250 Hz – 4 kHz): The midrange is where most vocals and instruments reside, making it critical for clarity and presence. Fine-tuning these frequencies allows for the enhancement of vocal intelligibility and instrument definition, which is vital for a balanced mix.
- High Frequencies (4 kHz – 20 kHz): This range encompasses treble sounds that add brightness and airiness to the audio. Boosting high frequencies can create a sense of space and detail, but overdoing it might result in harshness or listener fatigue.
- Band Width (Q Factor): The Q factor determines how wide or narrow the frequency adjustment will be. A narrow bandwidth focuses on a specific frequency, allowing for precise adjustments, while a wider bandwidth affects a broader range, which can be useful for general tonal shaping.
- Phase Response: Equalization can alter the phase relationship between frequencies, which can affect sound coherence and timing. Understanding how phase shifts interact can help achieve a more cohesive sound and prevent issues like comb filtering, which can detrimentally impact clarity.
- Dynamic Range Control: Some manual equalizers also influence the dynamic range, which is the difference between the quietest and loudest parts of the sound. Adjusting frequency bands can help to compress or expand this range, allowing for better control over how sounds are perceived in relation to each other.
What Role Does Bandwidth (Q Factor) Play in Manual Equalization?
Bandwidth, often referred to as the Q factor, plays a crucial role in manual equalization by determining the range of frequencies affected by an equalizer setting.
- Frequency Range: The Q factor influences how wide or narrow the frequency range is that an equalizer band will manipulate. A high Q factor results in a narrow bandwidth, affecting only a small range of frequencies, which allows for precise adjustments, while a low Q factor affects a broader range, which can be useful for more general tone shaping.
- Resonance Control: A higher Q factor can create a resonant peak at the center frequency, enhancing the amplitude of that specific frequency. This is particularly useful in genres where certain frequencies need to stand out, but it can also lead to unwanted feedback or harshness if overused.
- Phase Response: The Q factor also impacts the phase response of the equalized signal, which can influence the overall sound character. Narrow bandwidths can introduce more phase distortion, potentially making the sound less natural, whereas wider bandwidths might preserve phase integrity better.
- Application in Mixing: In manual equalization during mixing, the Q factor helps engineers make decisions on how to carve out frequencies that clash or enhance those that need to be highlighted. For example, using a high Q setting to cut out resonant frequencies in a vocal track can help it sit better in the mix without overshadowing other elements.
- Feedback Prevention: When using equalizers in live sound situations, managing the Q factor can help prevent feedback by allowing sound engineers to specifically target problematic frequencies without affecting the overall sound too dramatically. This selective approach can be crucial in maintaining clarity and preventing sound issues during performances.
What Advantages Does a Manual Equalizer Have Over Automatic Ones?
The advantages of a manual equalizer over automatic ones are significant for audio enthusiasts and professionals seeking precise control over their sound.
- Precision Control: Manual equalizers allow users to make specific adjustments to each frequency band, enabling a granular level of control over the audio output. This is particularly beneficial for fine-tuning the sound to match personal preferences or to adapt to various acoustical environments.
- Customization: With a manual equalizer, users can create tailored EQ settings that suit their unique listening styles or the characteristics of their audio equipment. This level of customization is often lacking in automatic equalizers, which may apply generic settings that do not cater to individual needs.
- Learning Opportunity: Using a manual equalizer encourages users to learn more about sound frequencies and how different adjustments impact audio quality. This hands-on approach fosters a deeper understanding of audio engineering principles and can enhance overall listening experiences.
- Consistency: Manual equalizers provide consistent results since the settings remain fixed until they are manually changed. In contrast, automatic equalizers may adjust settings dynamically based on perceived audio input, which can lead to fluctuating sound quality during playback.
- Creative Freedom: Manual equalizers allow for more creative sound shaping, as users can experiment with unconventional settings that may not be available in automatic systems. This flexibility can inspire unique audio outcomes that reflect personal artistic vision.
What Are the Most Common Applications for Manual Equalizers in Audio Production?
The most common applications for manual equalizers in audio production include:
- Mixing: Manual equalizers are used during the mixing process to adjust the tonal balance of individual tracks. By boosting or cutting specific frequency ranges, sound engineers can enhance clarity and ensure that each instrument occupies its own space within the mix.
- Mastering: In the mastering stage, manual equalizers help to refine the overall sound of a track before final release. They can correct frequency imbalances, smooth out harsh tones, and add warmth, ensuring that the final product translates well across various playback systems.
- Live Sound Reinforcement: During live performances, manual equalizers are crucial for adjusting the sound to suit the acoustics of the venue. Engineers can tailor the EQ settings to reduce feedback, enhance vocal intelligibility, and provide a better listening experience for the audience.
- Sound Design: Manual equalizers are often utilized in sound design to shape unique sounds and create effects. By manipulating frequencies, sound designers can craft distinctive audio textures, whether for music, film, or gaming applications.
- Voice Processing: In broadcasting and podcasting, manual equalizers are employed to enhance vocal recordings. By fine-tuning the EQ settings, audio professionals can eliminate unwanted frequencies, add presence to the voice, and ensure that the spoken content is clear and engaging.
How Do You Properly Set Up a Manual Equalizer for Optimal Sound?
To properly set up a manual equalizer for optimal sound, several key steps and considerations are essential.
- Understand Frequency Ranges: Familiarize yourself with the frequency ranges, typically divided into bass (20-250 Hz), midrange (250 Hz-4 kHz), and treble (4 kHz-20 kHz). Each range has its own impact on the overall sound quality, and understanding these will help you make informed adjustments.
- Identify Your Listening Environment: Assess the acoustics of your listening space, as this can greatly affect sound quality. Factors such as room size, shape, and furnishings can lead to reflections or absorptions of sound, necessitating different equalizer settings for optimal performance.
- Start with a Flat Response: Begin by setting all equalizer bands to a neutral position (0 dB) to establish a flat response. This gives you a baseline from which to make adjustments based on your preferences and the characteristics of the music or audio being played.
- Make Incremental Adjustments: Adjust one frequency band at a time, ideally by small increments, and listen for changes. This method allows you to identify how each adjustment impacts the overall sound, ensuring you maintain clarity and balance across the frequency spectrum.
- Use Reference Tracks: Utilize tracks you are familiar with and know to be well-produced as reference points for your adjustments. This helps in evaluating the effectiveness of your equalizer settings, allowing you to make more consistent and informed choices.
- Avoid Over-Equalizing: Resist the temptation to make drastic boosts or cuts in the equalizer settings. Over-equalizing can lead to unnatural sound and distortion, so maintain moderation for a more pleasing audio experience.
- Consider Your Source Material: Keep in mind the quality and genre of the source audio. Different types of music may require different equalization approaches, so adapt your settings based on the characteristics of the tracks you are listening to.
- Save Your Settings: If your equalizer allows for presets, save your settings for different genres or listening scenarios. This can make it easier to switch between configurations without needing to recalibrate every time you change the type of audio you’re enjoying.
What Are the Top Manual Equalizers Recommended by Professionals?
The top manual equalizers recommended by professionals include:
- DBX 231s: The DBX 231s is a dual-channel 31-band graphic equalizer known for its robust build quality and precise control over frequency ranges. Its low-noise circuitry ensures minimal signal degradation, making it ideal for both live sound and studio applications.
- Behringer Ultragraph Pro FBQ3102HD: This equalizer features 31 bands per channel and is equipped with an FBQ feedback detection system, which allows users to identify and eliminate feedback frequencies easily. Its affordability combined with reliable performance makes it a favored choice among both beginners and seasoned professionals.
- API 560: The API 560 is a unique graphic equalizer that utilizes a 10-band design, offering a more musical approach to EQ adjustments. Its distinctive sound is characterized by the API’s transformer-coupled outputs, delivering warmth and depth that is particularly favored in recording studios.
- Klark Teknik DN370: This dual-channel graphic equalizer is highly versatile, providing 30 bands of control per channel with a user-friendly interface. Its built-in dynamic EQ capabilities make it suitable for a range of applications, from live performances to studio mixing.
- Proel EQ231: The Proel EQ231 is a 31-band graphic equalizer that strikes a balance between affordability and quality, offering effective control over sound shaping. It is designed with high-quality components, ensuring reliable performance in various audio environments.