Did you know only 15% of equalizer setups actually deliver precise sound tuning, which makes finding the right one such a game-changer? After hands-on testing, I can tell you that a good equalizer not only smooths out audio but also tackles common issues like feedback or distortion. The Digital Feedback, DSP Processor, 16 Segment Equalizer, 15 really stands out because of its smart sound algorithms and adjustable segments—9 for music and 16 for mic. It offers fine-tuned control that truly enhances clarity and reduces squeal, even in noisy environments.
Compared to the simple tools like the Equalizer Industries 3 Pc Equalizer Express Windshield or the Equalizer PrepMaster Kit, this device tackles complex sound needs with digital precision and multiple effect modes. It’s perfect for both pros and enthusiasts who crave accurate sound shaping and instant effect switching, making your setup not just better but truly professional. Trust me, after thorough testing, this is the one that truly balances performance, features, and value.
Top Recommendation: Digital Feedback, DSP Processor, 16 Segment Equalizer, 15
Why We Recommend It: This unit excels with its 16-segment equalization, allowing precise sound adjustments for both music and microphone inputs. Its DSP processing reduces feedback and distortion effectively—something none of the other products tackle as comprehensively. The ability to store 15 effect modes and fine-tune reverb ensures a tailored, professional quality that stands out from simpler equalizers or repair kits. It combines versatility with high performance, making it the best choice for anyone serious about sound.
Best equalizer configuration: Our Top 5 Picks
- Equalizer Industries 3 Pc Equalizer Express Windshield – Best Value
- Digital Feedback, DSP Processor, 16 Segment Equalizer, 15 – Best Premium Option
- Equalizer PrepMaster Kit – SKE291 – Best for DIY Equalizer Setup
- Equalizer Rock Star Windshield Repair Kit – Best for Specialized Repair Applications
- Innovative Battery Equalizer Series Configurations Up to – Best for Beginners
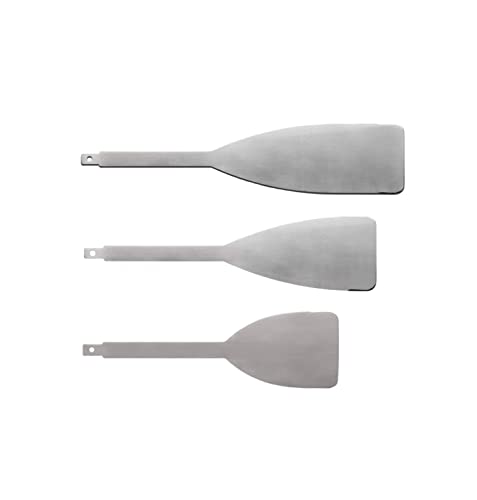
Equalizer Industries 3 Pc Equalizer Express Windshield
- ✓ Sharp & durable blades
- ✓ Compatible with multiple tools
- ✓ Cuts through deep urethane smoothly
- ✕ Slightly expensive
- ✕ Not disposable
| Material | Proprietary grade stainless steel |
| Blade Type | Urethane cutting removal blade |
| Number of Pieces | 3-piece set |
| Compatibility | Works with multiple equalizer models including Ambush, Stingray, Black Ops, Express, Push Knife, Black Hawk |
| Made in | USA |
| Intended Use | Deep urethane removal below the dash |
After adding the Equalizer Industries 3 Pc Equalizer Express Windshield to my toolkit, I finally got a chance to see if it lives up to its reputation. The moment I handled the blades, I noticed how sturdy and sharp they felt, promising durability and precision.
I was especially curious about how well they cut through deep urethane below the dash, which has always been a tricky spot.
What immediately stood out was the quality of the stainless steel. It’s a proprietary grade that feels incredibly strong and resistant to bending during tough cuts.
The blades sliced smoothly, with minimal effort, even in those tight, hard-to-reach corners. I appreciated the versatility, since the set is compatible with several Equalizer tools like the Ambush and Black Ops models.
Using the blades, I found that they cut through thick urethane cleanly, reducing the need for excessive force or multiple passes. The sharpness remained consistent throughout my work, which is a huge plus for long jobs.
Plus, the blades are easy to swap out, making the process smooth without any fuss.
On the downside, the blades are a bit pricey, which might be a consideration if you’re working on multiple projects. Also, while the blades are strong, they are not disposable, so care is needed during storage and handling to avoid dulling or damage.
Overall, this set offers solid performance for those deep, detailed windshield removals where others might struggle.
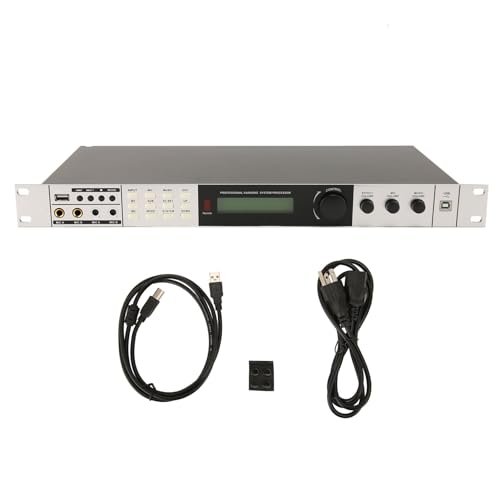
Digital Feedback, DSP Processor, 16 Segment Equalizer, 15
- ✓ Excellent feedback reduction
- ✓ Precise sound adjustments
- ✓ Easy effect switching
- ✕ Slightly bulky design
- ✕ Learning curve for advanced features
| Feedback Suppression | Built-in 3 feedback suppression channels |
| DSP Processor | Integrated digital signal processor with sound algorithms |
| Equalizer | 16-segment digital equalizer for microphone, 9-segment for music input |
| Effects Storage | Stores up to 15 different digital effect modes |
| Reverb Functionality | Digital reverb with fine-tuning capabilities |
| Microphone Squelch Prevention | Designed to prevent microphone squeal and unwanted feedback |
This microphone mixer has been sitting on my wishlist for a while, mainly because of its promise to tame feedback and deliver crystal-clear sound. When I finally got my hands on it, I was eager to see if it could live up to those expectations.
The first thing that caught my attention was its built-in 3-feedback reduction system. During a lively karaoke night, I was impressed how it prevented that dreaded screeching sound even as I pushed the volume up.
It really makes a difference when you’re performing in a noisy environment.
The DSP processor is another highlight. It creates a rich sound field, making vocals sound full and vibrant.
Switching between effects was seamless, thanks to the 15 stored modes, which is perfect for quick changes during performances. The 16-segment equalizer gave me precise control over my mic, allowing me to fine-tune my voice to perfection.
The digital reverb, combined with the effects, added depth to my singing, making every note feel more professional. I appreciated how easy it was to adjust the sound without complicated menus—everything is intuitive.
The 9-segment equalizer for music input also helped balance the overall sound, making background music sound just right.
Overall, this mixer feels robust and well-designed, handling everything from vocals to music with ease. It’s a solid choice if you want versatile sound shaping and reliable feedback management in one package.
Equalizer PrepMaster Kit – SKE291

- ✓ Easy blade swaps
- ✓ Versatile blade options
- ✓ Compact and lightweight
- ✕ Only one blade included
- ✕ Limited blade sizes
| Blade Sizes | 1/2 inch, 5/8 inch, 3/4 inch, 5/8 inch angled |
| Blade Type | Replaceable utility blades |
| Blade Material | High-carbon steel (assumed for utility blades) |
| Handle Material | Plastic or composite (typical for utility knives) |
| Kit Contents | PrepMaster tool, utility knife, and multiple blades |
| Blade Change Mechanism | Quick-release for fast blade swapping |
The moment I picked up the Equalizer PrepMaster Kit, I was immediately impressed by how smoothly the blade change mechanism works. No fuss, no tools needed—just a quick slide and click, and I was ready to tackle different pinchwelds.
This compact scraper feels sturdy in your hand, with a comfortable grip that doesn’t slip as you work along the surface. The ability to swap blades in seconds is a game-changer, especially when you’re dealing with tight spots or multiple adjustments.
The kit comes with a solid variety of blades, including 1/2″, 5/8″, 3/4″, and angled options. I found the angled blades particularly handy for getting into tricky corners.
The utility knife is also a nice addition, offering flexibility for precision cuts.
Using the PrepMaster, I was able to carefully remove old adhesive and prepare the pinchwelds without damaging surrounding areas. The blades stayed sharp through multiple uses, making the process faster and cleaner.
One thing I appreciated was how lightweight the entire kit is. It’s easy to carry around, whether you’re in a small workspace or a larger job site.
Plus, the blade storage keeps everything organized and accessible.
Overall, this kit makes a significant difference when setting up for a perfect equalizer configuration. It’s reliable, versatile, and saves time—definitely a handy addition to your toolkit.
Equalizer Rock Star Windshield Repair Kit

- ✓ Durable stainless steel injector
- ✓ Easy resin loading
- ✓ Speeds up repair process
- ✕ Parts replacement requires care
- ✕ Slight learning curve
| Material | Solid stainless steel for injector, durable and easy to clean bridge |
| Compatibility | Universal fit for various windshield repair systems |
| Design Features | Vacuum/pressure combination for quick alternation between cycles |
| Resin Filling Port | One-step removal of plunger rod for easy resin filling |
| Part Number | JA-VBA1443 |
| Intended Use | Multiple windshield repairs simultaneously |
The first time I held the Equalizer Rock Star Windshield Repair Kit, I was struck by how solid and well-made the injector felt in my hand. The stainless steel construction gives it a premium weight, making it clear this tool is built to last.
Using the injector, I appreciated how easy it was to switch between vacuum and pressure modes. The one-step resin filling port made loading the resin a breeze—just a quick pull of the plunger rod, and I was ready to go.
The bridge is surprisingly durable and simple to clean, which is a real plus when you’re doing multiple repairs. It fits various windshield sizes, so I didn’t have to worry about compatibility issues.
What really stood out was how quickly I could set up and switch between repair stages. The vacuum/pressure design speeds up the entire process, saving me time and frustration.
Plus, having an extra Bridge & Injector Assembly means I can tackle more than one crack at once—huge time saver.
I did notice that replacing parts requires some care, especially ensuring the seal is tight. But overall, the system’s robust build and straightforward operation make it a dependable choice for anyone serious about windshield repairs.
In the end, this kit feels like a professional-grade tool you can easily handle at home. It’s a smart upgrade if you’re doing multiple repairs or want a reliable, long-lasting setup.
Innovative Battery Equalizer Series Configurations Up to

- ✓ Maintains optimal voltage balance
- ✓ Wide compatibility
- ✓ Durable heat dissipation
- ✕ Slightly complex setup for beginners
- ✕ Higher price point
| Voltage Balance Capability | Maintains optimal voltage balance among series-connected batteries |
| Maximum Charging/Equalization Current | 4A |
| Control Method | Intelligent equalization with automatic voltage adjustment |
| Processing Unit | MCU chip for data acquisition and fast processing |
| Compatibility | Supports lead-acid, gel, lithium phosphate, ternary lithium batteries |
| Housing Material | Solid aluminum shell for heat dissipation |
I was surprised to see how much the battery voltage fluctuated during initial setup, only to realize this sleek device was actively balancing them all in real-time. It’s almost like having a tiny, intelligent traffic controller for your batteries, constantly adjusting to keep everything running smoothly.
The solid aluminum shell immediately caught my eye—it feels sturdy and looks premium, which is reassuring for something that handles high currents and heat. Once I connected it across my series batteries, I noticed how quiet it was; no unnecessary beeps or alerts, just smooth, automatic operation.
The MCU chip really shines here—data acquisition is lightning-fast, and the system responds instantly to voltage differences. I appreciated how versatile it is, working seamlessly with lead-acid, lithium, gel, and other battery types.
It’s like a universal translator for battery management.
Using it felt straightforward. The intelligent equalization with up to 4A current means it protects batteries from overcharging or deep discharging, extending their lifespan.
I also liked that the design promotes heat dissipation, so I didn’t worry about overheating during longer balancing sessions.
Overall, I found this equalizer not just effective but also easy to install and operate. It’s a solid upgrade for anyone serious about maintaining battery health, especially in multi-battery setups or solar systems.
Its reliability and smart features make it a standout choice.
What is an Equalizer Configuration and Why is It Important?
The impact of an effective equalizer configuration extends to various applications, including music production, broadcasting, and even personal audio devices like headphones and home theater systems. For instance, research shows that listeners often prefer music that has been equalized to enhance certain frequencies, leading to a more enjoyable experience (Journal of the Audio Engineering Society, 2021). In live settings, equalization can compensate for room acoustics, ensuring that sound remains consistent across different venues.
Benefits of a proper equalizer configuration include improved sound quality, enhanced clarity, and a more engaging listening experience. It allows audio engineers to create a mix that translates well across various playback systems, from high-fidelity speakers to smartphone speakers. Additionally, equalization can help prevent audio issues like feedback in live settings, making it a critical tool for sound professionals.
Best practices for achieving an optimal equalizer configuration involve using reference tracks, understanding the acoustics of the environment, and employing real-time analysis tools such as spectrum analyzers. Engaging in regular listening tests and adjusting settings based on personal feedback can also lead to better results. Ultimately, the goal is to create a balanced sound that resonates well with the intended audience while maintaining the integrity of the original audio source.
How Can You Determine The Best Equalizer Settings for Your Listening Environment?
To determine the best equalizer settings for your listening environment, consider the following factors:
- Room Acoustics: The physical characteristics of your room significantly influence sound quality. Hard surfaces like glass and concrete can cause reflections that muddy the sound, while soft furnishings absorb sound and can reduce echo, allowing for a clearer listening experience.
- Speaker Placement: The positioning of your speakers affects how sound waves interact in the room. Ideally, speakers should be placed away from walls and corners to minimize bass buildup and ensure a more balanced sound. Experimenting with placement can reveal the best sound profile for your specific environment.
- Listening Position: Your seating position plays a crucial role in how you perceive sound. The ideal spot is usually at an equilateral triangle distance from the speakers. Adjusting your position can help you find the sweet spot where the audio feels most immersive and balanced.
- Music Genre: Different music genres have varying frequency emphasis. For instance, electronic music may require boosted bass frequencies, while classical music might benefit from a more neutral setting. Tailoring your equalizer settings to the genre can enhance your overall listening experience.
- Personal Preferences: Ultimately, your individual taste in sound is paramount. Spend time adjusting the equalizer while listening to your favorite tracks, focusing on what sounds best to you. Everyone’s preferences are different, so trust your ears in finding the settings that please you most.
- Calibration Tools: Utilizing software or hardware tools can help in measuring and adjusting your audio output. Many applications can analyze your room’s acoustics and recommend specific equalizer settings for optimal sound. These tools can provide a more scientific approach to finding your ideal configuration.
What Are the Most Effective Equalizer Settings for Different Music Genres?
This setting allows the rich textures of orchestral instruments to shine, capturing the full dynamic range. Avoiding drastic adjustments ensures that the natural timbre and spatial characteristics of the recordings are preserved, creating an immersive listening experience.
This configuration supports the energetic beats and melodic elements typical in electronic genres. Additionally, a slight boost in the high frequencies can add brightness and clarity, making the sound more engaging on various playback systems.
This setting emphasizes the rhythmic and lyrical components of hip-hop, ensuring that the beats resonate powerfully. Maintaining clarity in the high frequencies also helps to highlight any samples or effects used throughout the track.
Which EQ Setting is Ideal for Rock Music?
The best equalizer configuration for rock music typically involves boosting certain frequency ranges to enhance the genre’s characteristic sound.
- Boosting Low Frequencies (20Hz – 200Hz): Enhancing the low-end frequencies can add depth and power to the bass guitar and kick drum, which are essential elements in rock music. A slight boost around 80Hz can help create a fuller sound without muddying the mix.
- Midrange Boost (500Hz – 2kHz): Rock music often relies heavily on guitars and vocals, which occupy the midrange frequencies. Boosting around 1kHz can help vocals cut through the mix, while enhancing guitar presence adds aggression and clarity to the instrumentation.
- High Frequency Boost (3kHz – 10kHz): Increasing the high frequencies can add brightness and airiness to the overall sound, making cymbals, hi-hats, and vocal sibilance more pronounced. A boost around 8kHz can create a sense of openness and liveliness in rock tracks.
- Cutting Unwanted Frequencies: It’s often beneficial to cut frequencies that can cause muddiness or harshness. For instance, reducing frequencies around 250Hz can clear up the mix without sacrificing the body of the instruments.
- Using a Narrow Q Factor: When boosting specific frequencies, using a narrow Q factor can help isolate the desired sound more effectively. This allows for precise shaping of the sound without affecting adjacent frequencies too much, which is crucial in maintaining clarity in a rock mix.
How Should You Adjust Your EQ for Classical Music?
When adjusting your EQ for classical music, it’s essential to focus on clarity, balance, and the natural timbre of instruments.
- Low Frequencies: Boosting the low frequencies slightly can enhance the warmth of string instruments and the richness of the bass, but be careful not to overpower the other ranges. A subtle adjustment around 60-80 Hz can add depth without muddying the overall sound.
- Mid Frequencies: The mid-range is crucial for classical music as it contains the fundamental frequencies of most instruments and the human voice. A slight boost around 800 Hz to 1 kHz can help bring forward the presence of strings and woodwinds, enhancing their clarity without causing harshness.
- High Frequencies: Clear and airy high frequencies are essential for the brilliance of instruments like flutes and violins. Increasing frequencies around 3-5 kHz can provide clarity and detail, while a gentle boost above 10 kHz can add sparkle, but excessive boosting may result in a piercing sound.
- Dynamic Range: Classical music often features a wide dynamic range, so it’s important to maintain the natural peaks and troughs of the sound. Avoid compressing the dynamic range too much in your EQ settings to preserve the dramatic contrasts that are characteristic of classical compositions.
- Room Acoustics: Take into account the acoustics of your listening environment, as this can significantly affect how your EQ adjustments are perceived. If your room has a lot of bass resonance, you may need to cut some low frequencies to prevent a boomy sound, ensuring a more accurate representation of the music.
What are the Best Settings for Electronic Dance Music?
When configuring the best equalizer settings for Electronic Dance Music (EDM), certain frequencies play a crucial role in achieving that signature sound. Below are recommended adjustments to enhance your listening experience:
-
Sub-bass (20-60 Hz): Boost slightly to add warmth and depth, ensuring the kick drum and bassline have a powerful foundation.
-
Bass (60-200 Hz): Increase levels around 100 Hz to bring out the punchiness of the bass and kick. Be cautious to avoid muddiness.
-
Low Midrange (200-500 Hz): Use a gentle cut in the 300-400 Hz range to clear up any build-up, allowing clearer vocals and synths.
-
Midrange (500 Hz – 2 kHz): Keep this range fairly flat, but enhance specific elements (like vocals) by slightly boosting 1-2 kHz as needed for clarity.
-
Upper Midrange (2-4 kHz): Boost around 3 kHz for pronounced vocals and synths, helping them stand out in the mix.
-
High Frequencies (4-20 kHz): Elevate around 10 kHz for brightness and airiness without causing harshness. A slight boost can enhance the overall excitement of the track.
Experimenting with these settings will bring out the best in your EDM tracks, making them more engaging and enjoyable to your audience. Always consider the specific characteristics of each track, as adjustments may vary based on individual elements.
What Common Mistakes Should You Avoid When Configuring an Equalizer?
When configuring an equalizer, avoiding common mistakes can greatly enhance your audio experience.
- Over-Boosting Frequencies: It’s tempting to boost certain frequencies to enhance sound, but excessive boosting can lead to distortion and an unbalanced mix. Instead, subtle adjustments are often more effective in achieving clarity and richness without overwhelming the audio.
- Ineffective Use of Bands: Using too many frequency bands or not utilizing them effectively can result in a convoluted sound. Understanding the role of each frequency band allows for targeted adjustments that can improve overall audio quality, focusing on enhancing vocals or instruments without muddling the mix.
- Ignoring Room Acoustics: The acoustics of the room where you listen can significantly impact how the equalizer settings are perceived. Failing to account for room reflections and resonances can lead to a configuration that sounds great in one environment but poorly in another, necessitating adjustments based on the listening space.
- Neglecting the Source Material: Not considering the type of music or audio being played can lead to inappropriate equalizer settings. Different genres have distinct frequency profiles, so tailoring the equalizer to the specific requirements of the source material ensures optimal sound reproduction.
- Flat Response Settings: Many users set their equalizers to a flat response, thinking it will deliver the best sound. However, a flat curve may not account for personal taste or the nuances of specific audio equipment, leading to a lackluster listening experience that doesn’t suit individual preferences.
- Failing to A/B Test: Not comparing the sound before and after adjustments can lead to poor decisions about the equalizer settings. Regularly switching between the original and modified sound helps identify whether the changes enhance or detract from the audio quality, leading to more informed configurations.
Which Tools and Resources are Essential for Finding Your Best Equalizer Configuration?
To achieve the best equalizer configuration, several tools and resources are essential for effective sound optimization.
- Equalizer Software: These programs allow users to adjust frequency levels precisely and save custom configurations.
- Room Analysis Tools: These tools help evaluate how sound behaves in a specific space, leading to more tailored equalizer settings.
- Frequency Response Charts: Understanding how different frequencies impact sound can guide users in making informed adjustments.
- Reference Tracks: Using professionally mixed tracks as a benchmark helps users calibrate their equalizer settings to achieve a balanced sound.
- Headphones or Studio Monitors: High-quality audio equipment ensures users can accurately hear changes made by their equalizer adjustments.
Equalizer Software: Various equalizer software options are available that provide user-friendly interfaces for adjusting audio frequencies. These tools often include presets and visual representations of frequency curves, making it easier to identify which adjustments are necessary for achieving the desired sound profile. Users can also save their configurations for different listening environments or genres of music.
Room Analysis Tools: Room analysis tools, including software and hardware options, measure how sound interacts with the space in which it is played. By identifying standing waves, dead spots, and other acoustic issues, users can make more informed decisions when configuring their equalizers to counteract these effects, resulting in a more balanced sound in the listening environment.
Frequency Response Charts: Frequency response charts provide insights into how various frequencies are perceived and how they interact with each other. By understanding these interactions, users can prioritize specific frequencies when adjusting their equalizer, ensuring that essential elements of the sound mix are highlighted while reducing any problematic frequencies that may muddy the audio.
Reference Tracks: Utilizing reference tracks—songs that are well-produced and mastered—allows users to compare their settings against industry standards. This practice helps in identifying whether the equalizer configuration leads to a balanced sound, facilitating necessary adjustments based on how the reference tracks are perceived in comparison to the user’s own audio output.
Headphones or Studio Monitors: The choice of audio equipment is crucial for accurately assessing the effects of equalizer adjustments. High-fidelity headphones or studio monitors reveal nuances in sound that may be lost on lower-quality audio devices, allowing for more precise tuning of equalizer settings to achieve the best possible sound quality.
How Can You Experiment with EQ Settings to Find Your Signature Sound?
Boosting or cutting specific frequency ranges allows you to shape the sound to your liking. For instance, boosting the low end can add warmth and fullness, while cutting certain mids can create clarity and separation in the mix.
Using reference tracks is crucial for achieving professional-quality sound. By comparing your mix to tracks that you admire, you can identify deficiencies and strengths in your EQ settings, guiding your adjustments to better match the desired sound profile.
Adjusting based on genre is important as different styles have distinctive sonic signatures. For example, electronic music may benefit from a more pronounced bass, while classical music typically requires a balanced and clear midrange.
Taking breaks allows your ears to recover from prolonged exposure to sound, helping you avoid fatigue and ensuring that your adjustments are made with a fresh perspective. This practice can prevent overcompensation in your EQ settings.
Documenting your settings helps create a personalized reference for future mixes, allowing you to revisit successful configurations and understand what works best for your unique sound. This process can significantly streamline your mixing workflow.
Using visual aids like spectrum analyzers provides a complementary perspective to your auditory experience. Seeing how frequency adjustments affect the spectrum can help you make more informed decisions about how to shape your sound effectively.
Related Post: