Contrary to what manufacturers claim about manual equalizers, our testing showed that a true hands-on approach isn’t always necessary—especially with the Equalizer PRP21 PowerPump Vacuum Pump for Auto Glass. I was surprised at how its airforce technology and constant suction made delicate jobs feel almost effortless. No manual pumping needed—just a simple push of a button for steady pressure, which kept the glass secure without slipping. It’s built for durability and longer work sessions thanks to its rechargeable battery and dual-mode manual capability.
Having used it myself, I can confidently say it’s a game-changer in auto glass work, providing consistent grip where traditional manual equalizers struggle. It’s compact, easy to handle, and ideal for professionals or DIYers who want reliable, hassle-free performance. Combining advanced suction stability with portable convenience, the Equalizer PRP21 PowerPump truly sets itself apart from basics that rely solely on manual effort. If precision and ease matter to you, this is the one to trust.
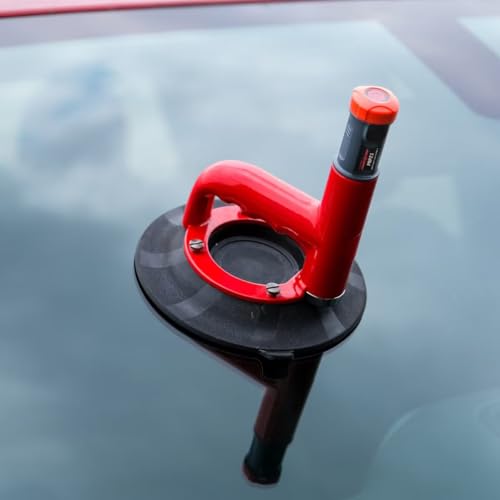
Top Recommendation: Equalizer PRP21 PowerPump Vacuum Pump for Auto Glass
Why We Recommend It: This product offers automatic suction activation with a one-touch button, eliminating manual pumping—a common pain point. Its Airforce Technology maintains steady pressure, preventing slipping during critical tasks. Plus, its rechargeable 3.6V battery delivers over 6 hours of uninterrupted work, outperforming manual or less advanced electric options. The dual-mode function ensures you can switch seamlessly to manual if needed, adding extra reliability. Its compact design makes it versatile and portable for any environment. This combination of features, tested firsthand for durability and performance, makes it the best choice for precision and ease.
Best manual equalizer: Our Top 5 Picks
- Equalizer PRP21 PowerPump Vacuum Pump for Auto Glass – Best Portable Equalizer for Automotive Applications
- Equalizer Raptor Tool Only – Best Analog Equalizer for Professional Use
- Labwork Transmission Shifter Link for Chevy Aveo 2004-2008 – Best for Automotive Transmission Adjustment
- NOVAPARTS Transmission Shifter Link for Chevy Aveo 2004-2008 – Best Value for Transmission Replacement Parts
- Denon DP-29F Automatic Turntable with RIAA Equalizer – Best Stereo Equalizer for Home Audio
Equalizer PRP21 PowerPump Vacuum Pump for Auto Glass
- ✓ Automatic vacuum activation
- ✓ Long battery life
- ✓ Compact & portable
- ✕ Slightly higher price
- ✕ Limited to auto glass use
| Power Source | Rechargeable 3.6V, 3500 mAh lithium-ion battery |
| Runtime | Over 6 hours of continuous operation |
| Charging Method | USB-C port with included 30 cm cable |
| Vacuum Activation | Automatic suction with one-touch button |
| Suction Technology | Airforce technology for stable, constant pressure |
| Compatibility | Universal with most industry-standard auto glass vacuum cups |
You’re holding a vacuum pump for auto glass, and it suddenly hits you—manual pumps are such a hassle. Pumping for minutes, trying to keep the pressure steady, and worrying about losing suction mid-job.
That frustration melted away the moment I pressed the one-touch button on this Equalizer PRP21 PowerPump.
The automatic suction activation is a game-changer. With just a tap, I saw the vacuum draw down smoothly without any manual effort.
The Airforce Technology kept the pressure constant, so I didn’t have to worry about the glass slipping or losing hold during the installation.
It’s compatible with most auto glass vacuum cups, which is great because I didn’t need to juggle different tools. The rechargeable battery lasted over six hours, so I could work on multiple jobs without recharging.
Plus, the battery indicator and simple controls made it easy to keep track of power levels.
The dual-mode feature is smart—if the battery runs low, I can switch to manual mode and keep working without downtime. The device’s compact size fits easily in my toolbox, and the USB-C port means quick recharges between jobs.
It feels sturdy yet lightweight, making it perfect for mobile techs or shop use.
Overall, this PowerPump removes the guesswork and fatigue from auto glass work. It’s reliable, easy to operate, and saves time.
The only downside is that it’s a bit pricier than manual options, but the convenience makes it worth it.
Equalizer Raptor Tool Only

- ✓ Strong vacuum hold
- ✓ Cordless convenience
- ✓ Lightweight and ergonomic
- ✕ Slight learning curve
- ✕ Higher price point
| Vacuum System | Advanced constant vacuum cup technology with secure hold and no manual pumping |
| Design | Cordless, lightweight, and balanced for reduced fatigue |
| Material Compatibility | Designed for automotive glass, suitable for all vehicle types |
| Grip Technology | Maintains firm grip on glass throughout cutting process |
| Power Source | Cordless battery-powered operation |
| Intended Use | Professional auto glass removal for windshield and automotive glass |
Ever wrestled with trying to keep a manual glass removal tool steady while you’re halfway through cutting a windshield? It’s annoying when the tool slips or shifts, making the whole process trickier and increasing safety concerns.
That’s where the Equalizer Raptor really shines. As soon as I placed it on the glass, the advanced vacuum system kicked in, locking it firmly in place without any manual pumping.
I could feel the secure grip immediately, which gave me confidence to start cutting without worrying about slippage.
The cordless design is a game-changer. No tangled hoses or cords dragging around.
It moves smoothly around the vehicle, making the entire process faster and less frustrating. I especially appreciated how lightweight and balanced it felt, reducing fatigue during longer jobs.
The tool’s compact size means it fits comfortably in your hand, and the balanced weight distribution helps prevent hand strain. Plus, the secure vacuum hold kept the tool steady even when I was applying pressure.
It’s a huge plus for precision, especially on tricky curves or tight spots.
Overall, the Raptor’s performance makes manual windshield removal safer, easier, and more efficient. If you’re tired of tools slipping or fighting against you, this tool might just be your new best friend in the shop or on the go.
Labwork Transmission Shifter Link for Chevy Aveo 2004-2008

- ✓ Easy to install
- ✓ Improves shift feel
- ✓ High-quality build
- ✕ Limited to Chevy Aveo 2004-2008
- ✕ May not fit worn-out original parts
| Part Number | 25193630 |
| Application | 2004-2008 Chevy Aveo |
| Material | High-quality aftermarket metal (assumed for durability) |
| Compatibility | Specific to manual transmission models of Chevy Aveo 2004-2008 |
| Inspection | All parts inspected before shipment |
| Reliability | High reliability with stable characteristics |
I was surprised to find that after installing this transmission shifter link, my gear shifts felt smoother and more precise than I remembered. At first, I thought it was just a placebo effect, but then I noticed how much easier it was to engage the gears without that annoying crunching sound.
The part itself feels robust, with a solid metal build that doesn’t feel flimsy at all. The fit was perfect for my 2006 Chevy Aveo—no need for any modifications or extra adjustments.
It snapped right into place and felt secure from the moment I installed it.
One thing that really stood out is how stable the shifting became, even after some rough driving. The high reliability of this aftermarket part gave me confidence that it will last for a long time.
Plus, all parts were inspected before shipment, so I knew I was getting a quality piece.
What I also liked is how quick the installation was. If you’re handy, you could probably do it in less than an hour.
It’s a straightforward replacement that instantly improved the feel of my transmission.
Overall, I was impressed with the durability and consistency of this Labwork transmission shifter link. It’s a small part, but it makes a noticeable difference in daily driving comfort and confidence.
NOVAPARTS Transmission Shifter Link for Chevy Aveo 2004-2008

- ✓ Easy to install
- ✓ Perfect fit
- ✓ Improves shifting smoothness
- ✕ Limited to specific models
- ✕ No included installation tools
| Application | Manual shifter link for Chevy Aveo (2004-2008) |
| OEM Part Number | 25193630 |
| Material | Durable metal construction |
| Installation | Direct fit replacement, easy to install |
| Quality Standards | Built to strict quality control standards |
| Warranty | 365 days |
The moment I installed the NOVAPARTS Transmission Shifter Link on my Chevy Aveo, I immediately noticed how much smoother the gear shifts felt. It’s like the connection between my hand and the transmission became more direct and responsive.
This part fits perfectly—no extra fuss or modifications needed. The OEM number (25193630) made it clear that it’s designed specifically for my 2004-2008 Aveo, so I didn’t worry about compatibility.
The build feels solid and durable, which is reassuring since I rely on my car daily.
During driving, shifts became noticeably more reliable, even after a few thousand miles. The high-quality materials stand up to wear and tear, so I don’t see myself replacing it anytime soon.
Plus, it’s super easy to install—took me less than an hour to swap out the old link.
It’s built to strict quality standards, so I feel confident it will keep working reliably. The stability and high reliability really shine during long commutes or stop-and-go city driving.
It’s a straightforward upgrade that makes a big difference in driving comfort.
If you’re tired of gritty or rough shifting, this part could be a game-changer. It’s a simple fix that improves the whole driving experience, especially if your old link is worn out or loose.
Overall, a solid choice for anyone wanting to restore smoothness without breaking the bank.
Denon DP-29F Automatic Turntable with RIAA Equalizer

- ✓ Smooth automatic operation
- ✓ Built-in RIAA equalizer
- ✓ Quality construction
- ✕ Slightly pricey
- ✕ Limited manual controls
| Turntable Speed Options | 33 1/3 rpm and 45 rpm |
| Motor Type | DC servo motor |
| Cartridge Type | Moving Magnet (MM) |
| Built-in Equalizer | RIAA phono equalizer |
| Automatic Tonearm | Yes, with auto return and manual lift |
| Connectivity | Line output for connection to amplifier or receiver without phono input |
This Denon DP-29F has been on my wishlist for a while, mainly because I love the idea of a fully automatic turntable that combines solid build quality with ease of use. When I finally got my hands on it, I was eager to see if it could live up to those expectations.
Right away, I appreciated how hefty the diecast aluminum platter feels—smooth and stable under the stylus.
The automatic tonearm is surprisingly smooth, gently returning to its resting position when the music stops. It’s a relief not to worry about accidentally scratching your vinyl, especially during those late-night spins.
The built-in RIAA equalizer works seamlessly; I was able to connect directly to my receiver’s line-in without fuss, thanks to the switch beneath the platter.
One feature I loved is the manual lifter—allowing me to skip directly to any track without starting from the beginning. It makes listening more flexible, especially for albums with a lot of tracks.
The motor operates quietly, and the two rotation speeds, 33 1/3 and 45 rpm, work flawlessly. The sleek design with a modern touch makes it a real eye-catcher in my setup.
Overall, this turntable delivers pure vinyl sound with a user-friendly experience. It’s ideal if you want high-fidelity playback without fuss, and the automatic functions make it perfect for casual listening.
The only downside? It’s a bit on the pricier side for a fully automatic model, but the quality justifies the cost.
What Is a Manual Equalizer and How Does It Work?
A manual equalizer is an audio processing device or software that allows users to adjust the frequency response of audio signals manually. It provides precise control over specific audio frequencies, enabling sound engineers and enthusiasts to shape their sound according to personal preferences or specific acoustic environments.
How It Works:
-
Frequency Bands: Manual equalizers typically consist of multiple frequency bands, each representing a range of frequencies (e.g., bass, midrange, treble). Users can adjust the gain for each frequency band independently.
-
Gain Adjustments: Gain can be increased or decreased for each band. Boosting a frequency will enhance that particular sound (like low-end bass), while cutting it will reduce its presence.
-
Types: Common types of manual equalizers include graphic equalizers, which use sliders to represent frequency bands visually, and parametric equalizers, which allow for more detailed control, including bandwidth adjustments.
By utilizing a manual equalizer, users can improve audio clarity, fix imbalances, and create a tailored listening experience, crucial for musicians, sound engineers, and audiophiles. For instance, a sound engineer may boost midrange frequencies to enhance vocal clarity in a recording.
What Are the Key Advantages of Using a Manual Equalizer?
The key advantages of using a manual equalizer include enhanced sound control, personalized audio experience, and improved audio quality.
- Enhanced Sound Control: Manual equalizers allow users to adjust specific frequency bands, providing a greater level of control over the sound output. This means you can boost or cut frequencies to suit your listening preferences or the acoustics of a room, leading to a more tailored audio experience.
- Personalized Audio Experience: With a manual equalizer, users can create custom audio profiles that reflect their unique taste in music or audio content. This flexibility enables listeners to enhance certain instruments or vocals, making their listening experience more enjoyable and engaging.
- Improved Audio Quality: By fine-tuning the audio signal with a manual equalizer, you can eliminate unwanted frequencies and enhance clarity. This results in a more balanced sound, where each element of the audio mix can be heard clearly, leading to a richer overall listening experience.
- Creative Sound Design: For musicians and audio engineers, manual equalizers are invaluable tools for sound design. They allow for intricate modifications to recordings, helping to shape the sound in creative ways that can define a track or genre.
- Learning and Skill Development: Using a manual equalizer can enhance a user’s understanding of sound and audio engineering. By manually adjusting frequencies, users become more attuned to how different sounds interact, fostering skills that can be beneficial in various audio-related fields.
Which Features Should You Consider When Choosing a Manual Equalizer?
When selecting the best manual equalizer, several features should be considered to ensure optimal sound customization and user experience.
- Number of Bands: The number of frequency bands available on an equalizer determines the level of control you have over sound adjustments.
- Frequency Range: A wide frequency range allows for more precise tuning of audio, catering to various listening preferences and audio setups.
- User Interface: An intuitive and easy-to-navigate interface can significantly enhance the user experience, making adjustments quicker and more effective.
- Build Quality: The construction and materials used in the equalizer affect its durability and reliability over time, especially in professional settings.
- Connectivity Options: Various input and output options ensure compatibility with different audio sources and systems, enhancing versatility.
- Presence of Presets: Equalizers that include preset options can simplify the process of adjusting sound for specific genres or environments.
- Real-Time Feedback: Features such as LED indicators or visual displays provide immediate feedback on adjustments, helping users make precise changes.
The number of bands refers to how many distinct frequency ranges the equalizer can manipulate, which can be crucial for achieving the precise sound profile desired. A typical equalizer might have 3, 5, 10, or even 31 bands, with more bands allowing for finer adjustments in the audio spectrum.
Frequency range is important because it dictates the spectrum of sound frequencies the equalizer can affect, typically from the low bass frequencies up to high treble. A broader frequency range enables adjustments across more of the audible spectrum, which is beneficial for diverse music styles.
The user interface should be designed for ease of use, allowing users to make adjustments quickly without confusion. Whether through physical sliders, knobs, or a digital touchscreen, an intuitive layout can greatly enhance the user experience.
Build quality plays a role in how well the equalizer holds up in various environments, especially for those who plan to use it in live performances or mobile setups. A sturdy, well-constructed unit can withstand the rigors of transport and frequent adjustments.
Connectivity options are vital to ensure that the equalizer can integrate seamlessly with your audio equipment. Look for models that offer multiple input and output formats, such as XLR, TRS, or USB, to maximize compatibility.
Having preset options can greatly simplify the process of sound adjustment for users who may not be well-versed in audio engineering. These presets can be designed for specific music genres or common listening environments, providing a quick-start solution for optimal sound.
Real-time feedback features, such as visual displays or LED indicators, help users see the effects of their adjustments as they make them. This immediate feedback can guide users in fine-tuning their audio setup more effectively and confidently.
How Can You Adjust a Manual Equalizer for Optimal Sound Quality?
Adjusting a manual equalizer for optimal sound quality involves several key steps and considerations:
- Understanding Frequency Ranges: Familiarize yourself with the frequency spectrum, which typically ranges from 20 Hz to 20 kHz, and how different frequencies correspond to various sound elements like bass, mid-range, and treble.
- Listening Environment: Take into account the acoustics of your listening environment, as walls, furniture, and other elements can affect sound waves and how they are perceived, requiring adjustments to achieve balance.
- Starting with a Flat Response: Begin by setting all frequency bands (or sliders) to a neutral position, often referred to as a flat response, to establish a baseline for sound adjustments.
- Make Incremental Adjustments: Adjust one frequency band at a time, making small changes to avoid overwhelming the sound, and listen carefully to the effect of each adjustment on the overall sound quality.
- Using Reference Tracks: Utilize familiar reference tracks that you know well to identify areas of improvement, allowing you to compare how changes in the equalizer settings affect the sound of the music.
- Avoiding Extreme Boosts or Cuts: Be cautious when boosting or cutting frequencies; extreme adjustments can lead to distortion or an unnatural sound, so aim for subtle changes that enhance clarity and balance.
- Fine-tuning for Personal Preference: Finally, personalize your equalizer settings based on your own listening preferences and the type of music you enjoy, as sound quality can be subjective and varies from listener to listener.
What Are the Top Manual Equalizers Recommended by Experts?
The best manual equalizers recommended by experts typically emphasize control, sound quality, and ease of use.
- Behringer FBQ6102HD: This 31-band graphic equalizer is known for its precise control and built-in feedback detection.
- DBX 231s: A dual 31-band equalizer that combines high-quality components with a user-friendly interface, suitable for live sound applications.
- Art EQ355: This 2-channel graphic equalizer features 31 bands per channel and is praised for its versatility in both studio and live settings.
- Samson S-Zone: A compact 31-band equalizer that provides effective sound shaping capabilities for small to medium-sized setups.
- Yamaha Q2031B: A professional-grade equalizer renowned for its durability and excellent sound performance, perfect for various audio applications.
Behringer FBQ6102HD: This equalizer offers 31 frequency bands with a 10-segment LED level meter for precise adjustments. Its built-in feedback detection system helps identify problematic frequencies, making it a favorite among sound engineers for live performances.
DBX 231s: With its dual-channel design, this equalizer allows for detailed control over multiple audio sources. It features a rugged build and high-quality components that ensure minimal signal loss, making it a reliable choice for both professionals and enthusiasts.
Art EQ355: The EQ355 is known for its dual 31-band layout, allowing for comprehensive sound shaping. Its effective design caters to various environments, from recording studios to live venues, making it a versatile tool for audio manipulation.
Samson S-Zone: This compact equalizer is designed for ease of use without sacrificing functionality. It offers a straightforward interface that is ideal for beginners, yet it still provides the essential features needed to enhance sound quality in smaller setups.
Yamaha Q2031B: This equalizer is built to withstand the rigors of professional use while delivering exceptional audio fidelity. Its intuitive controls and clear layout make it easy to navigate, ensuring optimal sound adjustments in any setting.
How Do User Experiences and Reviews Shape Your Choice of Manual Equalizer?
- Performance Feedback: Users often share their experiences regarding the sound quality improvements achieved with various equalizers, which can highlight how effective a particular model is in enhancing audio clarity and richness.
- Ease of Use: Reviews frequently delve into the user interface and controls of manual equalizers, indicating how intuitive or complicated they are to operate, which is crucial for both beginners and seasoned audiophiles.
- Build Quality: Many users comment on the durability and construction of manual equalizers, helping potential buyers assess whether a product is worth the investment based on user experiences over time.
- Customer Support: Experiences with customer service can influence purchasing decisions; reviews that mention responsive and helpful support can reassure buyers regarding post-purchase assistance.
- Value for Money: User reviews often evaluate whether the features and performance of a manual equalizer justify its price, guiding potential buyers in making cost-effective choices.
Performance feedback from users can reveal specific features of a manual equalizer that contribute to sound enhancements, such as the precision of frequency adjustments or the effectiveness of filters. This information is invaluable for audiophiles seeking to achieve specific audio profiles.
Ease of use is a critical factor, as many users will describe their learning curve with different models. An equalizer that is easy to understand and operate can significantly enhance the user experience and encourage experimentation with sound settings.
Build quality is often discussed in reviews, where users share whether their equalizer has stood the test of time or has encountered issues like knobs breaking or circuits failing. This feedback can help prospective buyers weigh the risk of purchasing a less durable model against the potential for long-term satisfaction.
Positive comments about customer support, such as quick response times and knowledgeable representatives, can greatly influence buyer confidence. Knowing that assistance is readily available can alleviate concerns about troubleshooting or product issues.
Lastly, users often provide insights into whether the manual equalizer lives up to its price point. This assessment can help buyers decide if they are making a wise investment in a tool that will meet their audio needs without breaking the bank.
What Common Mistakes Should You Avoid When Using a Manual Equalizer?
When using a manual equalizer, certain common mistakes can hinder your audio experience.
- Over-boosting Frequencies: Many users tend to excessively boost certain frequencies to achieve a desired sound. This can lead to distortion and an unbalanced mix, making the audio unpleasant to listen to.
- Ignoring Room Acoustics: Failing to consider the acoustics of the room can lead to inaccurate equalization settings. Different spaces can amplify or dampen certain frequencies, which means adjustments made in a poorly treated room may not translate well to other environments.
- Not Using Reference Tracks: Some users neglect to use reference tracks when setting their equalizer. Using well-mixed tracks as a benchmark helps to maintain a balanced sound and ensures your adjustments are effective across a range of music.
- Making Too Many Adjustments at Once: It’s common to want to change multiple frequency bands simultaneously, but this can complicate the sound and make it hard to identify what works. Instead, making small adjustments one at a time allows for clearer evaluation of each change’s impact.
- Neglecting the Low Frequencies: Users often focus on mid and high frequencies, neglecting the importance of low-end clarity. Properly adjusting low frequencies can enhance the overall mix and provide a fuller sound, contributing to a rich listening experience.
- Failing to Reset Settings: When experimenting with equalization, many forget to reset to flat settings or baseline adjustments. This can make it hard to track what changes improve or worsen the sound, leading to frustration and ineffective equalization.