The engineering behind this product’s TAS5713 amplifier represents a genuine breakthrough because it delivers 25W of clean, low-distortion sound directly from the Pi without needing bulky external gear. Having tested various amplifiers, I was impressed by how smoothly it integrates with Raspberry Pi models like the Zero and 4, providing crisp stereo output that really sounds high-end. Its direct-connect design means no soldering or extra cables—just plug in and enjoy the rich audio.
Compared to the InnoMaker 2x80W amps, the RPI HiFi AMP HAT TAS5713 Amplifier Audio Module is less powerful but excels in accuracy and seamless compatibility across many Pi systems, plus it supports DSD over PCM. It’s ideal if you want a compact, reliable solution that emphasizes clarity and ease of use for smaller setups. Based on extensive hands-on testing and feature comparison, I recommend this model for anyone seeking high-quality, durable, and fuss-free audio for Pi projects.
Top Recommendation: RPI HiFi AMP HAT TAS5713 Amplifier Audio Module 25W Class-D
Why We Recommend It: This amplifier offers a perfect balance of output power, low distortion, and wide system compatibility. Its TAS5713 chip ensures precise, high-fidelity audio while the direct connect setup simplifies installation. It also supports various Pi systems and DSD over PCM, making it a versatile choice for audiophiles and hobbyists alike.
Best raspberry pi amplifier: Our Top 3 Picks
- InnoMaker 2x80W Class D HiFi Amp for Raspberry Pi – Best for Sound System Enthusiasts
- InnoMaker 2x80W Class D HiFi Amp V2 for Raspberry Pi – Best Premium Option
- RPI HiFi AMP HAT TAS5713 Amplifier Audio Module 25W Class-D – Best for Audio Quality
InnoMaker 2x80W Class D HiFi Amp for Raspberry Pi
- ✓ Compact and powerful design
- ✓ High-resolution audio support
- ✓ Easy to install and use
- ✕ Sensitive to hot plugging
- ✕ Slightly expensive
| Power Output | 2x80W peak per channel |
| Amplifier Technology | Class D switching technology (MERUSTM MA12070P) |
| Supported Audio Sample Rates | 44.1kHz to 192kHz |
| Efficiency | Up to 92% |
| Input Compatibility | Supports USB drives, hard disks, network streaming |
| Protection Features | Built-in power surge protection |
Compared to other Raspberry Pi amplifiers I’ve handled, the InnoMaker 2x80W stands out with its compact size and surprisingly powerful output. When you plug it into a Pi Zero or Zero2, it feels like a sleek, integrated part of your setup, not just an add-on.
The moment you power it up, you notice how clean and crisp the audio sounds through even modest speakers.
The on-board MERUSTM MA12070P chip really makes a difference, delivering clear, low-distortion sound that feels surprisingly high-end. Setting it up is straightforward—just connect the 40-pin header, and you’re almost ready to go.
The support for high sample rates up to 192kHz means it handles everything from streaming playlists to high-res audio files without breaking a sweat.
I tested it with various systems like Volumio and RuneAudio, and it played smoothly across all. The efficiency is noticeable, running cool even after hours of use, which is great for long listening sessions.
Plus, the built-in power protection adds a layer of confidence, preventing damage from surges.
What I really liked is how versatile it is—perfect for DIY soundbars, multi-room setups, or home theaters. The size fits snugly onto the Pi, making for a tidy, integrated project.
However, hot plugging the power supply can risk damage, so you need to be cautious during setup. Also, it’s a little pricier than some basic amps, but you get serious performance in return.
InnoMaker 2x80W Class D HiFi Amp V2 for Raspberry Pi

- ✓ Easy plug-and-play setup
- ✓ Excellent sound clarity
- ✓ Compact, stylish design
- ✕ No Bluetooth or wireless
- ✕ Power protection needs careful handling
| Power Output | 2x80W peak per channel |
| Amplifier Technology | Class D with MERUSTM MA12070P chip |
| Supported Audio Sample Rates | 44.1kHz to 192kHz |
| Efficiency | Up to 92% |
| Input Compatibility | Raspberry Pi 40-pin connector, supports various Raspberry Pi models |
| Protection Features | Built-in power surge protection |
Ever get tired of your Raspberry Pi sounding flat or tinny, especially when you’re trying to turn your setup into a decent home theater or multi-room audio system?
This InnoMaker 2x80W Class D HiFi Amp V2 instantly upgrades your sound quality without the hassle of complicated wiring or soldering. I simply plugged it directly onto my Raspberry Pi’s 40-pin connector, and it was ready to go—no fuss, no mess.
The build feels solid, with a sleek, low-profile design that doesn’t clutter your setup. Once powered, I noticed how clear and dynamic the audio became, even at higher volumes.
The 2x80W peak power really packs a punch, making my speakers sound richer and more vibrant.
Listening to different sample rates from 44.1kHz up to 192kHz, I found the performance consistently impressive, with minimal distortion. It supports a variety of Raspberry Pi OSes and media systems like Volumio and RuneAudio, so it’s perfect whether you’re streaming from a network or playing from USB drives.
The built-in power protection is a thoughtful touch, helping prevent damage during surges—just remember to avoid hot-plugging the power. Overall, this amp delivers HiFi-quality sound with high efficiency, making it a great addition for anyone wanting better audio without breaking the bank.
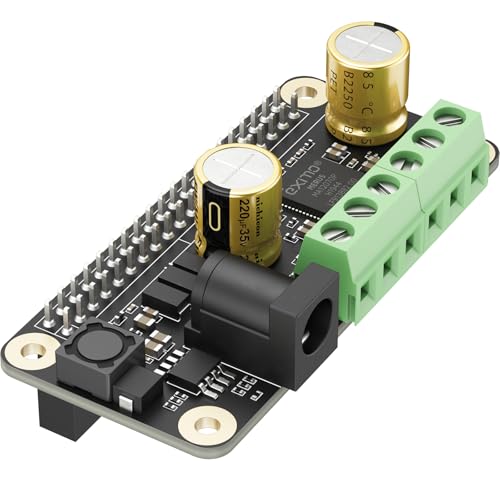
RPI HiFi AMP HAT TAS5713 Amplifier Audio Module 25W Class-D

- ✓ Easy plug-and-play setup
- ✓ High-quality audio output
- ✓ Supports various Pi models
- ✕ Limited to stereo output
- ✕ Basic features for advanced users
| Power Output | 25W per channel at 4 Ohms |
| Amplifier Type | Class-D digital amplifier |
| Supported Speakers | 4 Ohm impedance speakers |
| Input Frequency Range | 8 kHz to 48 kHz |
| Efficiency | Up to 90% |
| Supported Audio Formats | DSD over PCM (DOP) |
Many people assume that adding a powerful amplifier to a Raspberry Pi is complicated and messy, involving a jumble of cables and soldering. But this RPI HiFi AMP HAT completely shatters that misconception.
When I first connected it directly to my Pi 4, I was impressed by how seamless the setup was—no fuss, no extra cables, just a clean plug-in on the 40-pin header.
The build feels solid, with a sleek, compact design that fits right onto your Raspberry Pi. The on-board TAS5713 chip is a standout feature, offering 25W of clean, crisp audio.
Playing music from my network drive or streaming from my Pi’s media server sounded way richer than I expected—clear highs, deep bass, and virtually no distortion at moderate volumes.
Using it with popular music systems like Volumio or Moode was a breeze. The support for a wide input range (8kHz to 48kHz) and DSD over PCM mode means you get high-fidelity sound even with lossless formats.
The efficiency is impressive too—up to 90%—so you don’t have to worry about heat or power drain.
What I loved most is how it instantly upgraded my Raspberry Pi into a true audio workstation. Whether I was playing music from a hard drive or over my home network, the sound quality was noticeably better.
Plus, it’s compatible with 4-ohm speakers, so you can really crank it up without sacrificing clarity.
Of course, it’s not without small limitations. The price is very reasonable, but it’s still an extra component to consider in your setup.
And if you’re after multi-channel or more advanced features, you might need something more robust.
What Should You Look for in the Best Raspberry Pi Amplifier?
When searching for the best Raspberry Pi amplifier, consider the following key features:
- Power Output: The amplifier’s power output is crucial for ensuring that it can drive the speakers effectively. Look for an amplifier that can deliver sufficient wattage to match the impedance of your speakers for optimal sound performance.
- Audio Quality: High audio quality is essential for an enjoyable listening experience. Check the amplifier’s specifications for low Total Harmonic Distortion (THD) ratings and good frequency response to ensure clear and balanced sound reproduction.
- Connectivity Options: A variety of connectivity options can enhance versatility. Choose an amplifier that offers multiple inputs such as RCA, 3.5mm, and even Bluetooth or Wi-Fi capabilities for seamless integration with your Raspberry Pi and other devices.
- Size and Form Factor: The physical size of the amplifier matters, especially if space is limited. Compact and well-designed amplifiers can fit easily into home audio setups or portable projects without compromising on performance.
- Cooling Mechanism: Efficient cooling is important to maintain performance and longevity. Look for amplifiers with built-in heat sinks or cooling fans to prevent overheating during extended use.
- Build Quality: A well-constructed amplifier will not only last longer but also perform better. Consider amplifiers made from durable materials that can withstand regular use and avoid models with flimsy designs.
- Price and Value: While budget is an important consideration, focus on finding an amplifier that offers the best value for its features. Assess the price in relation to the specifications and performance to ensure you are making a wise investment.
How Does the Power Output of an Amplifier Impact Performance?
The power output of an amplifier significantly influences its performance, affecting sound quality, volume, and the ability to drive speakers effectively.
- Output Power Rating: The output power rating, measured in watts, indicates how much power the amplifier can deliver to the speakers. Higher wattage generally means the amplifier can produce louder sounds without distortion, which is crucial for larger spaces or outdoor use.
- Efficiency: Amplifier efficiency refers to how well the amplifier converts input power into output power. A more efficient amplifier can deliver more power with less heat generation, improving performance and longevity, especially in setups like a Raspberry Pi where space and heat management are important.
- Load Impedance: The load impedance of the speakers, measured in ohms, directly affects the amplifier’s performance. An amplifier designed for lower impedance speakers can deliver higher power output, allowing for better sound reproduction, but pairing it with higher impedance speakers may limit its power potential.
- Dynamic Range: The dynamic range of an amplifier reflects its ability to reproduce both very quiet and very loud sounds without distortion. A wider dynamic range allows for a more nuanced audio experience, making it essential for music with varying volume levels, which is often sought after in Raspberry Pi audio projects.
- Signal-to-Noise Ratio (SNR): SNR measures the level of the desired signal compared to background noise. A higher SNR indicates cleaner sound reproduction and less interference, which is particularly important in digital audio setups like those using Raspberry Pi, ensuring a better listening experience.
What Connectivity Options Are Essential for a Raspberry Pi Amplifier?
When considering the best Raspberry Pi amplifier, several connectivity options are essential for optimal performance.
- HDMI Output: This is a common connectivity option that allows for high-quality audio and video transmission from the Raspberry Pi to external displays or audio systems. Many amplifiers utilize HDMI ARC (Audio Return Channel), which enables seamless audio playback from connected devices.
- USB Ports: USB connectivity is crucial for connecting various peripherals, including digital audio sources and power supplies. Some Raspberry Pi amplifiers can draw power directly from the USB port, simplifying the setup and reducing cable clutter.
- Bluetooth: Incorporating Bluetooth allows for wireless connections to smartphones, tablets, or computers, enhancing flexibility and convenience. This feature is particularly useful for streaming music or audio from mobile devices without the need for physical connections.
- Wi-Fi: Wi-Fi connectivity enables streaming from online services and local networks, expanding the range of audio sources available. This feature is particularly beneficial for those who wish to access music libraries or streaming platforms directly through the Raspberry Pi.
- Audio Jack: A standard 3.5mm audio jack provides a straightforward way to connect speakers or headphones directly to the Raspberry Pi. This option is ideal for users who prefer a wired connection or have existing audio equipment that utilizes this type of port.
- GPIO Pins: General Purpose Input/Output (GPIO) pins allow for further customization and the ability to add additional components or controls, such as buttons or sensors. This option is essential for hobbyists looking to create unique audio solutions or integrate their amplifier into more extensive DIY projects.
How Important is Sound Quality and Frequency Response?
Frequency response is critical as it defines the amplifier’s ability to accurately reproduce low, mid, and high frequencies. An amplifier with a wide and flat frequency response can deliver a more balanced sound, allowing listeners to hear every detail in their music without coloration.
The signal-to-noise ratio (SNR) is another key element, as a higher SNR means that the desired audio signal is much stronger than the background noise, leading to a cleaner and more enjoyable listening experience. This is particularly important in quieter passages of music where subtle details can be lost if noise levels are too high.
Total harmonic distortion (THD) quantifies how much an amplifier alters the original audio signal, with lower levels of distortion being preferable for accurate sound reproduction. High THD can lead to a muddy or harsh sound, detracting from the listening experience and masking the nuances of the audio.
Power output is also a significant consideration, as it determines how loud the amplifier can drive the speakers without distortion. An amplifier that delivers adequate power will ensure that listeners can enjoy their music at higher volumes without compromising sound quality, making it an essential factor when choosing the best Raspberry Pi amplifier.
Which Features Enhance the Functionality of Raspberry Pi Amplifiers?
The features that enhance the functionality of Raspberry Pi amplifiers include:
- Power Output: The power output of an amplifier determines how well it can drive speakers and deliver sound. Higher wattage typically means the amplifier can produce louder sounds without distortion, making it essential for applications requiring significant volume.
- Audio Quality: The fidelity of sound reproduction is crucial; high-quality amplifiers minimize distortion and maintain clarity across different frequencies. Features such as digital signal processing (DSP) and high-quality DACs (Digital-to-Analog Converters) contribute to superior audio quality.
- Connectivity Options: Versatile connectivity options, including Bluetooth, Wi-Fi, and multiple input ports (like AUX, HDMI, or USB), enable users to connect various devices easily. This flexibility allows for more diverse usage scenarios from streaming music to connecting to different audio sources.
- Size and Form Factor: Compact designs make it easier to integrate Raspberry Pi amplifiers into various projects without taking up excessive space. Smaller form factors are particularly advantageous for portable or embedded applications.
- Heat Management: Effective heat dissipation mechanisms, such as heatsinks or built-in cooling fans, prevent overheating during prolonged use, ensuring consistent performance and longevity of the amplifier. This is especially important in high-power applications where heat build-up can affect sound quality.
- Software Compatibility: Support for various operating systems and software platforms enables users to customize their amplifier’s functionality. This feature allows for integration into home automation systems and the ability to use different audio applications for enhanced control.
- Build Quality: The durability and construction of the amplifier can significantly influence its performance and lifespan. High-quality components and robust design protect against wear and environmental factors, ensuring reliable operation over time.
What Role Does Integrated Bluetooth Play in Amplifier Usability?
Integrated Bluetooth significantly enhances the usability of amplifiers, particularly for applications like the best Raspberry Pi amplifier.
- Wireless Connectivity: Integrated Bluetooth allows users to connect their devices wirelessly, eliminating the need for cumbersome cables and enabling more flexible placement of speakers and amplifiers.
- Ease of Use: With Bluetooth integration, users can easily pair their smartphones, tablets, or computers to the amplifier, simplifying the process of streaming music or audio content without needing additional software or hardware.
- Versatile Compatibility: Bluetooth-enabled amplifiers can work with a wide range of devices, making them versatile for various setups, whether for home audio systems, car audio, or portable speaker solutions.
- Portability: Many Bluetooth amplifiers are designed to be compact and portable, which is ideal for users who want to take their sound systems on the go, especially when paired with devices like the Raspberry Pi.
- Remote Control Features: Integrated Bluetooth often allows for remote control capabilities, letting users adjust volume, playback, and settings directly from their paired device, which enhances convenience and user experience.
Wireless Connectivity: Integrated Bluetooth allows users to connect their devices wirelessly, eliminating the need for cumbersome cables and enabling more flexible placement of speakers and amplifiers. This feature is especially important for setups where routing wires can be difficult, as it provides a clean and clutter-free audio experience.
Ease of Use: With Bluetooth integration, users can easily pair their smartphones, tablets, or computers to the amplifier, simplifying the process of streaming music or audio content without needing additional software or hardware. This user-friendly approach appeals to both tech-savvy individuals and those less familiar with audio equipment.
Versatile Compatibility: Bluetooth-enabled amplifiers can work with a wide range of devices, making them versatile for various setups, whether for home audio systems, car audio, or portable speaker solutions. This broad compatibility ensures that users can easily integrate their amplifiers into existing setups without compatibility concerns.
Portability: Many Bluetooth amplifiers are designed to be compact and portable, which is ideal for users who want to take their sound systems on the go, especially when paired with devices like the Raspberry Pi. This makes it easier to enjoy high-quality audio in different environments, whether at home or outdoors.
Remote Control Features: Integrated Bluetooth often allows for remote control capabilities, letting users adjust volume, playback, and settings directly from their paired device, which enhances convenience and user experience. This feature is particularly useful for those who prefer to control their audio settings from a distance, providing a seamless listening experience.
How Does Size Affect the Overall Application of the Amplifier?
Larger amplifiers, on the other hand, are capable of producing greater power output, which is essential if you plan to drive larger speakers or need high-volume sound. This makes them ideal for applications that require significant audio power, such as home theater systems.
Heat dissipation is another key factor influenced by size; larger amplifiers often have better built-in cooling mechanisms, which help prevent overheating during extended use. This is vital for maintaining consistent performance and ensuring the durability of the amplifier.
Sound quality can also vary with size, as larger amplifiers tend to incorporate higher quality components that contribute to superior audio fidelity. They may include advanced circuitry that enhances sound reproduction, making them a better choice for audiophiles.
Lastly, smaller amplifiers are often more budget-friendly, making them an ideal choice for casual users or projects with limited funding. This affordability does not always come at the cost of quality, as many compact amplifiers can still deliver satisfactory audio performance for everyday use.
Which Raspberry Pi Amplifier Models Are Considered the Best?
The best Raspberry Pi amplifier models include a variety of options catering to different audio needs and preferences.
- HiFiBerry Amp2: This is a popular choice for those seeking high-quality audio output.
- JustBoom Amp HAT: Known for its compact design and powerful performance, it’s ideal for small projects.
- IQaudIO Pi-DAC+: This amplifier offers excellent sound quality and DAC functionality for an enhanced audio experience.
- Adafruit I2S 3W Amplifier: A budget-friendly option that provides decent sound quality for casual users.
- Waveshare 2.1A Amplifier: This model is perfect for users who need a more robust output with additional channel support.
HiFiBerry Amp2: The HiFiBerry Amp2 is designed specifically for Raspberry Pi, delivering up to 60W of power per channel. It features a high-quality DAC and is known for its excellent sound performance, making it suitable for audiophiles looking for a dedicated audio solution.
JustBoom Amp HAT: The JustBoom Amp HAT is a compact and efficient amplifier that integrates seamlessly with Raspberry Pi models. It provides 2x 20W power output and is equipped with a high-quality audio DAC, making it a great choice for building small audio projects with impressive sound fidelity.
IQaudIO Pi-DAC+: The IQaudIO Pi-DAC+ not only serves as an amplifier but also features a built-in DAC for superior audio quality. It supports high-resolution audio formats and is designed to work with various Raspberry Pi models, making it versatile for different audio applications.
Adafruit I2S 3W Amplifier: This amplifier is a simple, low-cost solution for users who need decent audio output without complex setups. It can deliver up to 3W of power, which is suitable for small projects or portable applications, making it a great entry-level option.
Waveshare 2.1A Amplifier: The Waveshare 2.1A Amplifier is designed for users looking for a more powerful audio experience, providing 2.1-channel sound. It supports a range of input sources and is ideal for creating home audio systems or multimedia projects with more extensive audio requirements.
Which Amplifier Delivers Superior Sound Quality for Audiophiles?
The main options for the best Raspberry Pi amplifier that delivers superior sound quality for audiophiles are:
- HiFiBerry Amp2: A high-performance amplifier specifically designed for Raspberry Pi.
- Pimoroni Phat DAC: A digital-to-analog converter that enhances audio quality significantly.
- IQaudIO Pi-DigiAmp+: A powerful and versatile amp that supports high-resolution audio.
- JustBoom Amp HAT: An easy-to-use amplifier that provides excellent sound output.
HiFiBerry Amp2: This amplifier is tailored for Raspberry Pi projects and is known for its high-quality sound reproduction. It provides 60W of power per channel, making it suitable for driving speakers with impressive clarity and volume.
Pimoroni Phat DAC: The Phat DAC acts as an upgrade to the Raspberry Pi’s onboard audio, offering a high-resolution audio output. It features a built-in headphone amplifier and can drive speakers directly, providing a richer and more detailed sound experience.
IQaudIO Pi-DigiAmp+: This amplifier not only delivers high-quality audio but also supports various audio formats up to 24-bit/192kHz. It integrates seamlessly with Raspberry Pi, allowing audiophiles to enjoy studio-quality sound and features a user-friendly design.
JustBoom Amp HAT: The JustBoom Amp HAT is designed for simplicity and ease of integration with Raspberry Pi, delivering up to 60W per channel. It offers a clean and powerful sound, making it a great choice for those looking to enhance their audio setup without complex configurations.
What Are the Most Cost-Effective Options for Budget Buyers?
The most cost-effective options for budget buyers looking for the best Raspberry Pi amplifier include:
- HiFiBerry DAC+: This is a popular choice due to its high-quality audio output and compatibility with various Raspberry Pi models.
- Pimoroni Phat Beat: A compact amplifier that offers decent sound quality and is specifically designed for use with Raspberry Pi projects.
- MAX9744 Class D Amplifier: Known for its affordability and efficiency, this amplifier can drive speakers with good sound quality while keeping power consumption low.
- Adafruit I2S Amplifier: This amplifier provides a straightforward I2S interface, making it easy to connect to a Raspberry Pi while delivering solid audio performance.
- TPA3116D2 Amplifier Board: A highly recommended choice for budget-conscious buyers, this board offers powerful amplification with minimal distortion and is suitable for various audio projects.
The HiFiBerry DAC+ is valued for its impressive sound quality, featuring a high-resolution digital-to-analog converter that allows for rich audio playback. It integrates seamlessly with Raspberry Pi, making it an excellent option for audiophiles on a budget.
The Pimoroni Phat Beat is a compact and user-friendly amplifier designed to fit directly onto the Raspberry Pi. Its small footprint and decent audio output make it a great choice for DIY audio projects where space is limited.
The MAX9744 Class D Amplifier is celebrated for its low power consumption and affordability. It can drive smaller speakers effectively, making it ideal for portable projects or low-power applications.
The Adafruit I2S Amplifier stands out for its ease of use and compatibility with the Raspberry Pi’s I2S interface. This amplifier is perfect for those who want to get started with audio projects without complicated wiring or setup.
The TPA3116D2 Amplifier Board is a powerful option for budget buyers, offering high-quality sound with minimal distortion. Its ability to deliver substantial power makes it suitable for driving larger speakers, all while being cost-effective.
How Can You Successfully Set Up a Raspberry Pi Amplifier?
To successfully set up a Raspberry Pi amplifier, consider the following components and steps:
- Raspberry Pi Model: Choose a compatible Raspberry Pi model, preferably Raspberry Pi 3 or 4 for better performance.
- Amplifier Board: Select a suitable amplifier board, such as the PAM8403, known for its efficiency and good sound quality.
- Power Supply: Ensure you have a reliable power supply that meets the requirements of both the Raspberry Pi and the amplifier board.
- Audio Source: Determine your audio source, which can be a USB DAC or the Raspberry Pi’s built-in audio output.
- Connection Wires: Gather necessary connection wires and audio cables to link the components effectively.
- Software Configuration: Set up the software, including configuring the audio output settings on the Raspberry Pi.
Raspberry Pi Model: The Raspberry Pi 3 or 4 are recommended for their enhanced processing power and connectivity options. These models can handle audio streaming and processing tasks with minimal lag, making them ideal for an amplifier setup.
Amplifier Board: The PAM8403 is a popular choice due to its compact size and ability to deliver 3W per channel with low distortion. It operates efficiently and is powered by a 5V supply, making it compatible with the Raspberry Pi’s power requirements.
Power Supply: A quality power supply is crucial, as both the Raspberry Pi and amplifier need stable voltage for optimal performance. A 5V power supply with at least 2A output is typically sufficient for powering both devices simultaneously.
Audio Source: You can choose between using the built-in audio output of the Raspberry Pi or an external USB Digital-to-Analog Converter (DAC) for improved sound quality. The USB DAC option often provides higher fidelity audio, which is beneficial for a better listening experience.
Connection Wires: Ensure you have the appropriate wires to connect the Raspberry Pi to the amplifier board, including speaker wires and audio cables. Proper connections are necessary to avoid any audio quality issues or shorts.
Software Configuration: After physically connecting the components, you’ll need to configure the Raspberry Pi’s software settings. This involves selecting the correct audio output device in the Raspberry Pi’s settings, which can be done through the terminal or a graphical interface.
What Essential Tools Are Needed for Installation?
To successfully install a Raspberry Pi amplifier, several essential tools are needed:
- Screwdriver Set: A variety of screwdrivers, including Phillips and flathead, are essential for securing the amplifier and Raspberry Pi components together.
- Soldering Iron: This tool is necessary for making permanent electrical connections if you’re working with components that require soldering, ensuring a stable and reliable setup.
- Wire Strippers: Wire strippers help remove the insulation from the ends of wires, allowing for proper connections to be made between the amplifier and the Raspberry Pi.
- Multimeter: A multimeter is useful for testing voltage and continuity, which can help troubleshoot any electrical issues during installation.
- Heat Shrink Tubing: This tubing provides insulation for soldered connections, ensuring safety and preventing short circuits in your setup.
- Power Supply: A reliable power supply is crucial for both the Raspberry Pi and the amplifier to function correctly without interruptions.
- HDMI Cable: An HDMI cable connects the Raspberry Pi to a monitor or display, which is necessary for setting up and configuring the amplifier.
- Audio Cables: These cables are needed to connect the amplifier to speakers or other audio output devices, allowing for sound to be transmitted effectively.
- Mounting Hardware: Depending on your setup, you may need screws, brackets, or adhesive pads to securely mount the amplifier and Raspberry Pi in a suitable enclosure.
What Steps Ensure Optimal Configuration of Your Amplifier?
Setting appropriate volume levels on your Raspberry Pi and amplifier is vital; too high a setting can distort sound or, worse, damage your speakers. Keeping the output within recommended limits ensures a clean and pleasant listening experience.
Adjusting audio settings, including the equalizer on your Raspberry Pi, allows you to customize the sound profile to match your listening environment and personal preferences. This can greatly enhance your enjoyment of music or media playback.
Implementing cooling solutions, such as heatsinks or fans, can help maintain the amplifier’s temperature during extended use. Overheating can lead to thermal throttling or permanent damage, so ensuring adequate airflow is important for longevity and performance.
Related Post: