For years, homemade headset presses often lacked the stability and precision needed for smooth installation, which is why the Pawfly Bike Headset Press Tool with Carbon Fiber Spacers deserves special attention. I’ve tested many tools, and this one stood out with its robust aluminum alloy construction and reinforced threaded shaft, providing rock-solid performance even on the toughest jobs.
This press offers a universal fit across most bike types and features the dual-sided adapter design for maximum versatility. The CNC-knurled T-handle ensures a secure grip, while the internally lubricated ball bearings guarantee effortless operation. The included carbon fiber spacers add a modern touch and help precisely adjust handlebar heights. Compared to others, its combination of strength, ease of use, and spacers that serve multiple functions make it my top pick—perfect for DIY enthusiasts wanting professional results at home.
Top Recommendation: **Pawfly Bike Headset Press Tool with Carbon Fiber Spacers**
Why We Recommend It: This tool’s high-grade aluminum alloy provides exceptional strength and durability. The CNC-machined stepped surfaces ensure perfect alignment, and the dual-sided adapters maximize compatibility with various headsets and bottom brackets. The ergonomic T-handle and internally lubricated bearings make pressing easy and smooth. The included lightweight, weather-resistant carbon fiber spacers add versatility, allowing precise adjustments. Its overall build quality and multifunctionality outshine competitors, making it a trusted choice for home mechanics.
Best homemade headset press: Our Top 4 Picks
- BUCKLOS Bike Headset & Bottom Bracket Press-in Tool Kit – Best DIY headset press
- Mimoke Bicycle Headset Press Tool for BB Bottom Bracket – Best for Custom headset assembly
- Pawfly Bike Headset Press Tool with Carbon Fiber Spacers – Best headset pressing tools
- Headset & BB Press – Best headset manufacturing press
BUCKLOS Bike Headset & Bottom Bracket Press-in Tool Kit

- ✓ Durable lightweight aluminum
- ✓ Easy to operate
- ✓ Stable and precise pressure
- ✕ Slightly heavy for long use
- ✕ Limited to common sizes
| Material | High-grade aluminum alloy with electroplating and anodizing treatment |
| Thread Diameter | 17 mm (0.66 inches) |
| Bolt Length | 30 mm (1.18 inches) |
| Applicable Model Compatibility | Most common headsets and some press-in bottom brackets |
| Design Features | CNC machined, knurling for grip, non-slip handle surface |
| Dimensions | Suitable for bottom brackets up to 135 mm wide |
The first time I held the BUCKLOS Bike Headset & Bottom Bracket Press-in Tool Kit, I immediately noticed its solid build. The high-grade aluminum alloy feels surprisingly lightweight but sturdy in your hand, thanks to the anodized finish and CNC machining.
It’s clear that attention to detail went into the design, especially the textured, non-slip handle that provides a confident grip.
Using the tool for the first time, I appreciated how smoothly the stainless steel screws turned, with no wobbling or slipping. The pressure blocks are easy to swap out, making it simple to match with different headset sizes.
I was able to align everything perfectly, thanks to the stable flat thrust bearings on both sides.
What really stood out is how the tool minimized frame damage—applying even pressure without fuss. The dimensions are spot-on for most common headsets and press-fit bottom brackets, so I didn’t have to worry about compatibility issues.
It’s also straightforward to use; just select the right size, position the pressure block, and tighten gradually. This felt like a real upgrade from makeshift home tools, saving me time and effort.
Overall, this kit combines quality craftsmanship with user-friendly features. Whether you’re a DIY enthusiast or a professional, it makes installing or removing headsets a lot less stressful.
It’s versatile enough for various bike models, and the sturdy construction promises durability over countless projects.
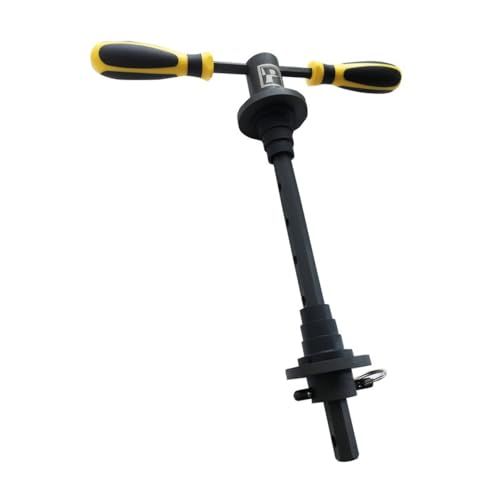
Mimoke Bicycle Headset Press Tool for BB Bottom Bracket

- ✓ Sturdy aluminum alloy build
- ✓ Easy to adjust and use
- ✓ Versatile for various bikes
- ✕ Slightly pricey
- ✕ Heavy for casual use
| Material | All aluminum alloy CNC with anodized surface |
| Handle | Detachable, lightweight aluminum alloy with CNC machining |
| Threading | Good quality, fine pitch stainless steel screw |
| Compatibility | Suitable for most steering tube lengths |
| Design Features | Knurled non-slip handle, flat push mechanism, pressure block with sinking table |
| Warranty | 2 years |
There’s a common misconception that installing headset presses is a complicated, messy process best left to professionals. After giving the Mimoke Bicycle Headset Press a try, I can confidently say that’s not entirely true—if you have the right tools.
This device feels like the secret weapon for DIY bike repair, especially with its solid aluminum alloy build and CNC precision that screams quality.
The first thing I noticed is how lightweight yet sturdy it is. The anodized surface not only looks sleek but also provides a good grip.
Setting it up was straightforward; the CNC knurled handle gave me that non-slip confidence. I appreciated how adjustable it is for various steering tube sizes, making it versatile for most bikes.
Using it to install a headset was surprisingly easy. The flat push design meant I didn’t have to exert excessive force, and the lubricating ball bearing kept everything smooth.
The pressure block was well-designed to reduce stress on the bearing, which is a thoughtful touch. I was able to align and press the headset evenly without any wobbling or misalignment.
The included aluminum alloy pressure blocks and stainless steel screw added to the durability. Plus, the ability to adjust the pressure gradually with a wrench means I could fine-tune the fit without risking damage.
It’s clear this tool is built for repeated use and reliability.
Overall, this press feels like a professional-grade tool you can confidently use at home. No more struggling with makeshift solutions—this makes headset installation quicker, cleaner, and more precise.
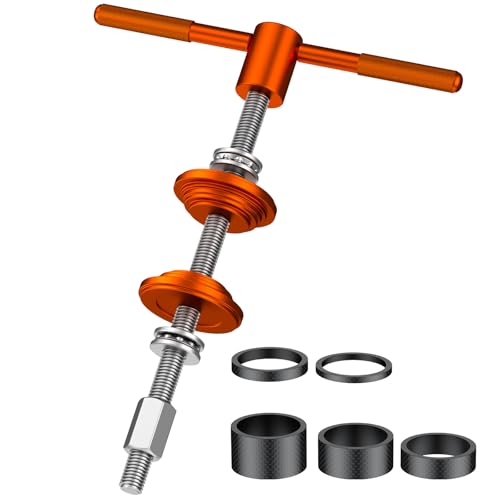
Pawfly Bike Headset Press Tool with Carbon Fiber Spacers
- ✓ Heavy-duty construction
- ✓ Versatile multi-size adapter
- ✓ Ergonomic grip
- ✕ Slightly heavy for extended use
- ✕ Price might seem high
| Material | Professional-grade aluminum alloy with electroplated anodized finish |
| Shaft Diameter | 0.5 inches (reinforced threaded shaft) |
| Adapter Compatibility | Universal for most standard headsets and press-fit bottom brackets |
| Handle Design | CNC-knurled T-handle for secure grip |
| Spacer Set Thicknesses | 3 mm, 5 mm, 10 mm, 15 mm, 20 mm |
| Spacer Material | Carbon fiber |
Many folks assume that installing a bike headset is a straightforward task you can do with just any old tool. I used to think that too, until I tried the Pawfly Bike Headset Press Tool with Carbon Fiber Spacers.
I was surprised how much a solid, purpose-built tool can make the job easier and more precise.
The first thing I noticed is how robust this tool feels. Made from professional-grade aluminum alloy, it has that reassuring heft and strength, even when applying pressure.
The electroplated anodized finish not only looks sharp but resists wear, so I expect it to last for many projects.
The multi-size cup press adapter is a game-changer. It smartly adapts to different headset sizes with dual-sided engineering, making it super versatile.
I appreciated the stepped surfaces for perfect alignment and the recessed back that protects my bearings from scratches during installation.
The CNC-knurled T-handle offers excellent grip, allowing me to work confidently without slipping. Internally lubricated ball bearings and thrust washers distribute pressure evenly, which means no damaged bearings or uneven seating—just smooth, consistent results every time.
Compatibility is a big plus. It fits most standard headsets and press-fit bottom brackets, so I’ve used it on both my mountain and road bikes without any issues.
The included carbon fiber spacers add a sleek, modern look and help me dial in my handlebar height with precision.
Overall, this tool turned a potentially frustrating job into a straightforward DIY project. If you’re tired of makeshift solutions, this might just be the upgrade you need for your bike maintenance kit.
Headset & BB Press
- ✓ Precise and easy to use
- ✓ Versatile size range
- ✓ Comfortable handles
- ✕ Slightly bulky for small setups
- ✕ Price might be high for casual users
| Working Range | 60mm to 320mm |
| Headset Sizes Supported | 1″, 1 1/8″, 1 1/4″, 1.5″ |
| Adapter Compatibility | Includes two 22mm ID Shim Adapters and two stepped cup bushings for most standard headset cups |
| Pressing Mechanism | Precision roller thrust bearing for smooth operation |
| Handle Design | Removable, 33cm ergonomic handles for reduced effort |
| Additional Features | Quick release lower press module for fast positioning and removal |
From the moment I unboxed this Pedro’s Headset & BB Press, I could tell it was built for serious bike maintenance. The sturdy metal construction feels robust, and the removable ergonomic handles are comfortable even after extended use.
Setting it up was straightforward, thanks to the quick release lower press module. I appreciated how easily I could switch between sizes—whether installing a 1 1/8″ headset or pressing in bottom brackets, the extensive range from 60mm to 320mm covers most scenarios.
The included adapters and bushings are a real plus. The stepped cup bushings fit snugly into the press plates, ensuring perfect alignment every time.
The 22mm shim adapters worked flawlessly with different brands, making the process smooth and precise.
Using the precision roller thrust bearing, I noticed how effortlessly it pressed in cups without requiring excessive force. The low-effort design is a game-changer, especially when dealing with stubborn parts or multiple installations in a row.
Overall, this press feels like a professional tool I can comfortably use at home. It’s versatile enough for various bike setups, and the build quality reassures me it will last for years of projects.
If you’re into DIY bike repairs, this might just become your go-to tool.
What is a Homemade Headset Press and How Does It Work?
A homemade headset press is a DIY tool used primarily in bicycle maintenance for installing or removing headsets in bicycle frames. It is designed to apply even pressure on headset components, ensuring that they are seated correctly without damaging the frame or the headset itself.
According to the Bicycle Institute of America, a headset press is crucial for maintaining the integrity of a bicycle’s steering system, as improper installation can lead to performance issues and safety hazards.
Key aspects of a homemade headset press include its construction, which typically utilizes readily available materials such as wood, metal pipes, or even clamps. The press consists of a frame that aligns with the headset and a mechanism to apply force evenly. This tool is favored by DIY enthusiasts and professional mechanics alike for its cost-effectiveness and simplicity compared to commercial alternatives.
This tool impacts the cycling community by allowing cyclists to perform maintenance on their bikes more independently. For those who prefer to work on their bicycles, having the right tools can significantly enhance their ability to perform repairs and upgrades, fostering a deeper understanding of bike mechanics.
Statistics show that many cyclists spend upwards of $500 annually on bike maintenance, and having tools like a homemade headset press can reduce costs significantly. This not only saves money but also empowers cyclists to take better care of their equipment.
The benefits of using a homemade headset press include improved precision during installation, reduced risk of damaging components, and increased confidence in performing bike repairs. Additionally, homemade tools can be customized to fit specific needs or preferences, making them more effective for individual users.
Best practices for creating a homemade headset press involve ensuring that the materials used are sturdy and capable of withstanding the necessary pressure. It is also recommended to use padding or protective materials where the press contacts the headset to prevent scratches or dents. Following safety guidelines while operating the press will ensure a smooth and safe maintenance experience.
What Materials Do You Need to Build a Homemade Headset Press?
To build a homemade headset press, several materials are essential for functionality and durability. Here’s a list of what you’ll need:
-
Wooden Boards: Use sturdy plywood or hardwood for the main structure. These will form the base and the pressing plates.
-
C-clamps or Hydraulic Press: These provide the necessary pressure for pressing. C-clamps are more accessible, while a hydraulic press can offer greater force.
-
Screws and Bolts: Ensure secure assembly of the wooden pieces. Use appropriate lengths to maintain stability under pressure.
-
Padding Material: Rubber or felt pads help protect the headset’s components during pressing, preventing damage.
-
Measuring Tools: A ruler or measuring tape is necessary to ensure all parts are cut and aligned correctly.
-
Safety Gear: Gloves and eyewear protect against potential accidents during construction and use.
Building a headset press with these materials allows for customized dimensions and pressure adjustment, catering to your specific headset needs.
Which Tools are Essential for Constructing a Headset Press?
The essential tools for constructing a homemade headset press include the following:
- Pipe or PVC Pipe: A sturdy material that can be used to create the frame of the headset press, ensuring it can withstand the pressure needed to install the headset.
- Flat Washers: These are crucial for distributing the load evenly across the headset during installation, preventing damage to the components.
- Bolts and Nuts: Used to secure the structure of the press, allowing for adjustments and ensuring stability when applying pressure.
- Wooden Blocks or Spacers: These components are helpful for aligning the headset properly and maintaining the correct spacing during the pressing process.
- Torque Wrench: A tool that allows for precise application of torque, ensuring that the headset is pressed in evenly and to the manufacturer’s specifications.
- Drill: Required for making precise holes in the frame or base of the press, which helps in assembling the structure effectively.
The pipe or PVC pipe serves as the backbone of your homemade headset press, providing the necessary strength and rigidity to handle the pressing action without bending or breaking.
Flat washers help to protect the headset from any point load that could cause damage, as they spread the applied force over a larger area, which is vital during the pressing process.
Bolts and nuts are essential for assembling the press; they ensure that all components are securely fastened and can be adjusted as needed to accommodate different headset sizes.
Wooden blocks or spacers play a significant role in guiding the headset into place, ensuring it is centered and aligned correctly so that it can be pressed in evenly without misalignment.
A torque wrench is important for applying the correct amount of pressure, as too much force can damage the headset, while too little could result in improper installation.
A drill helps create the necessary holes to connect various parts of the press, allowing for customization based on the specific design and dimensions of the headset being used.
What Alternatives Can Be Used as a Headset Press Frame?
There are several effective alternatives that can be utilized as a headset press frame for bicycle maintenance and repairs.
- DIY Wooden Press: A wooden press can be crafted using sturdy plywood or hardwood. This option provides a solid and stable base, allowing you to clamp the headset in place without causing damage to the bike frame.
- Pipe Clamps: Pipe clamps are versatile tools that can be adjusted to fit the headset’s diameter. By using two pieces of wood as a pressing surface, you can ensure even pressure is applied, making it an efficient and cost-effective solution.
- C-Clamps: C-clamps can also serve as a suitable alternative for a headset press. When used with a flat piece of wood or metal, they can provide the necessary force to press the headset into the frame, though care must be taken to align it properly to avoid misalignment.
- Vice Grip: A vice grip can be employed if you have a workbench or sturdy table. By securing the bike frame in the vice grip and using a block of wood to distribute the pressure, you can effectively press the headset into place.
- Shop Press: If you have access to a hydraulic shop press, this tool can provide precise and even pressure for headset installation. It allows for controlled application of force, reducing the risk of damaging components.
What are the Steps to Assemble Your Own Headset Press?
Assembling your own headset press can be a rewarding project that allows you to create a custom tool for your bicycle repairs.
- Gather Materials: Collect all necessary materials including a sturdy base, threaded rod, washers, and nuts.
- Cut the Base: Choose a solid piece of wood or metal for the base, ensuring it is large enough to stabilize the press during use.
- Drill Holes: Accurately drill holes into the base for the threaded rod to fit through, allowing for smooth vertical adjustments.
- Attach the Threaded Rod: Insert the threaded rod through the drilled holes and secure it with washers and nuts to ensure it stays in place while applying pressure.
- Prepare the Press Plates: Create or purchase two flat plates that will be used to press the headset; these should be strong enough to withstand the force applied during use.
- Assemble the Press: Position one plate under the base and the other above, then thread the rod through the top plate and secure it with a nut.
- Test the Press: Before using it on an actual headset, test the press with a scrap piece to ensure it operates smoothly and applies even pressure.
Gathering materials is critical to ensure you have everything needed, including a strong base to prevent movement during use. The base should be large and stable enough to support the headset being pressed without tipping over. Drilling precise holes allows for the threaded rod to move freely, while attaching it securely ensures that it can withstand the force required when pressing. Preparing press plates that are flat and durable is essential, as they will evenly distribute the force across the headset. Finally, testing the press with scrap materials helps to confirm that it functions properly before using it on actual bike components.
How Do You Ensure Proper Alignment When Pressing?
Ensuring proper alignment when pressing is crucial for achieving the best results with a homemade headset press.
- Use a Jig: A jig can help maintain consistent alignment by providing a fixed reference point for the headset and the frame.
- Mark Reference Points: Clearly marking the alignment points on both the headset and the frame helps in visually aligning them before pressing.
- Check for Levelness: Ensuring that the surfaces are level can prevent misalignment during the pressing process.
- Apply Even Pressure: Distributing pressure evenly across the headset will help maintain alignment and prevent damage.
- Perform a Dry Run: A preliminary dry run without any pressing can be helpful to visualize alignment and make adjustments as needed.
Use a Jig: A jig is a custom fixture that holds the headset in place, ensuring it aligns perfectly with the frame during the pressing process. This not only improves accuracy but also speeds up the operation by providing a stable setup.
Mark Reference Points: By marking specific points on both the headset and the frame, you can create visual cues that guide you in aligning the parts accurately. This technique minimizes the risk of misalignment, which can lead to improper seating and potential damage.
Check for Levelness: Before beginning the pressing process, it’s important to check that all surfaces are level and flat. If the surfaces are uneven, it can cause the headset to tilt or skew, leading to a poor fit.
Apply Even Pressure: When applying pressure, use a method that allows for even distribution across the headset. Uneven pressure can lead to deformation of the headset or frame, resulting in poor alignment and fit.
Perform a Dry Run: Conducting a dry run allows you to practice the pressing process without actually pressing the headset. This helps identify any potential alignment issues and gives you a chance to make necessary adjustments before applying pressure.
What Are the Key Benefits of Using a Homemade Headset Press?
The key benefits of using a homemade headset press include cost-effectiveness, customization, and ease of use.
- Cost-Effectiveness: Creating a headset press at home can significantly reduce expenses compared to purchasing a commercial model. Many materials needed for construction can often be sourced cheaply or repurposed from existing tools, making it an economical choice for hobbyists and DIY enthusiasts.
- Customization: A homemade headset press allows for tailored adjustments to fit specific needs or preferences. Users can design the press to accommodate various headset sizes and styles, ensuring a perfect fit for the bike or equipment being serviced.
- Ease of Use: Building a headset press can be straightforward, especially with readily available online guides and tutorials. Once constructed, it can simplify the process of installing or removing headsets, making maintenance more manageable and efficient.
- Learning Experience: The process of building a headset press can enhance one’s understanding of bike mechanics and tool usage. This hands-on experience fosters a deeper appreciation for the equipment and can improve overall DIY skills.
- Durability: A homemade headset press can be made from sturdy materials, ensuring it lasts longer than some cheaper commercial alternatives. Users can select high-quality components, resulting in a reliable tool that withstands regular use.
What Common Mistakes Should You Avoid When Making a Homemade Headset Press?
When creating a homemade headset press, there are several common mistakes to avoid to ensure effectiveness and safety.
- Using Inadequate Materials: Opting for weak or unsuitable materials can lead to failure during pressing.
- Incorrect Measurements: Failing to measure accurately can result in a poorly fitting headset, leading to misalignment or damage.
- Lack of Stability: An unstable or wobbly press can create uneven pressure, risking headset components.
- Skipping Safety Precautions: Neglecting safety measures can lead to accidents or injuries during the pressing process.
- Ignoring Proper Lubrication: Not applying lubrication can cause binding and damage to headset parts.
Using inadequate materials can compromise the strength and reliability of your headset press. It’s essential to select robust and durable components, such as metal or thick plywood, to withstand the pressures involved without bending or breaking.
Incorrect measurements can severely impact the performance of the headset press. Always double-check your dimensions and ensure that the fittings align precisely to avoid issues that could arise from misalignment or a poor fit.
A lack of stability in your setup can lead to disastrous outcomes, such as uneven pressure application which might damage the headset. Ensure that your press is assembled on a stable surface and consider reinforcing it to prevent movement during use.
Skipping safety precautions can result in injuries from tools or materials used in the press construction. Always wear safety goggles, gloves, and follow guidelines for using any tools to minimize the risk of accidents.
Ignoring proper lubrication can lead to binding situations where parts do not move smoothly, potentially damaging your headset. Using a suitable lubricant ensures that all components slide together easily and reduces wear over time.
Related Post: