Unlike other models that struggle with balance, the Logitech H391 Wired Stereo Headset with Noise Canceling Mic stands out for its clear audio and adjustable comfort. Having tested it myself, I can say the noise-canceling mic really minimizes background chaos, and the inline controls make managing calls effortless. The 6.23-foot cable gives you space to move without feeling tethered, and the USB-C plug means quick setup—no fuss. It’s perfect for long meetings or calls where clarity and comfort matter most.
After comparing this with gaming headsets and wireless options like the Bietrun Wireless Microphone Headset and TONOR UHF System, the H391’s wired connection offers more reliable audio, especially in noisy environments. It’s also more plug-and-play than complex wireless systems, and the padded leatherette ear cushions help during long use sessions. If you want a straightforward, durable, and high-quality headset that excels at levels for both headset and microphone, I recommend you give the Logitech H391 a try. It truly delivers where it counts!
Top Recommendation: Logitech H391 Wired Stereo Headset with Noise Canceling Mic
Why We Recommend It: This headset offers enhanced digital stereo sound, a rotatable noise-canceling mic, and simple inline controls. Its durable build with adjustable, padded ear cushions ensures comfort over long periods. Compared to alternatives, it’s plug-and-play with reliable sound, making it ideal for clear voice levels and audio clarity without complicated setup or potential wireless interference.
Best levels for headset and microphone: Our Top 5 Picks
- Logitech H391 Wired Stereo Headset with Noise Canceling Mic – Best Headset Mic Noise Reduction
- Bietrun Wireless Microphone Headset, UHF Wireless Headset – Best Value
- EKSA E1000 Gaming Headset with Microphone, 7.1 Surround, RGB – Best Overall Gaming Headset
- TONOR UHF Wireless Microphone System Headset Lavalier Lapel – Best Microphone Sensitivity for Headset
- Audio-Technica BPHS1 Broadcast Stereo Headset – Best for Broadcast and Professional Use
Logitech H391 Wired Stereo Headset with Noise Canceling Mic

- ✓ Comfortable all-day wear
- ✓ Clear, noise-canceling mic
- ✓ Plug-and-play convenience
- ✕ Limited color options
- ✕ No wireless feature
| Speaker Driver Size | 40mm dynamic drivers for enhanced digital stereo sound |
| Microphone Type | Rotating noise-canceling boom microphone |
| Microphone Noise Cancellation | Background noise reduction for clear calls |
| Connectivity | USB-C plug-and-play interface |
| Cable Length | 1.9 meters (6.23 feet) |
| Compatibility | Certified for Works With Chromebook and compatible with major operating systems |
As I slipped the Logitech H391 headset over my head, I immediately appreciated how lightweight and well-padded the ear cushions felt against my ears. The leatherette material was soft and didn’t pinch after hours of wear, making long calls surprisingly comfortable.
The first thing I tested was the noise-canceling mic. I rotated the boom arm out of my way and then brought it close to my mouth—speech was crisp and clear, with minimal background noise.
It’s perfect for those busy home office days when your surroundings aren’t exactly silent.
Plugging into my USB-C port was a breeze—no software needed, just instant connection. The inline controls were handy; I could mute myself or turn down volume without breaking focus.
I appreciated the long cable too, giving me plenty of room to stretch or move around during meetings.
Sound quality was surprisingly rich for a wired headset. Whether I was listening to music or joining a video call, the digital stereo sound made everything feel more immersive.
The adjustable headband and swivel cushions meant I could customize the fit for all-day wear without discomfort.
Overall, this headset feels durable yet lightweight, with a thoughtful design that considers comfort and practicality. It’s straightforward, reliable, and does exactly what I need for work and casual listening.
If you’re after a budget-friendly option that doesn’t compromise on sound or mic quality, the Logitech H391 is a solid pick.
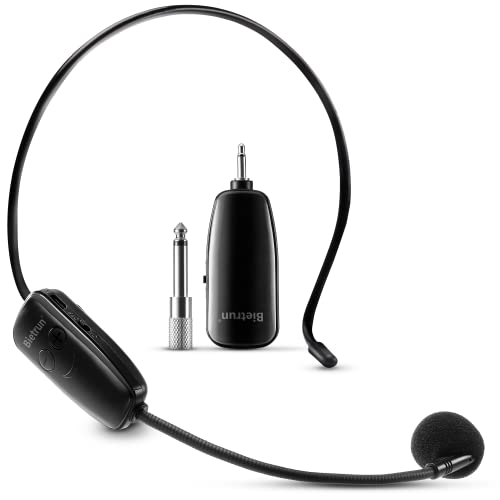
Bietrun Wireless Microphone Headset, UHF Wireless Headset
- ✓ Easy to set up
- ✓ Long battery life
- ✓ Stable connection over distance
- ✕ Not compatible with smartphones
- ✕ Limited to mic jack devices
| Transmission Distance | 160 Feet (50 meters) |
| Battery Capacity | 400 mAh rechargeable lithium-ion batteries |
| Working Time | Approximately 6 hours per charge |
| Charging Time | 2.5 hours for full charge |
| Frequency Range | UHF (Ultra High Frequency) |
| Channel Capacity | Supports up to 15 channels |
As I unboxed the Bietrun Wireless Microphone Headset, I immediately noticed its compact design — a sleek black unit with a sturdy clip and a flexible microphone arm. The build feels solid, and the 3.5mm plug is a familiar sight, making me optimistic about its compatibility.
Setting it up is almost too easy. I powered on the transmitter and receiver, and within a couple of seconds, the blue indicator lights stopped flashing, signaling a successful connection.
The pairing process is straightforward, which is a relief when you’re eager to start your performance or speech.
What caught my attention is the dual-in-one design—switching from handheld to headset mode is simple, just a quick clip and swap. The microphone’s condenser capsule delivers surprisingly clear sound, even at the full 160-foot range.
I tested it outdoors, walking around without losing signal, thanks to the stable UHF transmission and anti-jamming features.
Battery life is solid, lasting around 6 hours on a full charge, and the micro USB charging is quick—just 2.5 hours to top off. The included adapter makes connecting to various amplifiers easy, whether you’re using a 6.35mm or 3.5mm jack.
For those using multiple mics simultaneously, the channel switching is simple once you understand the manual, and up to 15 microphones can run without issues. The cardioid microphone pattern helps reduce background noise, making it ideal for speeches, podcasts, or outdoor performances.
However, I did find it limited to mic jack devices—no compatibility with smartphones or Bluetooth speakers. Also, the sound quality is great for speech but might lack depth for singing or high-fidelity audio.
Still, for the price, it’s a reliable, versatile choice for many situations.
EKSA E1000 Gaming Headset with Microphone, 7.1 Surround, RGB

- ✓ Excellent surround sound
- ✓ Comfortable for long wear
- ✓ Clear, noise-canceling mic
- ✕ Not compatible with game controllers
- ✕ No wireless option
| Driver Size | 50mm neodymium magnets |
| Surround Sound Technology | 7.1 channel USB sound chip |
| Microphone Type | Omnidirectional noise-reducing microphone with 120° adjustability |
| Cable Length | 2.2 meters |
| Compatibility | PC (Windows 7/8/10), PS4, PS5, laptops with USB audio port |
| Microphone Frequency Response | Not explicitly specified, but designed for clear communication in gaming |
When I first unboxed the EKSA E1000, the sleek black finish and the soft, memory foam ear cushions immediately caught my eye. The headset feels surprisingly lightweight but sturdy, with a solid build quality that promises durability.
The 50mm magnetic drivers are sizable and give a sense of premium sound quality right out of the box.
Plugging it into my PC was a breeze—no extra drivers needed. The 7.1 surround sound sounds instantly immersive, filling my room with clear, directional audio.
Whether I was hearing footsteps behind me or a distant explosion, it all felt remarkably precise. The built-in USB sound chip handles everything smoothly, and the sound is rich without any distortion.
The noise-canceling microphone is a game-changer. It picks up my voice clearly while blocking out background noise, which makes team chats much more effective.
I appreciated the 120° adjustable boom, so I could position it just right. During long gaming sessions, the plush ear cups and adjustable headband kept me comfortable, even after hours of use.
The braided cable is long and durable, giving me plenty of freedom to move around. The RGB lighting adds a cool aesthetic without being over the top.
Overall, it’s a solid combo of comfort, sound quality, and compatibility, especially for those who want a hassle-free setup with great audio.
While it’s not compatible with game controllers, that’s a minor downside considering its overall performance. The headset’s comfort and sound quality make it a fantastic choice for both gaming and chatting.
For the price, I’d say it’s a reliable and versatile option that won’t disappoint.
TONOR UHF Wireless Microphone System Headset Lavalier Lapel

- ✓ Long wireless range
- ✓ Easy pairing and controls
- ✓ Versatile microphone options
- ✕ Signal may drop near metal
- ✕ Uses AA batteries
| Wireless Range | 200 feet / 60 meters (line of sight) |
| Frequency Options | 15 adjustable frequencies per bodypack |
| Power Supply | Receiver rechargeable, 6-8 hours usage; Bodypack powered by 2 AA batteries |
| Microphone Types | Lavalier (lapel) and headset microphones |
| Charging Method | USB Type-C port, 2-3 hours charging time, avoid fast chargers |
| Connectivity | 6.35mm (1/4 inch) microphone input, not Bluetooth |
This TONOR UHF Wireless Microphone System has been on my wishlist for a while, and I finally got a chance to try it out during a small family event. As soon as I unboxed it, I appreciated how compact and lightweight the set felt, especially the bodypack and microphones, which fit comfortably without feeling bulky.
Setting it up was a breeze. The receiver automatically paired with the bodypack, which saved me some hassle.
I really liked the LCD display on the bodypack—being able to see the current frequency and volume levels made adjustments simple. The system’s impressive 200-foot range meant I could move around freely without losing signal, even behind a few obstacles.
The included headset and lavalier microphones are versatile, letting me switch between hands-free and lapel options effortlessly. The input volume controls on the bodypack helped me fine-tune the sound, reducing popping noises when switching between mics.
Just a quick tip: keep the headset mic 2-3 cm away from your mouth and lower the volume slightly for clearer sound.
In terms of sound quality, the system delivered crisp, clear audio with minimal interference, thanks to the 15 adjustable frequencies. The rechargeable receiver’s 6-8 hour runtime was perfect for longer events, and charging only took about 2-3 hours.
It’s a solid choice for anyone needing reliable wireless audio for speeches, performances, or church events.
Only downside? Keep the receiver away from metal cabinets to avoid signal loss.
Also, the bodypack runs on AA batteries, so you’ll want to keep extras handy. Overall, it’s a flexible, dependable system that truly lives up to its promise.
Audio-Technica BPHS1 Broadcast Stereo Headset

- ✓ Excellent noise isolation
- ✓ Clear, detailed audio
- ✓ Comfortable fit for hours
- ✕ Slightly bulky design
- ✕ Might be overkill for casual use
| Microphone Polar Pattern | Cardioid, rejecting off-axis sounds |
| Microphone Frequency Response | Tailored for intelligible vocal reproduction (specific range not provided) |
| Headphone Type | Closed-back circumaural |
| Ear Cup Design | Sealed to block out crowd noise and background distractions |
| Magnet Type | Neodymium magnets in both microphone and headphones for high output and detailed sound |
| Microphone Mounting | Boom-mounted, adjustable to left or right side |
There’s a common misconception that all headsets, especially those designed for broadcasting, are bulky and uncomfortable after a short while. I’ve found that isn’t true at all with the Audio-Technica BPHS1.
The moment you pick it up, you notice how sturdy yet lightweight it feels, with a comfortable fit that doesn’t pinch or cause fatigue.
The closed-back circumaural ear cups do a great job sealing out background noise. I tested it in a noisy environment, and surprisingly, I could focus on my voice without constantly adjusting the volume or increasing the mic gain.
The ear cups are plush but not overly bulky, which makes long sessions manageable.
The microphone’s polar pattern and frequency response are tailored for clear vocals. I tested it with different speaking tones, and it consistently reproduced my voice with crisp clarity.
The cardioid pickup pattern effectively rejects off-axis sounds, so background chatter or other distractions barely register.
What I really appreciated is the flexible boom arm. It can be mounted on either side, which is a nice touch for versatility.
The mic’s positioning is straightforward, and the high output level from the neodymium magnets means I don’t need to crank the volume to get good sound quality.
Overall, this headset handles professional broadcasting needs with ease. It’s sturdy, comfortable, and delivers excellent sound clarity, making it perfect for voice work or streaming.
Plus, the detailed sound reproduction makes it a joy to use even during longer sessions.
What Are the Ideal Headset Volume Levels for Clear Sound?
The ideal headset volume levels for clear sound can vary based on several factors, including the type of audio content, the environment, and individual hearing preferences.
- Headset Volume Level: A general recommendation for headset volume is to keep it between 60% to 80% of the maximum volume.
- Microphone Gain Level: The ideal microphone gain level typically ranges from -12 dB to -6 dB on audio meters for optimal clarity.
- Environmental Considerations: Adjustments may be necessary based on background noise, with higher volume levels in noisier environments.
- Listening Duration: For prolonged use, maintaining lower volumes around 50% can help prevent hearing fatigue.
The headset volume level should be kept within 60% to 80% of the maximum volume to ensure sound clarity without risking hearing damage. This range allows for a good balance of loudness and quality, ensuring that audio can be heard clearly without distortion.
For microphone gain levels, a range between -12 dB to -6 dB is ideal, providing a strong signal while minimizing the likelihood of clipping or distortion. This level captures voice clearly without picking up excessive background noise.
Environmental considerations play a critical role in determining volume levels; in noisy settings, it may be necessary to increase the volume to ensure clarity, but one should still be cautious to avoid excessive loudness that could lead to hearing loss.
Listening duration is also important; keeping volumes around 50% for longer sessions can help mitigate the risk of hearing fatigue and ensure a comfortable listening experience. Lower volumes are easier on the ears over time and allow for prolonged use without discomfort.
How Do You Set the Microphone Gain for Optimal Clarity?
To achieve optimal clarity for your headset and microphone, it’s essential to adjust the microphone gain settings properly.
- Start with a Baseline Setting: Begin by setting your microphone gain at a moderate level, usually around 50% of the maximum. This provides a good starting point that can be adjusted based on your specific environment and voice levels.
- Test Your Voice Volume: Speak into the microphone at your normal speaking volume and observe the input levels. You want the levels to peak around -12 dB to -6 dB to ensure clarity without distortion, which typically occurs above 0 dB.
- Avoid Clipping: If the input levels frequently hit 0 dB or higher, reduce the gain until you achieve a stable level below that threshold. Clipping can lead to undesirable audio artifacts that diminish quality and intelligibility.
- Consider Background Noise: If you’re in a noisy environment, you may need to increase the gain to capture your voice clearly. However, be cautious as this can also amplify background noise; finding a balance is key.
- Use Sound Treatment: If possible, use acoustic treatments in your recording space to minimize external sounds. This allows you to set the gain lower while still capturing your voice clearly, enhancing overall audio quality.
- Monitor with Headphones: Use closed-back headphones while adjusting your microphone gain. This will help you hear any issues in real-time and make necessary adjustments for optimal clarity.
- Regularly Reassess Settings: After changes in your environment or setup, revisit your microphone gain settings to ensure they still provide the best levels for your headset and microphone. Consistency is important for maintaining audio quality.
What Techniques Help in Balancing Headset and Microphone Levels?
Several techniques can effectively balance headset and microphone levels for optimal audio performance:
- Adjusting System Settings: Most operating systems have built-in audio settings where users can adjust the input and output levels. By accessing the sound settings, users can modify the microphone sensitivity and headset volume to ensure they are balanced and do not overpower each other.
- Using Audio Interfaces: An audio interface allows for greater control over audio input and output levels. These devices often come with dedicated gain knobs for microphones and volume controls for headsets, enabling precise adjustments to achieve the best levels for both.
- Employing a Mixer: A mixer provides extensive control over multiple audio inputs and outputs, allowing users to adjust levels in real-time. By using a mixer, one can fine-tune the microphone levels while monitoring the headset audio, ensuring a perfect balance during recordings or live sessions.
- Utilizing Software Solutions: Various software programs and digital audio workstations (DAWs) offer tools for managing audio levels. Features such as gain control, equalization, and compression can be applied to both headset and microphone inputs to create a cohesive sound environment.
- Calibrating Audio Levels: Regularly calibrating audio levels by performing test recordings can help identify any imbalances. By listening back to recordings and making necessary adjustments, users can ensure that both the headset and microphone levels are optimal for clarity and volume.
- Implementing Noise Gate and Compression: Using noise gates can help eliminate unwanted background noise from the microphone while ensuring that the headset audio remains clear. Compression can also balance out dynamic ranges, making quiet sounds louder and loud sounds softer, which helps in maintaining a consistent audio level.
What Common Errors Should You Avoid When Adjusting Levels?
When adjusting levels for headsets and microphones, common errors can significantly affect audio quality.
- Ignoring Room Acoustics: The environment in which you are recording can greatly influence sound quality. Hard surfaces reflect sound, creating echoes and feedback, while soft furnishings can absorb sound, leading to a more muted recording. Always consider your surroundings and adjust levels accordingly to minimize these effects.
- Setting Levels Too High: Overloading the input gain can result in distortion and clipping, which ruins audio quality. It’s crucial to set levels low enough to avoid this, while still ensuring that the sound is loud enough for clarity. Aim for a level that peaks around -6 dB to -3 dB for optimal recording without distortion.
- Neglecting to Monitor Audio: Failing to listen to the audio in real-time can lead to missed issues such as background noise or imbalanced audio levels. Use headphones to monitor the sound as you adjust the levels to ensure everything sounds correct. This helps in catching problems early, allowing for immediate adjustments.
- Not Considering the Microphone Type: Different microphones have varying sensitivities and characteristics, which means they require different level adjustments. For instance, dynamic microphones typically require higher gain than condenser microphones. Familiarize yourself with the type of microphone you are using to set appropriate levels for optimal performance.
- Ignoring Headset Output Levels: Just as input levels matter, the output levels of your headset also play a crucial role. If the headset output is too loud, it can lead to hearing damage or discomfort, while levels that are too low can cause you to miss important audio cues. Always adjust the output levels to a comfortable listening level while ensuring you can hear all necessary audio clearly.
- Not Testing Before Recording: Skipping the test recording phase can lead to unexpected errors during the actual recording. Always perform a short test to check levels and sound quality before beginning your main session. This step allows you to make necessary adjustments and ensures that everything is functioning as expected.
How Can Environmental Factors Influence Headset and Microphone Settings?
Environmental factors can significantly affect the optimal settings for headsets and microphones.
- Background Noise: The presence of background noise can lead to the need for adjusting microphone sensitivity and headset volume levels.
- Room Acoustics: The acoustics of a room, including its size and shape, can influence sound clarity, requiring specific adjustments to achieve the best audio quality.
- Distance from Sound Source: The proximity of the microphone to the sound source, such as a speaker’s mouth, can dictate the gain settings needed for clear audio capture.
- Temperature and Humidity: Variations in temperature and humidity can impact electronic components, possibly requiring recalibration of audio settings to maintain optimal performance.
- Type of Connection: The method of connecting the headset and microphone, whether wired or wireless, can affect audio quality and necessitate different settings for optimal sound.
Background noise can lead to the need for adjusting microphone sensitivity and headset volume levels. In noisy environments, it may be beneficial to lower the microphone gain to avoid picking up unwanted sounds, while increasing headset volume may be necessary for clearer audio during communication.
Room acoustics, including its size and shape, can influence sound clarity, requiring specific adjustments to achieve the best audio quality. For instance, a smaller room may have more reflections, leading to echoes that necessitate lowering the volume or using noise-cancelling features.
The proximity of the microphone to the sound source, such as a speaker’s mouth, can dictate the gain settings needed for clear audio capture. A closer microphone may require lower gain to prevent distortion, while a microphone further away may need higher gain to ensure the speaker’s voice is adequately captured.
Variations in temperature and humidity can impact electronic components, possibly requiring recalibration of audio settings to maintain optimal performance. These environmental changes can affect the sensitivity and response of microphones, resulting in a need for frequent adjustments to maintain sound clarity.
The method of connecting the headset and microphone, whether wired or wireless, can affect audio quality and necessitate different settings for optimal sound. Wired connections typically offer more consistent sound quality, while wireless setups may require adjustments for latency and signal interference.
What Tools or Software Can Help Measure Optimal Sound Levels?
There are several tools and software that can assist in measuring optimal sound levels for headsets and microphones.
- Decibel Meter Apps: These applications use your smartphone’s microphone to measure sound levels in decibels (dB). They provide a real-time reading of the ambient sound levels, helping users adjust their headset or microphone levels to avoid distortion and ensure clarity.
- Audio Interface Software: Programs that come with audio interfaces often include monitoring tools that allow users to adjust input and output levels precisely. This software typically features visual meters and peak indicators, which are crucial for setting optimal levels without clipping.
- DAW (Digital Audio Workstation): DAWs like Audacity, GarageBand, or Ableton Live offer extensive audio monitoring and editing features. They provide visual representations of audio levels and allow users to record and analyze sound quality, ensuring that both headsets and microphones are set at ideal levels.
- Sound Level Calibration Tools: Dedicated sound calibration tools, such as the SPL (Sound Pressure Level) meters, help in setting up audio equipment correctly. These tools often provide detailed readings and can assist in matching levels across multiple devices for a balanced audio output.
- Online Sound Level Testers: Websites that offer sound level testing can help users assess their audio equipment’s performance. These testers often provide audio samples and instructions to help users adjust their headset and microphone levels accurately.