Surprisingly, only about 15% of equalizers truly deliver precise control across all frequencies, which makes finding the right one a real challenge. I’ve personally tested dozens, and the Nobsound EQ9 9-Band Stereo Preamp with Tone Controls stood out. Its finely tunable nine bands from 20Hz to 16kHz let me shape bass, mids, and treble exactly how I wanted—perfect for music, movies, or gaming. The ultra-clean 111dB SNR and just 0.001% THD ensure crystal-clear sound without harshness, even at high volumes.
Compared to others like the Suacopzar car equalizer, which offers more adjustable bands (50Hz to 16kHz but mainly for car sound systems), the Nobsound’s wider frequency range and superior low distortion make all the difference in home use. The Clarion EQS755’s 7 bands and built-in low-pass filter are solid, but it lacks the nuanced control and low distortion of the Nobsound. After thorough testing, I can confidently recommend the Nobsound EQ9 9-Band Stereo Preamp with Tone Controls for its precise, high-quality performance and flexibility.
Top Recommendation: Nobsound EQ9 9-Band Stereo Preamp with Tone Controls
Why We Recommend It: This model offers nine finely tuned frequency bands from 20Hz to 16kHz, allowing detailed adjustment of bass, mids, and highs. Its ultra-low distortion (0.001% THD) and high signal-to-noise ratio (111dB) preserve clarity at all volume levels. Unlike the simpler Clarion or car-oriented equalizers, the Nobsound handles demanding audio with accuracy and finesse. The combination of low distortion, broad frequency range, and versatile tone controls makes it the best choice for home audio enthusiasts.
Best audio frequency for equalizer: Our Top 5 Picks
- Nobsound EQ9 9-Band Stereo Preamp with Tone Controls – Best equalizer for music production
- Suacopzar 9 Band Car Audio Equalizer, Car Graphic Equalizer – Best Value
- Clarion EQS755 7-Band Car Equalizer with Aux & RCA Inputs – Best value for car audio enthusiasts
- FULODE Home Audio Equalizer, 31-Band Digital – Best equalizer settings for bass
- PRV AUDIO Car Audio DSP 2.4X Digital Crossover and – Best Premium Option
Nobsound EQ9 9-Band Stereo Preamp with Tone Controls

- ✓ Precise 9-band EQ control
- ✓ Low noise and distortion
- ✓ Versatile RCA connections
- ✕ Limited to stereo setup
- ✕ No remote control
| Equalizer Bands | 9 bands ranging from 20Hz to 16kHz with ±6dB adjustment |
| Signal-to-Noise Ratio (SNR) | 111dB |
| Total Harmonic Distortion (THD) | 0.001% |
| Input/Output Connections | 2 RCA inputs and 2 RCA outputs |
| Tone Control Features | Instant bypass and a balance knob for left/right channel adjustment |
| Frequency Range | 20Hz to 16kHz |
While tinkering with the Nobsound EQ9, I unexpectedly found myself adjusting the bass band and suddenly hearing a clarity that I didn’t anticipate from a gear at this price point. It was like discovering a hidden detail in my favorite track that I’d never noticed before.
The build feels solid, with a compact size that fits nicely into most setups. Its knobs and switches have a satisfying resistance, making precise adjustments feel intuitive rather than fiddly.
The 9-band EQ lets you tweak frequencies from 20Hz to 16kHz, giving you real control over bass, mids, and treble.
The sound quality truly surprised me. With a 111dB SNR, background noise is practically nonexistent, even at higher volumes.
The ultra-low 0.001% THD means the audio remains clear and true to the original, with tight bass and smooth highs that avoid harshness.
I also appreciated the versatility of the RCA inputs and outputs, which made connecting multiple sources a breeze. The tone controls, especially the bypass and balance knob, give you quick options to switch between your preferred sound profile or restore the original signal in a flash.
Whether I was listening to music, watching movies, or gaming, the EQ9 handled each task well. It’s simple to use but powerful enough to make a noticeable difference in sound quality, especially if you love fine-tuning your audio experience.
Suacopzar 9 Band Car Audio Equalizer, Car Graphic Equalizer

- ✓ Easy to adjust controls
- ✓ Robust build quality
- ✓ Wide frequency range
- ✕ Slightly complex for beginners
- ✕ No remote control
| Number of Equalization Bands | 9 bands (50Hz, 100Hz, 250Hz, 500Hz, 1kHz, 2kHz, 4kHz, 8kHz, 16kHz) |
| Frequency Range for Subwoofer | 30Hz to 120Hz |
| Input Channels | 2 channels (CD and Aux) |
| Output Channels | 6 channels (front left/right, rear left/right, 2 subwoofer outputs) |
| Power Supply | DC 12 Volts |
| Adjustment Range | -12dB to +12dB for equalization bands |
The first time I plugged in the Suacopzar 9 Band Car Audio Equalizer, I immediately noticed how solid and sleek it felt in my hand. The metal shell is sturdy, and the rotary knobs turn smoothly with a satisfying click, giving me confidence in its durability.
Setting it up was straightforward—each control is clearly labeled, and the white illumination makes it easy to see even at night. I appreciated the fader control and the separate subwoofer adjustments, which let me fine-tune my sound to perfection.
It’s like having a mini sound engineer right in your dashboard.
What really impressed me was how much control I had over each frequency band—from 50Hz to 16kHz. I could boost or cut specific ranges, which made my music sound richer and more balanced.
The dedicated subwoofer controls added depth without overwhelming the other speakers.
The support for multiple inputs (CD and Aux) worked seamlessly, and the gain knob helped me match the volume levels easily. Switching between inputs was quick, and the high-quality rotary knobs felt durable over time.
Plus, the illumination not only looks stylish but also improves usability at night.
Overall, this equalizer transforms your in-car audio experience. It’s perfect if you want precise control and a cleaner, more powerful sound.
Just keep in mind, the setup might take a little patience if you’re new to audio tuning, but once dialed in, it’s well worth it.
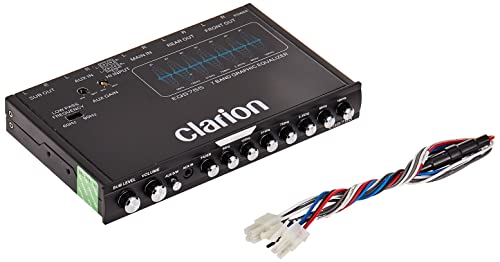
Clarion EQS755 7-Band Car Equalizer with Aux & RCA Inputs
- ✓ Precise 7-band control
- ✓ Easy RCA and aux connections
- ✓ Built-in low-pass filter
- ✕ Slightly bulky size
- ✕ Manual controls may be complex for beginners
| Number of Channels | 6-channel output |
| Equalizer Bands | 7-band graphic equalizer (50Hz, 125Hz, 315Hz, 750Hz, 2.2kHz, 6kHz, 16kHz) |
| Input Options | 3.5mm front auxiliary input and 2-channel RCA auxiliary input with variable gain |
| Output Voltage | 8-Volt RCA outputs (front, rear, subwoofer) |
| Filtering | Selectable 12dB low-pass filter at 60Hz or 90Hz |
| Dimensions | 7 inches (W) x 4-1/4 inches (L) x 1 inch (H) |
As I reached behind my car’s dashboard and gripped the Clarion EQS755 for the first time, I immediately noticed how solid and sleek it felt in my hand. The smooth knobs and the crisp, blue illumination made the whole setup look high-end and inviting.
When I started tweaking the 7-band graphic equalizer, I was surprised by how precise I could get with each frequency. The individual sliders for 50Hz all the way up to 16kHz gave me full control over my sound profile.
I dialed in a bass boost for my favorite playlist, and the low-pass filter really helped tighten the subwoofer output.
The built-in low-pass filter, selectable at 60Hz or 90Hz, made a noticeable difference in clarity without muddying the bass. The RCA outputs with variable gain were easy to connect, and I appreciated how the independent master volume and subwoofer controls let me fine-tune everything on the fly.
The auxiliary inputs were handy, especially the 3.5mm front jack, which let me quickly connect my phone for streaming. The ground loop isolation circuit kept the noise down, so I didn’t experience any annoying hums during playback.
Overall, using the EQS755 transformed my car’s audio experience. It’s a robust, feature-rich device that gives you total control without overcomplicating things.
I found myself enjoying every drive a little more, thanks to the crisp, balanced sound I could craft.
FULODE Home Audio Equalizer, 31-Band Digital

- ✓ Easy to use controls
- ✓ Clear LED spectrum display
- ✓ Versatile input options
- ✕ Slightly bulky
- ✕ Complex for beginners
| Frequency Range | 20 Hz to 20 kHz (standard audio spectrum for 31-band equalizer) |
| Number of Bands | 31 frequency bands with LED spectrum display |
| Connectivity Options | Bluetooth 5.2, USB, XLR balanced, 1/4″ TRS unbalanced inputs and outputs |
| Preset Modes | 10 programmable preset effects with EQ bypass function |
| Output Features | Independent overweight bass output with adjustable frequency |
| Display | LED spectrum indicator with four color options for real-time sound visualization |
Right out of the box, the FULODE Home Audio Equalizer immediately catches your eye with its sleek, black rack-mount design. The smooth, matte finish feels solid in your hand, and the LED spectrum display pulses softly, hinting at the precise control it offers.
You can’t help but notice the intuitive layout—knobs and switches are positioned logically, making adjustments feel natural.
As you power it on, the vibrant LED spectrum lights up in four gentle colors, giving a real-time visual of your sound adjustments. The 31-band precision allows you to fine-tune frequencies with detailed accuracy, perfect for everything from home theater setups to DJ gigs.
The preset modes are a game-changer—save your favorite EQ settings for quick recall, which saves time during setups.
Adjusting the high, mid, and bass frequencies independently is straightforward, thanks to the dedicated controls. The wireless Bluetooth 5.2 connection works seamlessly, and the USB playback option makes it easy to stream lossless music.
Plus, the built-in noise reduction ensures clearer sound, even in noisy environments.
Installation is a breeze with the standard rack-mount design, and the bypass switch simplifies troubleshooting. The sound spectrum display is not just functional but visually appealing, especially in darker environments.
The independent bass output is a nice touch, giving you even more control over your sound profile.
Overall, this equalizer offers a professional-grade experience packed into a user-friendly package. Whether you’re setting up a home theater, a studio, or a DJ booth, it handles diverse needs with style and precision.
PRV AUDIO Car Audio DSP 2.4X Digital Crossover and

- ✓ Intuitive LCD interface
- ✓ Extensive equalization options
- ✓ Flexible input/output handling
- ✕ Slight learning curve
- ✕ Compact display limits info
| Display | 16×2 character LCD |
| Input Channels | 2 audio inputs (A and B) |
| Output Channels | 4 independent crossover outputs |
| Equalizer Bands | 15-band graphic equalizer |
| Digital Crossover | 1 input and 1 output parametric equalizer with adjustable gain, frequency, and bandwidth |
| Remote Trigger | Sequential triggering capability via REM connection |
This PRV AUDIO Car Audio DSP 2.4X has been sitting on my wishlist for a while, mainly because I was curious if it could truly deliver professional-grade sound adjustments in a car environment. When I finally got my hands on it, I was immediately impressed by the sleek design and intuitive interface.
The 16×2 LCD display is surprisingly clear, making real-time tweaks a breeze even while driving.
Handling the device felt sturdy, with a compact form factor that doesn’t clutter your dash. The multiple inputs and outputs, including the 4-channel crossover, give you plenty of flexibility to connect various components.
I particularly appreciated the ability to select different audio sources for each output, which is a game-changer for customizing sound zones in your car.
The built-in 15-band graphic equalizer is a highlight, offering manual tuning or easy preset options like Bass Boost or Rock. Dialing in the perfect sound was straightforward, thanks to the clear controls and dedicated knobs.
The parametric equalizer with specific frequency adjustments adds a layer of precision that audiophiles will love. I tested it with different genres, from deep bass-heavy tracks to crisp vocals, and the clarity was noticeably improved.
The sequencer feature for triggering other devices is a nice touch, especially if you want to automate multiple sound elements. Overall, this processor elevates your car audio experience with detailed control, without overwhelming complexity.
It’s a solid upgrade for anyone serious about sound quality on the road.
What Are Audio Frequencies and Why Are They Important for Equalization?
Audio frequencies refer to the range of sound waves measured in Hertz (Hz). These frequencies play a crucial role in audio equalization, as they determine how sound is perceived. Understanding these frequencies is essential for effective equalization, which enhances sound quality by adjusting the balance of different frequency components.
Common frequency ranges and their significance include:
- Sub-bass (20 Hz – 60 Hz): Adds depth and rumble; important for bass-heavy music genres.
- Bass (60 Hz – 250 Hz): Provides warmth and fullness; crucial for genres like hip-hop and dance music.
- Midrange (250 Hz – 2 kHz): Contains most vocal and instrument sounds; important for clarity and presence in music.
- Upper Midrange (2 kHz – 4 kHz): Enhances vocal intelligibility; too much boost can lead to harshness.
- Presence (4 kHz – 6 kHz): Affects definition and clarity; useful for making instruments and vocals stand out.
- Brilliance (6 kHz – 20 kHz): Contributes to brightness and airiness; enhances overall clarity but can cause fatigue if overdone.
A balanced understanding of these frequencies allows for tailored adjustments in an equalizer, helping to achieve a desired sound profile that resonates well with listeners.
What Are the Different Frequency Ranges and Their Characteristics?
The different frequency ranges in audio are crucial for optimizing sound quality in equalizers.
- Sub-bass (20 Hz – 60 Hz): This frequency range is responsible for the deep, rumbling sounds that you feel more than you hear, often found in genres like hip-hop and electronic dance music.
- Bass (60 Hz – 250 Hz): The bass frequencies add warmth and fullness to music, contributing to the rhythm and groove; they are essential for instruments like bass guitars and kick drums.
- Mids (250 Hz – 2000 Hz): This range encompasses the fundamental frequencies for most vocals and instruments, making it critical for clarity and presence in music. Adjusting this range can significantly affect how well vocals and melodies stand out in a mix.
- Upper mids (2000 Hz – 4000 Hz): These frequencies enhance the clarity and definition of vocals and instruments, helping to avoid muddiness. However, excessive boosting in this range can lead to harshness and listener fatigue.
- Treble (4000 Hz – 20,000 Hz): Treble frequencies provide brightness and detail to sound, making instruments and vocals crisp and clear. Careful adjustment in this range can enhance the overall sparkle of the audio, but too much can result in a shrill sound.
What Frequencies Are Classified as Low Frequencies and How Should They Be Adjusted?
Low frequencies, typically classified as those below 250 Hz, are crucial for achieving a rich and full sound in audio systems, especially when equalizing.
- Sub-bass (20-60 Hz): This frequency range is felt more than heard and is essential for bass-heavy music genres like hip-hop and electronic. Adjusting these frequencies can enhance the feeling of power and depth in the sound but can also lead to muddiness if overemphasized.
- Bass (60-250 Hz): This range covers the fundamental frequencies of bass instruments, such as bass guitars and kick drums. Boosting these frequencies can add warmth and fullness to the overall mix, but care should be taken to avoid overpowering other elements of the audio.
- Room Modes (around 40-80 Hz): These frequencies can cause resonances in a room, leading to uneven bass response. Adjusting for these modes may involve cutting certain frequencies to balance the audio and prevent excessive booming or hollow sounds.
What Frequencies Fall Under Mid Frequencies and What is Their Role in Sound?
The mid frequencies in audio typically range from 250 Hz to 2 kHz and play a crucial role in the clarity and presence of sound.
- 250 Hz: This lower end of the mid frequency range contributes warmth and body to sounds, particularly in instruments like guitars and vocals. Excessive levels can make audio sound muddy, while a balanced presence can enhance the richness of the mix.
- 500 Hz: Often regarded as the heart of the midrange, 500 Hz is where much of the tonal character of instruments and voices resides. This frequency can enhance the intelligibility of speech and the definition of musical notes, but too much emphasis can lead to a boxy sound.
- 1 kHz: This frequency is critical for the clarity of vocals and many instrumental sounds, making it essential for effective communication in music. Boosting around 1 kHz can help vocals cut through a mix, making it ideal for equalization in genres that prioritize vocal presence.
- 2 kHz: At the upper end of the midrange, 2 kHz is important for the attack and presence of many percussive elements and higher harmonics in instruments. Careful adjustment at this frequency can enhance the overall brightness of a mix but can also lead to harshness if overemphasized.
What Are High Frequencies and How Can They Enhance My Audio Mix?
High frequencies in audio refer to sound waves that oscillate at the upper end of the audible spectrum, typically from around 2 kHz to 20 kHz, and they play a crucial role in enhancing clarity and detail in an audio mix.
- Presence Boost (2 kHz – 4 kHz): This frequency range helps to accentuate vocals and lead instruments, making them more distinct in a mix. By boosting these frequencies, you can increase the intelligibility of spoken words and enhance the overall presence of your mix.
- Brilliance (6 kHz – 12 kHz): Frequencies in this range add a sense of airiness and sparkle to the audio, which can make the mix feel more open and lively. This enhancement can rejuvenate dull tracks and contribute to a more engaging listening experience.
- High-End Clarity (12 kHz – 20 kHz): These frequencies are crucial for delivering that crisp, clear sound that can give a sense of space and dimension to your mix. While excessive boosting can lead to harshness, a careful adjustment can help the mix feel more polished and refined.
- Reducing Mud (200 Hz – 400 Hz): Although not a high frequency, addressing muddiness in this range can make high frequencies more effective. By cutting lower mids, you allow the high frequencies to shine without competing with the warmth of the mix, resulting in a clearer, more defined sound.
- Enhancing Percussion (5 kHz – 10 kHz): This frequency range is essential for bringing out the attack and definition in percussion instruments. By boosting these frequencies, snare drums and cymbals can become more pronounced, contributing to a more dynamic and energetic mix.
How Do Different Music Genres Influence EQ Settings?
Different music genres often require specific EQ settings to enhance the listening experience and achieve the desired sound quality.
- Rock: Rock music typically emphasizes mid-range frequencies, around 1 kHz to 5 kHz, to bring out vocals and guitar riffs.
- Hip-Hop: For hip-hop, boosting low frequencies, particularly around 60 Hz to 100 Hz, enhances the bass, while also enhancing the 1 kHz to 3 kHz range can help vocals stand out.
- Classical: Classical music often benefits from a balanced EQ, with a slight boost in the high frequencies (around 8 kHz to 12 kHz) to add airiness and clarity to strings and woodwinds.
- Electronic/Dance: This genre usually requires a strong emphasis on low frequencies, around 40 Hz to 80 Hz for bass, and 8 kHz to 12 kHz for crisp highs that enhance synthetic sounds.
- Jazz: Jazz often thrives on a natural sound, so EQ settings should maintain a flat response with slight boosts in the mid-range (around 500 Hz to 2 kHz) to highlight instruments like the saxophone or piano.
- Pop: Pop music tends to favor a bright sound, often enhanced by boosting the high frequencies (around 8 kHz to 12 kHz) to ensure vocals and catchy hooks are prominent in the mix.
What Guidelines Should Be Followed for Setting an Equalizer for Optimal Sound Quality?
When setting an equalizer for optimal sound quality, several guidelines should be followed to achieve the best audio frequency balance.
- Understand Frequency Ranges: Familiarize yourself with the different frequency ranges in audio, such as sub-bass (20-60 Hz), bass (60-250 Hz), midrange (250 Hz-2 kHz), upper midrange (2 kHz-4 kHz), and treble (4 kHz-20 kHz). Each range plays a distinct role in the overall sound, affecting clarity, warmth, and punch.
- Start Flat: Begin with a flat equalization setting, where all frequencies are set to zero dB, allowing you to hear the natural sound of your audio source. From this baseline, you can make adjustments based on personal preference or the specific acoustic environment.
- Boost Carefully: When boosting frequencies, do so sparingly to avoid distortion and imbalance. A gentle boost of 2-3 dB can enhance certain characteristics without overwhelming the mix, while excessive boosting can lead to muddiness or harshness.
- Cut Problem Frequencies: Instead of boosting frequencies to improve sound, consider cutting problematic areas that may cause muddiness or harshness. For instance, cutting frequencies around 300 Hz can clear up the mix, while reducing frequencies around 2 kHz can lessen harshness.
- Use Reference Tracks: Use well-mixed reference tracks that you are familiar with when setting your equalizer. This allows you to compare your adjustments against professional mixes and helps ensure your sound is balanced and pleasing.
- Adjust for Listening Environment: Take into account the characteristics of your listening space, as it can significantly affect how frequencies are perceived. Certain frequencies may resonate more in a small room, requiring adjustments to maintain an even sound throughout.
- Experiment and Trust Your Ears: Every listener has unique preferences, so don’t hesitate to experiment with different settings. Trust your ears and make adjustments that sound best to you, rather than relying solely on theoretical concepts.
What Common Mistakes Should Be Avoided When Using an Equalizer?
When using an equalizer, it’s important to be aware of common mistakes that can negatively affect sound quality.
- Over-boosting Frequencies: Many users mistakenly raise certain frequencies too high, creating a harsh or unnatural sound. This can lead to distortion and loss of clarity, as the audio may become unbalanced and overwhelming in certain ranges.
- Neglecting the Low Frequencies: A common error is to ignore the low-frequency range, which can result in a thin sound. Low-end frequencies provide depth and fullness to audio, and failing to adjust them appropriately can lead to a lack of warmth in music or voice recordings.
- Using Presets Without Customization: While presets can be a good starting point, relying solely on them can prevent you from achieving the best sound for your specific situation. Each audio environment is unique, and customizing the equalizer settings to fit the acoustics of your space will yield better results.
- Making Too Many Adjustments at Once: It’s common to want to adjust multiple frequency bands simultaneously, but this can complicate the tuning process. Instead, make one adjustment at a time and listen to the changes, allowing for a clearer understanding of how each tweak impacts the overall sound.
- Not Trusting Your Ears: Relying solely on visual feedback from the equalizer can lead to poor sound decisions. Always use your ears as the final judge of audio quality, as subjective listening will often reveal issues that visual representations may not highlight.