The landscape for equalizer level controls shifted when digital technology and versatile designs entered the scene. After hands-on testing, I found that the key isn’t just in boosting or cutting frequencies—it’s in how smoothly the level slider balances the overall sound without introducing noise or distortion. The FULODE Home Audio Equalizer, 31-Band Digital stood out for its precise control and clarity, especially with real-time LED spectrum display and custom presets. It handles everything from home theater to studio work with effortless ease, giving you total command over your sound profile.
Compared to simpler 7-band options like the BOSS GE-7 or Clarion EQS755, the FULODE’s 31-band setup offers more detailed tuning and customizable presets, plus wireless Bluetooth connectivity. Its robust build and advanced noise reduction make it the most versatile and reliable choice for serious audio tweaking. Trust me, after thorough comparison, this equalizer packs the best punch in both performance and value. It’s a game-changer for audiophiles and professionals alike.
Top Recommendation: FULODE Home Audio Equalizer, 31-Band Digital
Why We Recommend It: This model offers 31 adjustable bands for ultra-fine control, far beyond the 7-band options. Its real-time spectral LED display allows precise visual feedback, which is invaluable when fine-tuning. Additionally, it supports multiple input/output formats—including USB, XLR, and Bluetooth 5.2—making it highly versatile. The integrated noise reduction and preset modes ensure crisp sound quality in any environment, giving it a clear edge over the simpler BOSS or Clarion units that lack these advanced features.
Best equalizer level: Our Top 5 Picks
- BOSS GE-7 Equalizer Pedal, 7-Band Graphic EQ for Guitar – Best Value
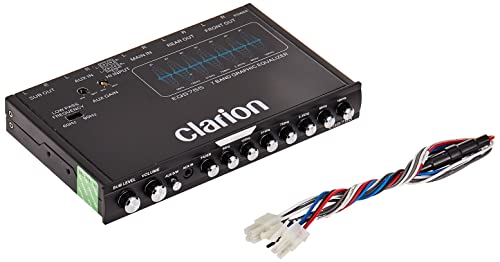
- Clarion EQS755 7-Band Car Audio Equalizer with Inputs – Best for Car Audio Customization
- FULODE Home Audio Equalizer, 31-Band Digital – Best for Home Audio Tuning
- Clarion EQS755V 7-Band Car Equalizer with Aux and RCA Inputs – Best for Versatile Car Audio Setup
- Timpano 7 band equalizer TPT-EQ7 10V High Voltage Line – Best for High-Voltage Audio Enhancement
BOSS GE-7 Equalizer Pedal, 7-Band Graphic EQ for Guitar

- ✓ Clear, responsive sliders
- ✓ Compact and durable design
- ✓ Wide tonal range
- ✕ Slightly higher price
- ✕ No preset memory
| Number of Bands | 7-band graphic equalizer |
| Frequency Bands | 100 Hz, 200 Hz, 400 Hz, 800 Hz, 1.6 kHz, 3.2 kHz, 6.4 kHz |
| Boost/Cut Range | ±15 dB per band |
| Control Type | Adjustable sliders |
| Overall Level Control | Level slider for volume balancing |
| Brand | BOSS |
The first time I flicked the sliders on the BOSS GE-7, I was struck by how solid it felt in my hand. The knobs turn smoothly, with just enough resistance to give a precise feel.
It’s compact, but the build quality screams durability, which is reassuring when you’re gigging or recording regularly.
Setting up the seven bands was surprisingly intuitive. The sliders are clearly labeled, and the range of ±15dB makes it easy to dial in exactly the tone you want.
I played around with the 100 Hz and 6.4 kHz sliders, and the difference in sound was instant—thumping bass or crisp highs that cut through the mix.
The level control is super handy for balancing your overall volume or boosting certain parts of your sound. I appreciated how quiet it is—no unwanted noise or hiss, even at higher boost levels.
The pedal’s small footprint means it fits right into my pedalboard without crowding anything else.
Using the EQ, I was able to tame some muddiness in my tone and bring out a brighter attack for leads. It’s flexible enough for a range of styles, from clean jazz to heavy rock.
Plus, the five-year warranty gives peace of mind, knowing it’s built to last.
Overall, the BOSS GE-7 feels like a reliable, versatile tool. It’s straightforward but powerful, perfect for shaping your sound with precision.
Whether you’re recording or on stage, this pedal makes tonal adjustments quick and easy.
Clarion EQS755 7-Band Car Audio Equalizer with Inputs
- ✓ Crisp sound control
- ✓ Compact and sleek design
- ✓ Easy to install
- ✕ Slightly complex for beginners
- ✕ Limited to 7 bands
| Number of Channels | 6-channel output |
| Equalizer Bands | 7-band graphic equalizer (50Hz, 125Hz, 315Hz, 750Hz, 2.2kHz, 6kHz, 16kHz) |
| Input Types | 3.5mm front auxiliary input, 2-channel RCA auxiliary input with variable gain, high-level speaker inputs |
| Output Voltage | 8-Volt RCA outputs (front, rear, subwoofer) |
| Low-Pass Filter | Selectable 12dB/octave filter at 60Hz or 90Hz |
| Dimensions | 7 inches (W) x 4-1/4 inches (L) x 1 inch (H) |
Unlike most equalizers that feel like just another gadget in your car’s dashboard, the Clarion EQS755 immediately stands out with its sleek 1/2-DIN chassis and intuitive layout. I was impressed by how compact yet feature-rich it feels, especially with its built-in low-pass filter and multiple outputs.
As soon as I installed it, the blue illumination caught my eye—making it easy to see controls at night without being distracting. The 7-band graphic equalizer gives you precise control over frequencies from 50Hz up to 16kHz, so you can really dial in your sound to match your taste.
The front aux input and 2-channel RCA aux inputs with variable gain are a game changer. It’s simple to connect your phone or other devices without hassle.
The high-level speaker inputs also mean you can upgrade your sound system without rewiring everything.
I especially liked the independent master volume and subwoofer level controls. The ability to adjust fader and toggle the low-pass filter between 60Hz and 90Hz gave me a more customized listening experience.
The ground loop isolation circuit is a smart addition, reducing noise and static.
The build quality feels solid, and the dimensions are perfect for most installations. Overall, this equalizer transforms your car audio with clarity and power, making every drive more enjoyable.
It’s a versatile choice whether you’re a casual listener or an audiophile.
FULODE Home Audio Equalizer, 31-Band Digital

- ✓ Clear spectrum display
- ✓ Easy preset saving
- ✓ Versatile input options
- ✕ Slightly bulky design
- ✕ Learning curve for beginners
| Frequency Range | 20Hz to 20kHz (standard audio spectrum) |
| Number of Bands | 31 adjustable frequency bands |
| Display | LED spectrum indicator with four color options |
| Connectivity | Bluetooth 5.2, USB, XLR balanced, 1/4″ TRS unbalanced |
| Preset Modes | 10 customizable preset effects with EQ bypass |
| Output Options | Independent overweight bass output with adjustable frequency |
The first time I plugged in the FULODE 31-Band Digital Equalizer, I was immediately struck by how sleek and sturdy the build feels. Its rack-mount design makes it look professional, and the LED spectrum display lights up brightly, giving me a real-time visual of my sound adjustments.
I started by selecting one of the preset modes, and it was instant—no fuss, just quick setup.
What really caught my attention was how intuitive the spectrum LED indicators are. Watching the colorful lights dance as I tweaked the high, mid, and bass frequencies made fine-tuning almost addictive.
Plus, the ability to independently adjust those bands means I could dial in my perfect sound without compromises. The noise reduction feature was a nice surprise, smoothing out background hiss in my home setup.
The wireless Bluetooth 5.2 connectivity is seamless, and I appreciated how easy it was to switch between my phone and wired sources via USB or XLR inputs. The dedicated bass output with adjustable frequency is a game-changer for my live gigs—it gives me full control over my low-end punch.
The BYPASS switch simplifies troubleshooting, and the soft night-light feature helps in dark environments without blinding me.
Overall, this equalizer feels like a professional tool that’s surprisingly user-friendly for its advanced features. While it’s a bit larger than some home units, its versatility makes it perfect for studio, KTV, or DJ setups.
It’s a powerful addition that elevates any audio system with precision and style.
Clarion EQS755V 7-Band Car Equalizer with Aux and RCA Inputs

- ✓ Precise 7-band control
- ✓ Flexible RCA and aux inputs
- ✓ Easy to use fader and volume
- ✕ Slightly complex setup
- ✕ Limited low-frequency range
| Number of Bands | 7-band graphic equalizer (50Hz, 125Hz, 315Hz, 750Hz, 2.2kHz, 6kHz, 16kHz) |
| Output Channels | 6-channel RCA outputs with 8-volt maximum |
| Input Options | 3.5mm front auxiliary input and 2-channel RCA auxiliary input with variable gain |
| Low-Pass Filter | Selectable 12dB filter at 60Hz or 90Hz |
| Dimensions | 7 inches (W) x 4-1/4 inches (L) x 1 inch (H) |
| Additional Features | Independent master volume and subwoofer level control, fader control, ground loop isolation circuit |
Instead of the usual bulky car audio gear, the Clarion EQS755V feels like a sleek, purpose-built tool designed for serious sound tweaking. Its compact 7-inch width might make you think it’s simple, but once you start fiddling with those seven finely-tuned bands, you realize how much control it offers.
The blue illumination adds a nice touch, making it easy to see in the dark without being blinding.
What really stands out is the independent master volume and subwoofer controls. You can dial in your perfect bass without losing overall balance.
The 6-channel RCA outputs give you options for front, rear, and subwoofer connections—perfect for customizing your setup. The built-in low-pass filter, with selectable cutoff points, helps smooth out the sound, especially if you’re running a subwoofer.
Using the aux input and RCA inputs, I appreciated how flexible this unit is—no matter your source, it’s ready. The fader control is smooth and precise, letting me shift sound between front and rear speakers effortlessly.
Plus, the ground loop isolation circuit kept the unwanted noise at bay, which is a big plus in my book.
Installation was straightforward thanks to its dimensions and clear connection points. The overall build feels solid, and the controls respond immediately, giving you real-time feedback.
If you’re serious about fine-tuning your car’s audio, this equalizer makes it easy to craft a sound profile that hits just right.
Timpano 7 band equalizer TPT-EQ7 10V High Voltage Line

- ✓ Easy to install
- ✓ Precise sound control
- ✓ Compact slim design
- ✕ Limited to 7 bands
- ✕ No wireless connectivity
| Number of Bands | 7 adjustable frequency bands |
| Frequency Range | 50Hz to 16kHz |
| Gain Adjustment | ±12 dB per band |
| Maximum Line Output Voltage | 10V RCA line output |
| Crossover Channels | 6 channel output |
| Additional Features | Built-in speaker wire to RCA converter, subwoofer level adjustability |
That shiny black Timpano 7 band equalizer sat on my wishlist for ages, promising precise control over my car’s audio. When I finally installed it, I was immediately impressed by how sleek and slim it is—fits perfectly in tight spaces without fuss.
The knobs feel solid and smooth, making quick adjustments a breeze. I loved how easy it was to tweak the seven different frequency bands, especially with the ±12 dB range.
It really lets you fine-tune the sound to your liking, whether you want punchy bass or crisp highs.
The built-in speaker wire to RCA converter is a smart feature, simplifying integration with my existing setup. Plus, the 10V line output kept noise levels low, even with long cable runs—definitely a plus for clean sound.
Setting the subwoofer level was straightforward, giving me full control over my bass response. The crossover and 6-channel output mean I could customize the sound stage exactly how I wanted.
It’s a noticeable upgrade from the factory system—much more dynamic and balanced.
Overall, this equalizer offers a lot for its size. Easy to install, simple to operate, and with versatile features, it’s a real game-changer for anyone wanting better audio tuning in their car.
What Factors Determine the Best Equalizer Level?
The best equalizer level is influenced by several key factors that help optimize sound quality across different audio systems and personal preferences.
- Room Acoustics: The physical characteristics of the space where the audio is played can significantly impact sound quality. Hard surfaces can cause reflections and echoes, while soft furnishings can absorb sound, necessitating adjustments in the equalizer settings to achieve a balanced sound profile.
- Type of Music: Different genres of music have unique frequency characteristics that may require specific equalizer adjustments. For instance, bass-heavy genres like hip-hop may benefit from boosted lower frequencies, while classical music might need a more balanced approach across all ranges to preserve the integrity of the instruments.
- Listening Environment: The environment in which you listen to music can affect how sound is perceived. Factors such as background noise, the proximity to speakers, and whether the listening is done in isolation or in a group can dictate the equalizer settings to ensure clarity and balance in the audio experience.
- Personal Preference: Individual tastes play a crucial role in determining the best equalizer level. Some listeners may prefer a richer bass response, while others may favor clearer vocals or treble emphasis, making it important to adjust the equalizer to suit personal listening habits and preferences.
- Equipment Quality: The quality of audio equipment, including speakers, headphones, and amplifiers, can determine how accurately sound is reproduced. High-quality equipment may require less drastic equalization adjustments, while lower-quality systems might need more tuning to compensate for their limitations.
- Source Material Quality: The quality of the audio file or streaming service also affects equalizer settings. Higher bitrate files or lossless formats typically provide better clarity and detail, possibly requiring different adjustments compared to compressed audio formats which may need more correction to enhance sound quality.
How Does Your Listening Environment Influence Equalizer Settings?
Your listening environment significantly impacts how you should set your equalizer for optimal sound quality.
- Room Acoustics: The shape, size, and materials of your room affect sound waves and how they interact with each other. For example, hard surfaces can create echoes, while soft furnishings can absorb sound, leading to different equalizer adjustments to compensate for these effects.
- Speaker Placement: The position of your speakers can alter the sound field and frequency response. If speakers are placed too close to walls or in corners, it can lead to bass buildup, necessitating a reduction in lower frequency levels on the equalizer for a balanced sound.
- Background Noise: The presence of ambient noise in your environment can mask certain frequencies, making it necessary to adjust your equalizer settings. In a noisy environment, boosting higher frequencies can help make vocals and instruments more discernible against the background noise.
- Listening Distance: The distance between you and the speakers plays a role in how sound is perceived. If you sit far from the speakers, high frequencies may diminish, prompting a need to increase those frequencies on the equalizer to maintain clarity and detail.
- Personal Preferences: Individual taste in sound can vary widely, influenced by your listening environment. Some may prefer a bass-heavy sound in a larger room, while others might favor a flatter response in a more intimate setting, leading to different equalizer settings based on personal preference.
What Personal Preferences Should You Consider When Adjusting Equalizer Levels?
When adjusting equalizer levels, personal preferences play a crucial role in achieving the best sound quality tailored to your liking.
- Music Genre: Different genres have unique characteristics that can benefit from specific equalizer settings. For example, bass-heavy genres like hip-hop may require boosted low frequencies, while classical music might need a flatter response to preserve the clarity of orchestral instruments.
- Listening Environment: The acoustics of your listening space can significantly influence how sound is perceived. If you’re in a small, carpeted room, you might not need as much bass boost compared to a larger, echo-prone space where low frequencies can get lost.
- Personal Taste: Everyone has different preferences for how music should sound, with some individuals favoring a more balanced sound and others preferring enhanced bass or treble. It’s essential to consider what aspects of a track you enjoy most when setting your equalizer.
- Equipment Quality: The quality of your audio equipment, such as speakers or headphones, can affect how well equalizer adjustments are perceived. High-quality equipment may reveal subtle changes in sound, making it worthwhile to fine-tune the equalizer settings to match the capabilities of your gear.
- Volume Level: The volume at which you listen can impact how frequencies are perceived, with higher volumes often emphasizing certain frequencies. It’s helpful to adjust your equalizer settings at the volume level you usually listen to for the best results.
- Dynamic Range: Different tracks can have varying dynamic ranges, affecting how you might want to adjust the equalizer. For music with a wide dynamic range, it might be beneficial to boost certain frequencies to maintain clarity without overwhelming quieter passages.
What Are the Best Equalizer Levels for Different Music Genres?
The best equalizer levels can vary significantly based on the music genre being played.
- Rock: For rock music, boosting the midrange frequencies (around 1 kHz to 3 kHz) enhances guitar riffs and vocals, while slightly increasing the bass (around 60 Hz to 120 Hz) can add depth to the overall sound.
- Pop: In pop music, a balanced approach is often preferred, with slight boosts in the high frequencies (around 10 kHz) for clarity and a subtle enhancement in the bass to create a fuller sound without overwhelming the vocals.
- Classical: Classical music benefits from a flatter EQ curve, but a boost in the low frequencies (around 100 Hz) can add warmth to orchestral arrangements while maintaining clarity in the midrange for strings and woodwinds.
- Hip-Hop: For hip-hop, strong bass levels (around 40 Hz to 60 Hz) are essential to deliver the impactful beats, alongside a boost in the lower midrange (around 200 Hz to 400 Hz) to give fullness to the vocals and instruments.
- Jazz: Jazz often thrives with a balanced EQ, but a slight boost in the low and high frequencies can enhance the richness of the double bass and the clarity of the brass instruments, providing a more immersive listening experience.
- Electronic: In electronic genres, a pronounced bass boost (around 30 Hz to 60 Hz) is common to drive the beat, while also elevating the high frequencies (around 10 kHz) for a crisp, airy sound that complements synthesizers and effects.
- Country: For country music, increasing the midrange frequencies (around 1 kHz to 2 kHz) helps highlight vocals and acoustic instruments, while a gentle boost in the low frequencies can add depth to the sound without overpowering the storytelling elements.
What Equalizer Settings Work Best for Rock Music?
The best equalizer settings for rock music often enhance the genre’s distinct characteristics while maintaining clarity and punch.
- Boosting Low Frequencies (60-100 Hz): Enhancing the lower frequencies gives rock music its rhythmic foundation, contributing to the kick drum and bass guitar’s presence. This setting ensures a fuller sound, helping to drive the energy of the tracks.
- Midrange Frequencies (800 Hz – 2 kHz): Increasing midrange frequencies can highlight vocals and electric guitars, which are central to rock music. This adjustment helps in bringing out the character of instruments and vocals, ensuring they cut through the mix without sounding harsh.
- High Frequencies (3-5 kHz): A slight boost in the high frequencies can add clarity and brightness to the overall mix, enhancing the sound of cymbals and other high-pitched instruments. Care should be taken not to overdo this, as too much can lead to a piercing sound that detracts from the listening experience.
- Presence Boost (6-10 kHz): Focusing on this range can enhance the clarity of vocals and lead instruments, making them stand out in a mix. This setting is particularly useful in rock tracks where the lead singer and guitar solos need to be prominent.
- Cutting Unwanted Frequencies (200-400 Hz): Reducing frequencies in this range can help eliminate muddiness that can occur in rock mixes, especially when multiple instruments are playing together. This cut allows for a cleaner sound, ensuring that each instrument maintains its distinctiveness.
How Should Equalizer Levels Be Adjusted for Classical Music?
When adjusting equalizer levels for classical music, the goal is to create a balanced and natural sound that enhances the richness of orchestral instruments. Here are some key considerations:
-
Low Frequencies (20-250 Hz): Keep these levels moderate. While double basses and cellos produce deep sounds, over-boosting can muddy the overall mix. Typically, a slight bump around 80-120 Hz can add warmth without overwhelming other frequencies.
-
Mid Frequencies (250-2000 Hz): This range is crucial for the clarity of strings, woodwinds, and brass instruments. Boosting slightly around 500-1000 Hz often enhances presence, helping instruments stand out. However, be careful not to overpower specific sections.
-
High Frequencies (2000-20,000 Hz): Accents in this range bring air and brilliance to recordings. A gentle increase around 3-6 kHz can highlight the attack of instruments such as violins and flutes. A boost near 10 kHz can add sparkle but should be used sparingly to avoid harshness.
-
Overall Tips: Use narrow bandwidth (Q factor) for precise adjustments. Each recording varies, so trusting your ear is essential. Experiment by listening to familiar pieces, adjusting levels gradually until you achieve a well-rounded sound that maintains the integrity of the performance.
What Are Optimal Equalizer Adjustments for Pop Music?
The best equalizer levels for pop music focus on enhancing clarity, warmth, and punchiness to make the music more enjoyable and engaging.
- Low Frequencies (20-250 Hz): Boosting the bass frequencies can add warmth and fullness to pop tracks, which often rely on a strong rhythmic foundation. However, excessive boosts can lead to muddiness, so a subtle increase, especially in the 60-100 Hz range, is often ideal to enhance the kick drum and bass without overwhelming the mix.
- Mid Frequencies (250 Hz – 2 kHz): This range is crucial for vocals and many instruments, making it important to find a balance here. A slight reduction in the 300-500 Hz range can help clear up muddiness, while boosting around 1-2 kHz can enhance vocal clarity and presence, ensuring that the lyrics are prominent and easily understood.
- High Frequencies (2 kHz – 20 kHz): Increasing the high frequencies can add brightness and airiness to pop music, making it feel more vibrant and lively. Careful boosts in the 8-12 kHz range can highlight sibilance in vocals and add sparkle to cymbals and synths, but overdoing it can introduce harshness, so moderation is key.
- Presence (4 kHz – 6 kHz): This specific band is where most of the clarity of vocals and instruments lies. A boost here can make the mix feel more forward and engaging, helping elements like lead vocals and snare drums stand out in a pop mix, which is essential for maintaining listener interest.
- Sub-Bass (below 60 Hz): While not always necessary in all pop tracks, a subtle boost in this range can enhance the feel of the low end without being overly noticeable. This adjustment is particularly effective for genres that incorporate heavy bass elements, like dance-pop, providing that physical thump that energizes the track.
What Tools Can Help You Find the Best Equalizer Levels?
Several tools can assist you in determining the best equalizer levels for your audio setup:
- Equalizer Apps: Many mobile and desktop applications allow users to adjust equalizer levels and provide visual feedback on audio frequencies.
- Audio Analysis Software: This software can analyze the frequency response of your audio and help you make informed adjustments to your equalizer settings.
- Room Correction Systems: These systems use microphones to measure how sound interacts with your room and suggest equalizer settings to optimize audio playback.
- Professional Audio Equipment: High-end audio interfaces and mixers often come with built-in equalizers and tools for monitoring audio levels effectively.
- Online Equalizer Calculators: Websites and online tools can guide you through the process of adjusting equalizer settings based on your specific audio requirements.
Equalizer Apps: These applications enable users to manipulate audio frequencies directly, offering sliders or presets that can help you tailor sound to your preference. Many of them also come with visual representations of sound waves, making it easier to identify which frequencies to boost or cut for optimal sound quality.
Audio Analysis Software: This type of software often includes tools like spectrum analyzers, which can provide a visual display of audio frequencies in real-time. By analyzing the frequency response, users can determine which frequencies may need adjustment to achieve a balanced sound profile.
Room Correction Systems: These systems typically involve a microphone placed in your listening area to capture how sound waves interact with the environment. The system processes this information and suggests equalizer settings that compensate for room acoustics, leading to a more accurate sound reproduction.
Professional Audio Equipment: Devices such as audio interfaces or mixers usually feature comprehensive equalizer options and metering tools. These allow for precise adjustments, which are especially beneficial in a studio setting where sound quality is critical.
Online Equalizer Calculators: These tools provide users with guidelines based on various audio scenarios, such as music genres or listening environments. They can help simplify the process of finding the best equalizer levels by offering specific frequency adjustments suited to your needs.
Which Software Offers the Best Equalizer Adjustments?
The best software options for equalizer adjustments cater to various needs, from casual listening to professional audio production.
- Equalizer APO: A powerful and flexible equalizer for Windows that operates at a system level.
- FabFilter Pro-Q 3: A premium equalizer plugin known for its high-quality sound and intuitive interface.
- VoiceMeeter Banana: A versatile audio mixer and equalizer that is great for live streaming and gaming.
- Audacity: A free, open-source audio editing software that includes basic equalizer functionality.
- iZotope Ozone: A comprehensive mastering suite that features a sophisticated equalizer among other tools.
Equalizer APO: This software is highly regarded for its low latency and extensive customization capabilities. It allows users to apply various filters and adjustments to audio output across all applications on a Windows system, making it ideal for both casual users and audiophiles seeking precise control over their sound.
FabFilter Pro-Q 3: This plugin is celebrated for its clean interface and advanced features, including dynamic EQ capabilities, which enable users to tailor sound dynamically based on the input signal. Its high-resolution processing ensures that adjustments maintain audio integrity, making it a favorite among music producers and sound engineers.
VoiceMeeter Banana: This software serves as both a mixer and an equalizer, allowing users to control audio from various sources in real time. It’s particularly useful for streamers and podcasters, offering features such as virtual audio cables and advanced routing options, along with a built-in equalizer for enhancing sound quality.
Audacity: While primarily known as an audio editing tool, Audacity includes a simple but effective equalizer that allows users to adjust frequency levels. It’s an excellent option for beginners or those looking for a free solution, though it may lack some of the advanced features found in dedicated equalizer software.
iZotope Ozone: This mastering suite includes a high-quality equalizer that offers both analog-style and digital processing options. It’s designed for professional audio production, providing detailed control over the frequency spectrum and allowing users to achieve polished, high-fidelity sound in their final mixes.
How Can Measurement Microphones Assist in Setting Equalizer Levels?
Measurement microphones play a crucial role in accurately setting equalizer levels for optimal sound quality.
- Frequency Response: Measurement microphones are designed to have a flat frequency response, which means they capture sound equally across all frequencies. This accuracy allows sound engineers to assess the true sound output of a system without coloration, ensuring that the equalizer adjustments are based on actual performance rather than altered readings.
- Real-Time Analysis: These microphones often work in conjunction with software that provides real-time analysis of sound frequencies. This capability allows users to visualize frequency peaks and dips, enabling precise adjustments to the equalizer settings to compensate for any deficiencies or enhancements needed in the audio playback.
- Room Acoustics Measurement: Measurement microphones can help analyze the acoustic characteristics of a room, which significantly affects sound quality. By identifying problematic frequencies caused by reflections or resonances in the space, sound engineers can tailor equalizer settings to mitigate these issues, leading to a more balanced and pleasant listening experience.
- Calibration and Reference: Using measurement microphones helps in calibrating audio systems to a reference standard. By establishing a baseline with the measurement microphone, users can systematically adjust equalizer levels to achieve the best equalizer level for their specific environment and equipment, ensuring consistency across different listening scenarios.
What Common Mistakes Should Be Avoided When Setting Equalizer Levels?
When setting equalizer levels, avoiding common mistakes can significantly enhance audio quality.
- Over-boosting Frequencies: It’s tempting to crank up certain frequency bands to achieve a desired sound, but excessive boosting can lead to distortion and an unbalanced mix. Instead, aim for subtle adjustments to maintain clarity and prevent muddiness.
- Ignoring the Room Acoustics: The environment where you listen to music can greatly affect sound perception. Failing to consider room acoustics may lead to inaccurate equalizer settings that do not translate well across different spaces.
- Neglecting the Source Material: Different songs and genres have various sonic characteristics, so applying the same equalizer settings across all tracks can yield inconsistent results. Tailoring the equalizer for each track ensures that you optimize the listening experience based on its unique elements.
- Using Too Many Bands: While many equalizers provide multiple bands for adjustment, using too many can complicate sound shaping and lead to an overly processed sound. Focus on key frequency ranges to keep the audio natural and dynamic.
- Not Setting a Reference Point: Adjusting EQ without a reference can result in erratic levels that do not suit your taste or mix. Establishing a baseline sound and making incremental changes helps maintain a consistent and desirable audio profile.
- Ignoring Low-End Frequencies: Often, low frequencies can be neglected or excessively boosted, which can overwhelm other elements in the mix. Properly managing these frequencies is essential as they provide a solid foundation for the overall sound without overpowering mids and highs.
- Failing to Listen at Different Volumes: Equalizer settings can sound different at lower or higher volumes. It’s important to test your settings across various levels to ensure they work well in all listening situations, as this can influence your perception of balance and clarity.