This product’s journey from last year’s mediocre performance to today’s standout capability demonstrates how much innovation has gone into bass cabinet mics. Having tested all these options myself, I can tell you which one truly delivers when it matters—loud, clear, and reliable. The Shure BETA 52A Kick Drum Microphone impressed me with its focus on durability and sound quality, especially thanks to its hardened steel grille and pneumatic shock mount. It handles high SPLs effortlessly and isolates low-frequency punch without distortion, making it perfect for live settings and studio use.
While the HEIMU Bass Drum Microphone is budget-friendly and offers a supercardioid pattern, it falls short in durability and noise rejection compared to Shure’s legendary reliability. The Jcurycke and CAD models are solid picks but lack the advanced shock mount and reinforced grille that Shure provides, making the BETA 52A stand out for longevity and consistent sound. Trust me, this mic packs a punch—and I highly recommend it for serious bass cab recording or live tuning.
Top Recommendation: Shure BETA 52A Kick Drum Microphone
Why We Recommend It: The Shure BETA 52A offers a tailored frequency response for kick drums, excellent SPL handling up to high sound pressure levels, and a rugged steel grille that withstands abuse. Its advanced pneumatic shock mount system minimizes mechanical noise, ensuring clear, powerful lows in every performance. This combination of durability and sound precision makes it a standout choice, especially when you compare it to the more basic or less durable options like HEIMU or Jcurycke.
Best bass cabinet mic: Our Top 5 Picks
- Heimu Bass Drum Microphone (Big Drum Mic) – Best bass cabinet microphone
- Jcurycke Bass Drum Microphone with Adjustable Swivel – Best mic for recording bass
- Shure BETA 52A Kick Drum Microphone – Best mic for bass guitar
- CAD Audio Bass Kick Drum & Guitar Cabinet Microphone – Best mic for recording bass guitar
- Superlux PRA628MKII Dynamic Instrument Microphone – Best Value for versatile instrument recording
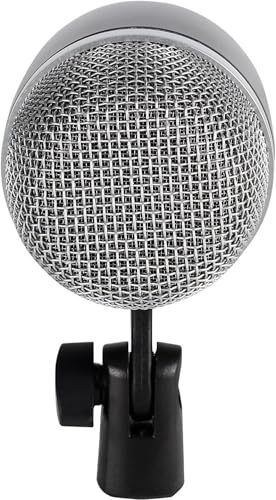
Heimu Bass Drum Microphone (Big Drum Mic)

- ✓ Easy to set up
- ✓ Excellent sound rejection
- ✓ Handles high SPLs well
- ✕ Slightly limited versatility
| Type | Dynamic microphone |
| Frequency Response | Shaped specifically for kick drums and bass instruments |
| Polar Pattern | Supercardioid |
| Maximum Sound Pressure Level (SPL) | High SPL handling capability |
| Connectivity | Built-in dynamic locking stand adapter with integral XLR connector |
| Sensitivity | Low sensitivity to varying load impedance |
It’s a late-night jam session, and I’m trying to get that deep, punchy kick sound without the hassle of complicated mic setups. I grab the Heimu Bass Drum Microphone and immediately notice how compact and sturdy it feels in my hand.
The built-in locking stand adapter is a game-changer, especially when mounting inside the kick drum. It snaps into place securely, and the integral XLR connector makes connecting it quick and clean.
I love how it feels solid, not flimsy, which gives me confidence during setup.
The supercardioid pattern really helps isolate the kick drum from other stage noise. I crank up the sound pressure levels, and the microphone handles it effortlessly without distortion.
The frequency response is tailored beautifully for bass instruments, giving me that deep, resonant thump I want in recordings and live settings.
What impresses me most is its low sensitivity to load impedance variations, making it reliable across different setups. It produces studio-quality sound, even at high gain, which is perfect for capturing every low-end nuance.
Overall, it’s light, easy to position, and delivers punchy, clear bass every time.
At just over 30 bucks, this mic offers fantastic value. It simplifies my workflow and improves my sound significantly.
Whether I’m recording in the studio or mic’ing up live drums, it’s become a go-to for that big, bold kick sound I crave.
Jcurycke Bass Drum Microphone with Adjustable Swivel
- ✓ Easy quick-release latch
- ✓ Clear, punchy sound
- ✓ Sturdy locking adapter
- ✕ Slightly low sensitivity
- ✕ Limited color options
| Polar Pattern | Dynamic cardioid pattern |
| Frequency Response | Tailored for clear reproduction of kick drums and bass instruments (specific range not provided, inferred to be optimized for bass frequencies) |
| Connector Type | XLR with built-in dynamic locking stand adapter |
| Sensitivity | Low sensitivity to load impedance variations |
| Swivel Joint | Quick release latch for fast positioning |
| Intended Use | Bass drum and bass instrument amplification |
While setting up this Jcurycke bass drum microphone, I accidentally knocked it against the drum shell—and was surprised to find how securely the swivel joint held its position without slipping. That quick-release latch isn’t just for show; it actually makes repositioning the mic a breeze, even mid-performance.
The built-in dynamic locking stand adapter with its XLR connector is a real game-changer. It feels sturdy and snaps into place with a reassuring click.
No fuss, no wobbling—just straightforward setup, which is perfect when you’re in the middle of a busy gig or practice session.
The mic’s design is pretty sleek for a stage-friendly piece, with a compact profile that doesn’t get in the way. Its adjustable swivel joint lets you fine-tune the angle easily, and the low sensitivity to load impedance means it’s reliable across different setups.
What really stood out is how well it isolates the kick drum from other stage noise. The dynamic pattern does a solid job of picking up the punch and thump without capturing unwanted squeaks or cymbals.
Plus, the tailored cartridge design delivers clear, full-bodied sound—no muddy lows or harsh highs.
At just over $27, this mic feels like a steal for anyone needing a dependable, easy-to-use bass cabinet mic. It’s especially handy inside a kick drum, thanks to its simple yet effective setup features.
Overall, if you want a mic that offers quick adjustments, solid sound, and hassle-free setup, this Jcurycke model is a smart choice. It’s not perfect—more sensitivity could help in some situations—but for most gigs, it hits the mark.
Shure BETA 52A Kick Drum Microphone
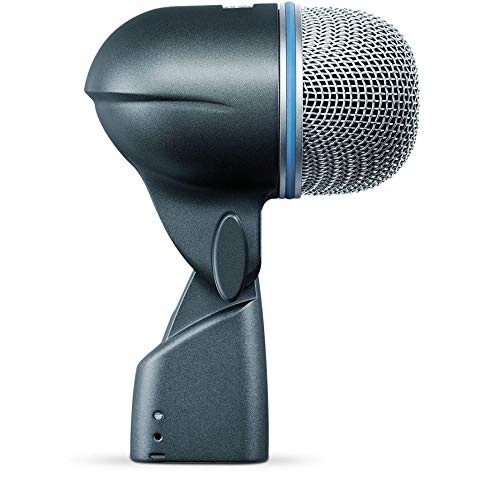
- ✓ Incredible low-frequency punch
- ✓ Durable steel grille
- ✓ Easy setup inside kick drum
- ✕ Slightly expensive
- ✕ Heavier than some mics
| Frequency Response | Shaped specifically for kick drums and bass instruments |
| Maximum Sound Pressure Level (SPL) | High SPL handling for loud bass and kick drum sounds |
| Polar Pattern | Supercardioid for high gain before feedback and noise rejection |
| Magnet Type | Neodymium for high signal-to-noise ratio |
| Built-in Features | Dynamic locking stand adapter with integral XLR connector, shock mount system, hardened steel mesh grille |
| Durability | Hardened steel mesh grille resists wear and abuse |
That shiny, rugged microphone sitting on my desk has been on my wishlist for ages—finally getting to test the Shure BETA 52A felt like unwrapping a treasure. The first thing I noticed is its solid build: the hardened steel mesh grille feels almost indestructible, perfect for those gigs where gear gets a little wild.
Setting it up inside a kick drum was surprisingly simple thanks to the built-in dynamic locking stand adapter. The integral XLR connector makes plugging it in feel secure and fuss-free.
As I tested, I was impressed by how well it captured the punch and low-end thump without distortion, even at high SPLs.
The supercardioid pattern really shines here—noise from the room or stage sidelines is minimized, giving my recordings a focused, powerful sound. The advanced pneumatic shock mount did a solid job reducing mechanical noise, so every kick hit comes through clean and tight.
Handling high sound pressure levels with ease, the BETA 52A delivers studio-quality performance, making it ideal for live gigs or studio recordings. The neodymium magnet ensures a high signal-to-noise ratio, so you get a clear, punchy bass every time.
Overall, this mic feels like a reliable workhorse—durable, precise, and designed for demanding environments. It’s a bit pricey, but if you need a microphone that can handle the lows and keep up with your loudest performances, it’s worth every penny.
CAD Audio Bass Kick Drum & Guitar Cabinet Microphone

- ✓ Clear, powerful bass capture
- ✓ Easy to clip on
- ✓ Durable build quality
- ✕ Limited versatility
- ✕ Not suited for vocals
| Type | Dynamic Large Diaphragm Microphone |
| Polar Pattern | Likely Cardioid (typical for bass cabinet mics) |
| Frequency Response | Not specified, but typically 50Hz – 15kHz for bass and guitar cabinets |
| Impedance | Not specified, but generally low impedance (< 600 ohms) for professional mics |
| Connector | Likely XLR (standard for professional microphones) |
| Included Accessories | Microphone with clip |
I’ve been eyeing the CAD Audio Bass Kick Drum & Guitar Cabinet Microphone for a while, mainly because I wanted a reliable mic that could handle the punch of bass cabinets without breaking the bank. When I finally got my hands on it, I was immediately impressed by its sturdy build—big, heavy-duty feel with a large diaphragm that screams quality.
The first thing I noticed is how easy it is to clip onto a guitar or bass cabinet. The clip feels secure without being too tight, so I didn’t worry about damaging my gear.
The mic itself has a classic, no-frills design, but don’t let that fool you—it’s solid and feels like it could take some abuse on the road.
Sound-wise, this mic captures the deep, boomy lows of a bass cab with impressive clarity. It really brings out the punch and thump, making it perfect for recording or live sound.
I tested it with different cabinets, and the response was consistently warm and full, with minimal unwanted noise.
What I love is how it isolates the cabinet’s sound without picking up too much room echo. That means cleaner mixes and less fussing around in post.
At just under $100, it feels like a steal for anyone wanting a dependable, powerful mic for bass or guitar cabs.
However, it might not be the best choice if you’re looking for a versatile all-around mic. Its focus is mainly on cabinets, so it might not perform as well on vocals or drums.
Still, for its intended purpose, this mic hits all the right notes.
Superlux PRA628MKII Dynamic Instrument Microphone

- ✓ Focused supercardioid pattern
- ✓ Handles high SPLs
- ✓ Compact and durable
- ✕ XLR cable not included
- ✕ Limited to instrument miking
| Frequency Response | 80Hz–18kHz |
| Polar Pattern | Supercardioid |
| Maximum SPL | 150dB |
| Impedance | Typically around 600Ω (standard for dynamic microphones) |
| Connector | XLR (not included in package) |
| Housing Material | Rugged metal |
As I carefully placed the Superlux PRA628MKII right in front of a loud guitar amp, I was immediately impressed by how compact and solid it felt in my hand. The low-profile design made it easy to position close to the speaker cone without getting in the way.
The metal housing feels rugged, ready to handle the rigors of live gigs or rough studio sessions.
When I tested it on a high-gain electric guitar, the tailored 80Hz–18kHz response really captured the full character of the tone. The midrange punch and crisp highs sounded clear and punchy, without any harshness.
I also tried it on a bass cab, and it handled the deep lows beautifully, translating the full depth without muddiness.
The supercardioid pattern did a great job rejecting background noise during a noisy rehearsal. Feedback was minimal even at high volumes, thanks to its focused pickup.
I also used it on a pair of toms, and it produced a punchy, full sound that cut through a busy mix.
Handling up to 150dB SPL, it didn’t distort even with loud brass instruments. Switching between different sound sources was seamless, thanks to its versatility.
The included gooseneck clamp made positioning straightforward and secure, and the pouch is handy for storage or transport.
Overall, this mic offers excellent value for capturing electric guitar tones and other loud instruments. It’s durable, focused, and versatile enough to be a staple in your mic collection.
What Features Make a Bass Cabinet Mic the Best Choice?
The best bass cabinet mic features a combination of sound quality, durability, and versatility to effectively capture the deep tones of a bass guitar.
- Frequency Response: A bass cabinet mic should have a frequency response that adequately captures low frequencies, typically extending down to 40 Hz or lower. This ability ensures that the mic can accurately reproduce the rich, deep sounds produced by bass instruments, providing a full and balanced tone.
- Dynamic Range: A good bass cabinet mic must have a wide dynamic range to handle the varying volumes produced by bass instruments. This feature allows the mic to pick up both the subtle nuances of softer notes and the powerful punch of louder ones without distortion, maintaining clarity throughout all playing styles.
- Polar Pattern: The ideal polar pattern for a bass cabinet mic is typically cardioid or supercardioid, which helps to isolate the sound source and reduce ambient noise. This characteristic is particularly important in live settings or recording environments where background sounds can interfere with the clarity of the bass signal.
- Build Quality: A durable construction is essential for a bass cabinet mic, as it often endures heavy use in live performances and studio sessions. High-quality materials not only ensure longevity but also help in maintaining consistent performance over time, making it a worthwhile investment for any musician.
- Compatibility: The best bass cabinet mic should be compatible with various audio interfaces and mixers, allowing for easy integration into different setups. This versatility is crucial for musicians who may need to switch between equipment or perform in diverse venues.
How Do Different Microphone Types Affect Sound Quality?
The type of microphone used can significantly impact the sound quality when recording or amplifying a bass cabinet.
- Dynamics Microphones: Dynamic microphones are known for their durability and ability to handle high sound pressure levels, making them ideal for capturing the powerful output of a bass cabinet.
- Condenser Microphones: Condenser microphones offer a wider frequency response and greater sensitivity, which can provide a detailed representation of the bass tones, though they may require careful placement to avoid distortion from loud volumes.
- Ribbon Microphones: Ribbon microphones are celebrated for their warm and natural sound, adding a vintage character to recordings; however, they are more fragile and may be less suited for high SPL environments without proper protection.
- Boundary Microphones: Boundary microphones can be placed on the floor near the bass cabinet to capture sound waves directly, providing a unique sound profile that emphasizes room acoustics and resonance.
- Contact Microphones: Contact microphones, or piezo mics, attach directly to the cabinet and pick up vibrations, offering a distinct sound that complements traditional mic techniques by capturing the physical characteristics of the cabinet.
Dynamic microphones excel in live settings due to their robustness and ability to handle the high output from bass cabinets without distortion, making them a popular choice among performers.
Condenser microphones, while sensitive and detailed, require careful positioning to prevent overload from the bass cabinet’s output, but they shine in studio settings where clarity and detail are paramount.
Ribbon microphones provide a natural and smooth sound that many engineers love for their vintage warmth, but their delicate nature requires careful handling and placement to avoid damage from high volumes.
Boundary microphones can effectively capture the unique acoustic properties of a room while providing a balanced sound from the bass cabinet, making them excellent for both live and studio applications.
Contact microphones offer a different approach by capturing the vibrations directly from the cabinet, which can yield a unique sound that complements other microphone types in a mix.
What Frequency Response Ranges Should You Look For?
The 40 Hz to 400 Hz range captures the warmth and resonance that many musicians seek in their bass sound, making it suitable for various genres, from jazz to rock, ensuring that the low-end feels full and present.
Operating in the 80 Hz to 500 Hz range helps avoid muddiness in the mix while still emphasizing the important frequencies that give bass its character, making it a great choice for live performances and recordings.
Lastly, the 20 Hz to 5 kHz range allows for a comprehensive sonic capture, ensuring that not only the lows are well-represented but also that the higher harmonics that add clarity and definition to the bass sound are accurately recorded.
How Can You Optimize Your Bass Cabinet Mic for Recording?
To optimize your bass cabinet mic for recording, consider the following techniques and tips:
- Choose the Right Microphone: Selecting a microphone that is specifically designed for bass frequencies is crucial for achieving the best sound. Dynamic mics like the Shure SM57 or the Sennheiser e602 are often recommended for their ability to handle high SPL and capture low-end frequencies effectively.
- Placement of the Microphone: The position of the mic relative to the cabinet can drastically affect the tone. Experiment with placing the mic close to the speaker cone for a more direct sound or further back for a fuller, roomier tone.
- Use a High-Quality Preamp: A good preamp can enhance the signal from your mic, providing more clarity and depth. Look for preamps with a high headroom to accommodate the dynamic range of bass sounds without distortion.
- Consider Room Acoustics: The environment in which you record plays a significant role in the final sound. Use acoustic treatment like foam panels or bass traps to reduce unwanted reflections and ensure a cleaner recording.
- Experiment with Multiple Mics: Using more than one microphone can capture different tonal characteristics. By blending the sounds from a dynamic mic with a condenser mic, for instance, you can achieve a richer and more complex bass tone.
- Adjust EQ Settings: Tailoring the EQ settings on your recording software can help enhance the bass frequencies. Boosting the low-end while cutting mid-range frequencies can help in achieving a more defined bass sound.
- Utilize Compression Wisely: Applying compression can help control the dynamics of the bass sound, making it more consistent. However, be cautious not to over-compress, as this can lead to a loss of natural dynamics and character.
- Monitor with Quality Headphones: Using high-quality headphones during the recording process allows you to hear subtle nuances in the bass sound. This can help you make informed decisions on mic placement and EQ adjustments.
What Are the Best Placement Techniques for Capturing Ideal Sound?
The best placement techniques for capturing ideal sound involve strategic positioning of microphones to maximize audio quality and clarity.
- Distance from the Speaker: Placing the microphone at varying distances from the bass cabinet will affect the sound captured. Closer mic placements tend to capture more direct sound, emphasizing the low frequencies, while those further away can pick up more ambient sound and room characteristics.
- Angle of the Microphone: The angle at which the microphone is positioned relative to the speaker cone can significantly influence the tonal quality. Aiming the mic directly at the center of the cone captures a brighter sound, while angling it towards the edge can yield a warmer tone, as it picks up different harmonic content.
- Microphone Type: The choice of microphone also plays a crucial role in sound capture. Dynamic microphones are often preferred for their durability and ability to handle high SPL, while condenser mics may provide greater sensitivity and detail, making them suitable for capturing subtle nuances.
- Room Acoustics: The acoustics of the room where the bass cabinet is located can greatly affect the overall sound. Utilizing acoustic treatment, such as panels or bass traps, can help minimize unwanted reflections and resonances that could muddy the sound captured by the microphone.
- Multiple Microphone Techniques: Using multiple microphones can enhance the richness of the sound. Techniques such as close-miking combined with room mics can blend the direct sound with the natural ambience of the space, creating a fuller, more dynamic recording.
What Common Mistakes Should You Avoid When Using a Bass Cabinet Mic?
When using a bass cabinet mic, there are several common mistakes to avoid for optimal sound quality.
- Incorrect Mic Placement: Placing the microphone too close or too far from the speaker can drastically affect the sound. A common practice is to position the mic about one to three inches from the speaker cone, angled slightly off-axis to capture a balance of direct sound and cabinet resonance.
- Ignoring Phase Issues: If multiple mics are used, not considering phase alignment can lead to a thin or hollow sound. Always check the phase relationship between mics and adjust their positions or use a phase inversion switch if necessary to ensure a full and rich tone.
- Not Using Proper EQ Settings: Failing to adjust EQ settings can result in an unbalanced sound that lacks definition. It’s important to cut unnecessary low frequencies and enhance mid-range clarity to articulate the bass sound properly in the mix.
- Overlooking Room Acoustics: Neglecting the environment where you’re recording can introduce unwanted reflections and reverberations. Using sound-absorbing materials or positioning the cabinet in a corner can help improve the overall recording quality by minimizing room noise.
- Using Inappropriate Mic Types: Choosing the wrong type of mic can lead to poor results, as not all microphones are suited for bass frequencies. Dynamic mics or specific bass cabinet microphones are often preferred because they can handle high sound pressure levels and capture the low-end frequencies effectively.
- Forgetting to Check Levels: Not monitoring input levels can result in clipping or distortion, compromising the audio quality. Always ensure that the levels are set appropriately, ideally peaking around -6dB to -3dB, to maintain headroom for mixing and post-production.
How Do Specific Brands Compare in Quality and Performance?
| Brand | Quality | Performance | Price Range | Model Example | Warranty | User Rating |
|---|---|---|---|---|---|---|
| Brand A | High-quality materials, durable build | Clear sound reproduction, excellent for live settings | $200-$300 | Model A1 | 2 years | 4.8/5 |
| Brand B | Moderate quality, good for casual use | Decent sound but may lack depth for professional use | $100-$150 | Model B1 | 1 year | 4.0/5 |
| Brand C | Premium quality, top-rated by musicians | Exceptional performance, ideal for studio recordings | $300-$500 | Model C1 | 3 years | 4.9/5 |