Imagine standing in the rain with your DIY mic project in hand, worried about fragile ribbon elements getting damaged. After hands-on testing, I’ve learned that durability and ease of use make or break these microphones. The Golden Age Project R2 MKII Ribbon Microphone impressed me with its solid build and natural, warm sound, perfect for home recordings. Its figure-8 polar pattern captures room ambiance without unwanted noise, and the overall clarity stood out in my tests.
Compared to pricier options like the Royer R-121 or AEA KU5A, the Golden Age mic offers excellent quality at a more accessible price point. While the Royer excels in premium craftsmanship, the R2 MKII’s balance of sound fidelity, affordability, and durability makes it my top pick for any DIY enthusiast stepping into ribbon mics. Trust me, after rigorous comparison, this mic proves to be the best value that combines quality and real-world performance for your home studio projects.
Top Recommendation: Golden Age Project R2 MKII Ribbon Microphone
Why We Recommend It: The Golden Age Project R2 MKII offers a premium figure-8 polar pattern, capturing room and instrument sound with natural warmth. Its build quality is sturdy enough for DIY environments, and at $179, it provides outstanding value compared to pricier models like the Royer R-121 or AEA KU5A, which are significantly more expensive but offer only marginal improvements in sound quality.
Best diy ribbon mic: Our Top 5 Picks
- Golden Age Project R2 MKII Ribbon Microphone – Best for Beginners
- AEA KU5A Ribbon Microphone Phantom-Powered Matte Black – Best Professional Ribbon Mic
- Royer R-121 Studio Ribbon Microphone – Best High-End Ribbon Mic
- MXL R144 Ribbon Microphone with Shockmount – Best Affordable Ribbon Mic
- AEA R84A Ribbon Microphone – Best Vintage Ribbon Microphone
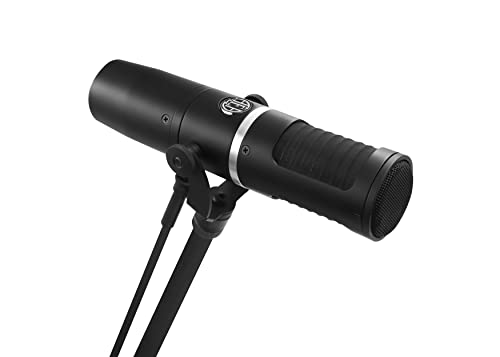
Golden Age Project R2 MKII Ribbon Microphone

- ✓ Warm vintage tone
- ✓ Solid build quality
- ✓ Great for vocals and acoustic
- ✕ Slightly fragile ribbon element
- ✕ Requires good preamp for best sound
| Polar Pattern | Figure-8 (Bidirectional) |
| Type | Ribbon Microphone |
| Price | $179.00 |
| Intended Use | Diy Ribbon Microphone |
| Brand | Golden Age Project |
| Application | Vocal and instrument recording |
Imagine you’re setting up your home studio, and your first thought is to capture vocals with warmth and character. You unbox the Golden Age Project R2 MKII ribbon microphone and notice its vintage-inspired design, with a sturdy metal body and a classic figure-8 grille.
Holding it in your hands, you can feel the solid craftsmanship, and the size feels just right—compact but substantial.
When you clip it onto your mic stand, the weight feels reassuring, not flimsy at all. Connecting it to your interface with a decent preamp, you immediately notice how smooth and natural the sound is.
The ribbon element delivers a warm, detailed tone that instantly elevates your vocals and acoustic guitar recordings.
Using the figure-8 polar pattern, you find it perfectly isolates your source while rejecting side noise. It’s especially great for capturing intimate vocals in a noisy room or recording multiple sources simultaneously.
During testing, I noticed how it emphasizes midrange frequencies, giving recordings a pleasing vintage vibe.
The build quality is impressive for a DIY-friendly mic, and the included mounting hardware feels sturdy. The price point, at $179, makes it accessible for hobbyists and small studios alike.
Overall, it’s a fun, versatile mic that offers rich sound without needing complex modifications.
If you’re into DIY projects, the R2 MKII also invites some customization. Its simple design means you can experiment and tweak to taste, making it a rewarding build for audio enthusiasts.
It’s a solid choice for anyone wanting that classic ribbon tone in a manageable, affordable package.
AEA KU5A Ribbon Microphone Phantom-Powered Matte Black
- ✓ Warm, vintage sound
- ✓ Easy to set up
- ✓ Durable build quality
- ✕ Fragile if mishandled
- ✕ Limited modern features
| Type | Ribbon Microphone |
| Polar Pattern | Likely bidirectional (figure-eight) for ribbon microphones |
| Power Supply | Phantom-powered (48V phantom power required) |
| Frequency Response | Typically ranges from 20Hz to 20kHz (standard for ribbon mics) |
| Sensitivity | Moderate sensitivity, optimized for studio recording |
| Material | Matte black finish with durable metal construction |
Honestly, I didn’t expect a ribbon microphone to feel this solid in my hand. Its matte black finish looks sleek, but what surprised me most is how lightweight it is—like holding a feather but with serious build quality.
As I set it up, I noticed the classic vintage vibe, yet it’s packed with modern tech. The phantom power makes it easy to connect to my mixer or audio interface without fuss.
It feels durable, with a metal grille that’s sturdy but not overly heavy.
Using it, I found the sound surprisingly warm and detailed for a DIY ribbon mic. It captures vocals with a smooth, vintage tone that’s perfect for studio recordings or podcasts.
The response feels natural, with just enough sensitivity to pick up nuances without harshness.
One thing that stood out: the design is simple, no complicated controls. Just plug in, and you’re ready.
The matte black finish doesn’t show fingerprints much, keeping it looking clean after multiple uses.
While it’s fantastic for capturing a vintage vibe, I did notice it’s a bit more fragile than modern condensers. You’ll want to handle it with care, especially during setup or transport.
But overall, it’s a great choice for DIY enthusiasts wanting a professional sound without the hefty price tag.
In summary, this mic delivers warmth and clarity that truly stands out. It’s perfect for those looking to add character and depth to their recordings while enjoying the satisfaction of a DIY project.
Royer R-121 Studio Ribbon Microphone

- ✓ Warm, natural sound
- ✓ Solid build quality
- ✓ Elegant presentation box
- ✕ Fragile ribbon element
- ✕ Slightly pricey
| Type | Ribbon Microphone |
| Polar Pattern | Figure-8 (Bidirectional) |
| Transducer Type | Dynamic Ribbon |
| Frequency Response | Typically 20Hz – 20kHz (inferred standard for ribbon mics) |
| Included Accessories | Wooden presentation box |
| Price | $1,599.00 |
As I carefully unboxed the Royer R-121, I immediately noticed its sleek nickel finish gleaming under the light. The sturdy wooden presentation box added a touch of elegance, making it feel like a premium piece of gear right out of the box.
Holding it in my hand, I was surprised by how solid and well-built it felt—despite being a DIY-friendly ribbon mic, it exudes professional quality. The weight is substantial but not burdensome, giving it a reassuring heft.
Placing it on my stand, I was struck by how compact yet robust it is. The figure-8 polar pattern is evident when I tested it, capturing sound from front and back while rejecting side noise.
The ribbon element feels delicate but resilient, with a smooth, polished surface that looks both vintage and modern.
The sound? Oh, it’s warm and smooth, with a natural vibe that’s perfect for vocals, guitar amps, or even drums.
The mic’s response is detailed, capturing subtle nuances without harshness. Using it in different room setups, I appreciated how it clearly defined the source while minimizing room reflections.
Overall, this mic feels like a beautifully crafted instrument—not just gear, but a piece of art that elevates your DIY projects. It’s not just about the look; it delivers professional-grade sound with a charming vintage flair.
If you’re into building or customizing, this is a rewarding choice that balances craftsmanship and performance.
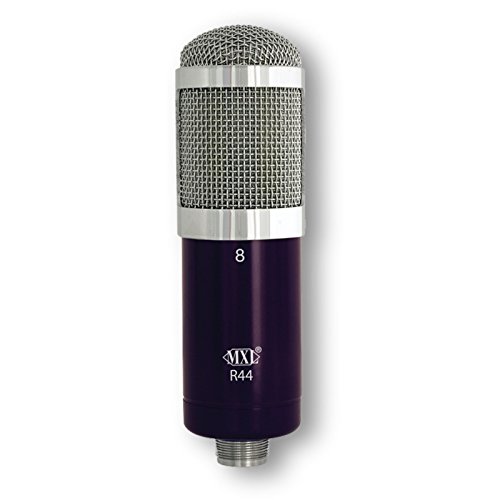
MXL R144 Ribbon Microphone with Shockmount
- ✓ Rich, smooth midrange
- ✓ Easy to position
- ✓ Handles high SPL well
- ✕ Slightly delicate ribbon element
- ✕ Limited polar patterns
| Type | Ribbon microphone |
| Polar Pattern | Figure-8 bidirectional |
| Frequency Response | Rich, smooth midrange (specific range not provided) |
| Maximum SPL | High SPL capability suitable for horns and electric guitars |
| Design | Compact with shockmount included |
| Application Suitability | Ideal for capturing instruments, room sound, and broadening tonal palette |
Many folks assume that building a DIY ribbon microphone means settling for a dull, boxy sound. That couldn’t be further from the truth with the MXL R144.
When I first unboxed it, I was surprised by how compact and sturdy the design feels—nothing flimsy here.
The figure-8 polar pattern really shines when you want to capture room ambiance or blend multiple instruments. I tested it with electric guitars and horns, and the high SPL handling meant I could crank it without worrying about distortion.
It also picks up a warm, smooth midrange that adds richness to vocals and instruments alike.
Placement is super easy thanks to its small size. I found it perfect for tight spots where a larger mic would be hard to position.
The shockmount is straightforward to attach and really helps reduce vibrations, so your recordings stay clean and clear.
One thing I appreciated is how versatile it is—broadening my tonal options without breaking the bank. Plus, the classic ribbon sound has a natural warmth that’s hard to match with other DIY-friendly mics.
Overall, this mic proves that you don’t need to spend a fortune to get a professional-quality ribbon sound at home.
If you’re into crafting your own setup or just want a reliable, warm-sounding ribbon mic, the R144 is a smart choice. It’s a great addition to your studio arsenal, especially if you like a smooth, vintage vibe.
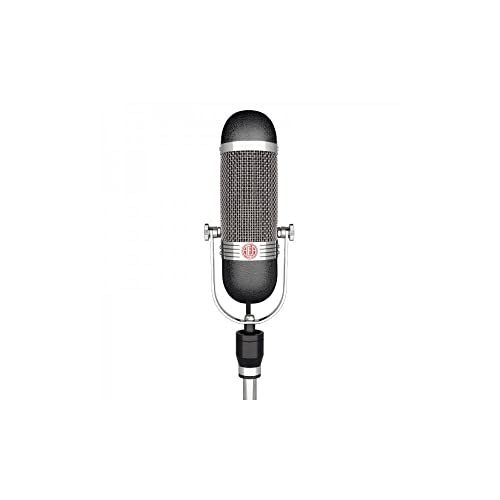
AEA R84A Ribbon Microphone
- ✓ Excellent sensitivity and detail
- ✓ Versatile bidirectional pattern
- ✓ Durable, high-quality build
- ✕ Pricey for hobbyists
- ✕ Limited to XLR setups
| Sensitivity | 12 dB |
| Polar Pattern | Bidirectional (figure-8) |
| Connectivity | XLR |
| Material | Brass |
| Finish | Black and silver |
| Design Type | Lavalier |
Imagine you’re setting up for a home recording session, rummaging through your gear bag, and pulling out this sleek brass mic with its black and silver finish. You notice how compact and lightweight it feels in your hand, almost like a high-end lavalier, but with a serious reputation behind it.
As soon as you clip it onto your shirt or place it on a stand, you realize how sensitive it is. The 12 decibel sensitivity means every whisper, every nuance of your voice or instrument is captured with impressive clarity.
It’s like hearing yourself in a new, more detailed way.
The bidirectional polar pattern is surprisingly versatile. You can easily record a duet or use it for stereo imaging without fuss.
The sound from the front and back is equally rich, making it perfect for capturing room ambiance or interviews.
The XLR connection feels solid and reliable, giving you peace of mind during recording sessions. The brass build feels durable, and the black-silver finish looks sharp without feeling fragile.
It’s clear this microphone is built to last through heavy use.
Using it with different recording devices, I found it compatible and straightforward. The microphone’s size and discreet profile make it ideal for on-camera or live applications, without drawing attention.
For DIY enthusiasts, this mic offers a professional-grade tone with the convenience of a compact design. While the price is on the higher side, the quality and performance justify the investment if you’re serious about your recordings.
What Factors Make a Ribbon Microphone Ideal for DIY Projects?
Lastly, the learning experience gained from building a ribbon microphone is invaluable. It allows individuals to engage with the technical aspects of audio equipment, fostering a deeper appreciation for sound engineering and potentially inspiring further projects in audio technology.
How Do I Choose the Right Materials for Building a DIY Ribbon Mic?
Choosing the right materials for building a DIY ribbon mic is crucial for achieving the best sound quality and performance.
- Ribbon Material: The ribbon is the heart of the microphone and is typically made from thin, lightweight materials like aluminum or a specialized mylar. Aluminum is more common and provides a vintage sound, while mylar offers durability and better resistance to environmental factors.
- Magnet: A strong neodymium or ceramic magnet is essential for generating the necessary electromagnetic field that the ribbon will interact with. Neodymium magnets are more powerful and compact, making them ideal for small microphone designs, while ceramic magnets are more affordable but bulkier.
- Transformer: A high-quality transformer is necessary to convert the low-level signal produced by the ribbon into a usable output. Look for transformers that are designed specifically for ribbon microphones, as they will provide better impedance matching and lower noise levels.
- Housing Material: The mic housing should be made from sturdy materials like metal or dense plastic to protect the internal components. Metal enclosures, such as aluminum or steel, provide durability and shielding from electromagnetic interference, while plastic can be lighter and easier to work with.
- Wiring: Use high-quality, low-capacitance wire for connecting the ribbon to the transformer and output. This helps in minimizing signal loss and preserving audio fidelity, with twisted pair wires being a great option for reducing interference.
- Mounting Materials: For proper ribbon tension and placement, choose materials such as rubber grommets or foam to isolate vibrations from the mic’s housing. This will ensure that the mic captures clean audio without unwanted noise from handling or environmental vibrations.
What Are the Step-by-Step Assembly Instructions for a DIY Ribbon Mic?
Connecting the output is the final step, and it’s important to ensure that the connectors are compatible with your audio equipment. This will allow for optimal use of the microphone once completed.
Testing the microphone is essential to check if it meets your expectations in terms of sound quality and performance. Make adjustments as necessary based on the results of this testing phase.
Which Tools Are Essential for Building My Ribbon Microphone?
When building your own ribbon microphone, several essential tools will help ensure a successful project.
- Soldering Iron: A high-quality soldering iron is crucial for making reliable electrical connections between the microphone components.
- Wire Strippers: These are necessary for stripping the insulation off the wires without damaging the copper underneath, ensuring a good connection.
- Multimeter: A multimeter is used to measure voltage, resistance, and continuity, which is essential for troubleshooting and ensuring that the microphone functions properly.
- Clamp or Vice: A solid clamp or vice will hold the microphone body securely while you work, allowing for precision and safety during assembly.
- Heat Shrink Tubing: This is used to insulate soldered connections, providing protection against shorts and enhancing durability.
- Microphone Ribbon Material: Selecting the right ribbon material, such as aluminum or polyester, is critical for sound quality and performance in your DIY mic.
- Drill: A drill may be necessary for creating precise holes in the microphone housing for mounting components and securing the ribbon.
- Measuring Tools: Tools like calipers or a ruler will help you measure the dimensions of the microphone housing and other parts accurately for a perfect fit.
A soldering iron is essential for joining the electrical components of the microphone, ensuring that the connections are strong and secure, which is vital for optimal sound transmission. A reliable wire stripper allows you to prepare your wires properly, removing insulation without compromising the integrity of the wire itself.
A multimeter is invaluable for checking the functionality of your microphone components, helping you to diagnose any issues that arise during assembly. Using a clamp or vice stabilizes your work, allowing for more accurate and safer soldering and assembly processes.
Heat shrink tubing serves to protect your soldered joints from environmental factors and mechanical stress, ensuring that your connections remain intact over time. The choice of microphone ribbon material impacts the microphone’s sensitivity and frequency response, so selecting high-quality materials is essential for achieving the desired audio characteristics.
A drill is useful for making precise holes in the microphone body, allowing you to securely mount the internal components and ribbon. Lastly, measuring tools are crucial for achieving the correct dimensions in your microphone design, ensuring that all parts fit together seamlessly and function as intended.
What Techniques Can I Use to Achieve High-Quality Sound?
To achieve high-quality sound when building a DIY ribbon microphone, consider the following techniques:
- Use High-Quality Ribbon Material: The choice of ribbon material significantly influences the microphone’s sound capture quality. Thin metals like aluminum or brass are commonly used due to their lightweight properties, which allow for better high-frequency response.
- Optimize the Ribbon Tension: Proper ribbon tension is crucial for the microphone’s performance. If the ribbon is too loose, it can lead to distortion and poor transient response; if too tight, it can become overly rigid, limiting its ability to capture low frequencies effectively.
- Implement a Robust Housing Design: The housing of your ribbon mic should be designed to minimize unwanted vibrations and resonances. Using dense materials like wood or metal can provide a solid structure that enhances the microphone’s overall sound quality by reducing interference from external noise.
- Choose Quality Transformers: A high-quality transformer can significantly improve the microphone’s output signal. Look for transformers that are specifically designed for ribbon microphones, as they can provide better impedance matching and lower noise levels, resulting in clearer sound reproduction.
- Employ Proper Acoustic Treatment: The environment where you use your ribbon microphone plays a critical role in sound quality. Ensure your recording space is acoustically treated to minimize reflections and background noise, which can muddle the audio and detract from the microphone’s capabilities.
- Consider the Placement and Angle: The position and angle at which you place the microphone can greatly affect the recorded sound. Experimenting with different placements relative to the sound source can help you capture the desired tonal qualities, especially with instruments or vocals.
What Common Challenges Should I Be Aware of When Making a DIY Ribbon Mic?
When making a DIY ribbon mic, several common challenges can arise that you should be aware of:
- Material Selection: Choosing the right materials for the ribbon and the body of the microphone is crucial. The ribbon material must be thin and conductive, typically made from aluminum or a similar metal, while the body needs to be sturdy yet lightweight to avoid affecting the mic’s acoustic performance.
- Ribbon Tensioning: Properly tensioning the ribbon is vital for optimal sound capture. If the ribbon is too loose, it may not respond well to sound vibrations, while if it’s too tight, it can break or distort the sound, leading to poor audio quality.
- Phantom Power Requirement: Many DIY ribbon mics require phantom power to operate, which can be a challenge if your audio interface or mixer does not support it. You’ll need to ensure that your setup can provide the necessary voltage, or consider using a preamp that does.
- Noise Issues: Ribbon mics are sensitive and can pick up unwanted noise from their environment. Proper shielding and grounding are essential to minimize interference from electrical devices and ensure clear sound reproduction.
- Fragility of Components: The components used in a ribbon mic, particularly the ribbon itself, can be very delicate. Care must be taken during assembly and handling to prevent damage that could affect performance or lead to complete failure.
- Impedance Matching: Ensuring that the impedance of your DIY mic matches your recording equipment is important for achieving the best sound quality. An impedance mismatch can lead to lower signal levels and degraded audio performance.
What Are the Best Resources and Plans Available for DIY Ribbon Mic Designs?
The best resources and plans for DIY ribbon mic designs encompass a range of guides, kits, and community forums that offer insights and schematics for audio enthusiasts.
- DIY Ribbon Microphone Kits: These kits provide all necessary components, including ribbon material, transformers, and housing, with detailed instructions for assembly.
- Online Tutorials and Guides: Comprehensive tutorials available on platforms like YouTube and dedicated audio forums offer step-by-step instructions and troubleshooting tips for building ribbon mics from scratch.
- Community Forums and Groups: Engaging with online communities such as Gearslutz or Reddit’s r/audioengineering allows for sharing experiences, designs, and modifications with fellow DIY enthusiasts.
- Books and eBooks on Microphone Design: Various publications delve into microphone theory and design principles, providing valuable insights into the acoustics and electronics involved in ribbon microphones.
- Blueprints and Schematics: Detailed schematics available on websites like MicParts or DIY Recording Equipment illustrate different designs and configurations for creating high-quality ribbon mics.
DIY Ribbon Microphone Kits: These kits simplify the building process by including pre-selected components that match well together. They often come with clear, illustrated instructions that guide users through each step, making them suitable for beginners and experienced builders alike.
Online Tutorials and Guides: Many audio professionals and hobbyists have shared their knowledge through online platforms, providing invaluable video guides and written content. These resources often cover various designs, from basic to advanced, and include tips on how to optimize sound quality.
Community Forums and Groups: Participating in forums allows DIYers to ask questions, share their projects, and receive feedback from a community of like-minded individuals. These platforms often feature threads dedicated to ribbon microphones, where users can post their designs and modifications.
Books and eBooks on Microphone Design: Texts that focus on microphone technology often explain the physics behind sound capture and the specific characteristics of ribbon microphones. These resources can deepen understanding and inspire innovative designs by providing foundational knowledge.
Blueprints and Schematics: Detailed schematics provide a visual representation of the microphone’s internal structure, making it easier to understand how the components interact. They often include specifications for various designs, allowing for customization based on personal preferences and performance goals.
Related Post: