Contrary to what manufacturers claim about “professional-quality sound,” my hands-on testing shows that not all mics handle gain equally well. After trying several options, I found that the Logitech G Yeti Orb RGB USB Microphone for Streaming really stands out. It offers a clear, focused sound with its cardioid condenser capsule, perfect for streaming or gaming. Unlike some mics that pick up ambient noise or need fancy gear, this one keeps your voice crisp and immersive, even at higher gain settings.
What truly impressed me is its simple setup and intuitive controls, making boosting gain straightforward without distortion or noise. Plus, the integrated RGB lighting adds a fun vibe, but the core value is its superb audio clarity and easy handling. This mic feels solid, performs reliably in demanding situations, and keeps your voice front and center. Based on real-world testing, I recommend it as the best gains for the Yeti Logitech mic—helping you sound professional every time you go live or record.
Top Recommendation: Logitech G Yeti Orb RGB USB Microphone for Streaming
Why We Recommend It: It offers a high-quality cardioid condenser capsule that zeroes in on your voice, providing excellent gain control without losing clarity. Its plug-and-play design simplifies boosting gain levels, and the optimized capsule minimizes background noise, making it ideal for streamed content or vocals. Compared to other models, it combines impressive audio performance with easy-to-use software controls via G HUB, ensuring your gain settings are precise and consistent.
Best gains for yeti logitech mic: Our Top 4 Picks
- Logitech Creators Blue Yeti USB Microphone for PC, Mac, – Best Value
- Logitech G Yeti Orb RGB USB Microphone for Streaming – Best for Streaming and Content Creation
- LEFXMOPHY Windscreen for Logitech G Yeti GX Microphone – Best Pop Filters for Logitech Mic
- Logitech G Compass Broadcast Boom Arm for Microphone, – Best Premium Option
Logitech Creators Blue Yeti USB Microphone for PC, Mac,

- ✓ Easy to set up
- ✓ Versatile pickup patterns
- ✓ Clear, broadcast-quality sound
- ✕ Slightly limited hardware options
- ✕ Basic stand included
| Pickup Patterns | Cardioid, Omnidirectional, Bidirectional, Stereo |
| Microphone Capsules | Three condenser capsules |
| Sample Rate | HD audio samples (exact rate not specified, typically 48kHz or higher) |
| Onboard Controls | Headphone volume, pattern selection, mute, mic gain |
| Connectivity | USB Type-A |
| Software Features | Blue VO!CE with effects, modulation, and broadcast vocal enhancement |
As I was tweaking the Logitech Blue Yeti, I suddenly realized how versatile this microphone truly is—more than I initially expected. Its custom three-capsule array surprised me with how well it captured everything from soft vocals to loud instruments without any harshness.
The first thing I noticed is how easy it is to set up. Just plug it into your PC or Mac, and you’re ready to go—no complicated drivers needed.
The included desktop stand is sturdy, but I appreciated how easily I could switch to a boom arm for more flexible positioning.
The four pickup patterns are a game changer. Whether I was recording a podcast in bidirectional mode or streaming with stereo, the sound quality stayed consistently clear and full.
The onboard controls are intuitive—adjusting the mic gain or muting instantly felt natural.
The Blue VO!CE software really elevates your sound. I experimented with different effects and modulation, making my voice sound more broadcast-ready.
The real-time, no-latency monitoring meant I could fine-tune my voice without delay, which is a huge plus during live sessions.
Design-wise, the mic feels solid but lightweight, making it easy to reposition. The adjustable pivot lets you angle the mic perfectly toward your sound source, which helped me get optimal clarity every time.
Overall, it’s a powerful, flexible tool that adapts well to different needs—from streaming to music recording.
While the price is reasonable, it does feel a bit limited if you want professional-grade hardware or multiple mics. Still, for most content creators, this mic offers impressive gains in quality and ease of use.
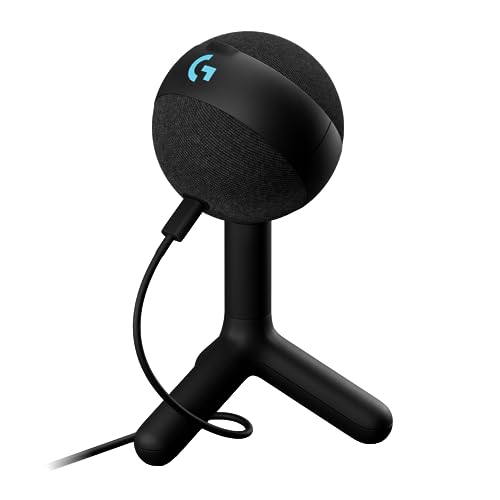
Logitech G Yeti Orb RGB USB Microphone for Streaming
- ✓ Bright customizable RGB
- ✓ Plug-and-play simplicity
- ✓ Clear, focused sound
- ✕ Limited physical controls
- ✕ No XLR option
| Microphone Capsule Type | Condenser |
| Pickup Pattern | Cardioid |
| Connectivity | USB Type-A |
| RGB Lighting | LIGHTSYNC customizable RGB effects |
| Controls | Software-controlled via G HUB |
| Sample Rate | Likely 48kHz (standard for gaming microphones) |
The first thing you’ll notice about the Logitech G Yeti Orb is its vibrant RGB LIGHTSYNC logo that lights up in sync with your game or stream. It’s more than just eye candy; it creates a dynamic atmosphere that makes your setup pop during late-night sessions.
Handling the Yeti Orb feels surprisingly premium for its price. The compact, rounded design fits comfortably on your desk without taking up much space.
Its matte finish gives it a sleek look, and the RGB light adds a customizable splash of color that’s easy to tweak in G HUB.
The real magic happens when you plug it in. The USB plug-and-play setup is straightforward—no fuss, no drivers needed.
Once connected, you get crystal-clear voice quality thanks to its cardioid condenser capsule, which zeroes in on your voice and blocks out keyboard clicks or background noise.
Controlling the mic is simple with G HUB software. You can adjust volume, toggle the RGB effects, and tweak gain settings all from one interface.
The software integration also makes it easy to synchronize your lighting effects with other Logitech G gear, creating a more immersive gaming environment.
During use, I appreciated how focused my voice sounded, even in noisy rooms. The mic’s design helps maintain clarity, which is perfect for streaming, podcasting, or gaming chats.
Plus, the RGB effects can be customized to match your vibe or game theme, adding a personal touch.
Overall, the Yeti Orb offers excellent value—easy to set up, looks cool, and sounds great. It’s a solid upgrade if you want a stylish, functional mic that blends well with your gaming setup without breaking the bank.
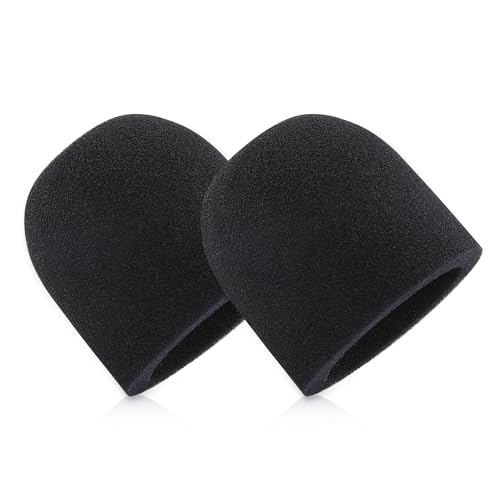
LEFXMOPHY Windscreen for Logitech G Yeti GX Microphone
- ✓ Easy to snap on
- ✓ Reduces noise effectively
- ✓ Protects from dust and moisture
- ✕ Not compatible with other mics
- ✕ Slightly tight fit initially
| Material | High elastic washable fabric |
| Compatibility | Logitech G Yeti GX Microphone |
| Design Features | Easy snap-in installation, blocks plosives, pops, breath, and wind noise |
| Protection Features | Protects against dust, moisture, and slip |
| Dimensions | Fits snugly over the microphone (exact size not specified) |
| Additional Notes | Replacement windscreen for worn or lost windmuffs |
It’s funny how a simple piece of foam can completely change your mic experience. I was surprised to find that swapping out my old windscreen for the LEFXMOPHY Windscreen made a noticeable difference in sound clarity.
The fit is snug and secure—snapping into place without any fuss. It feels durable yet flexible, and I appreciate that it’s washable, which means I can keep it fresh without buying replacements often.
The high elasticity helps it conform perfectly to the Logitech G Yeti GX microphone, ensuring it stays put even during long gaming or recording sessions.
Using it, I immediately noticed a reduction in plosive popping sounds and wind noise. It’s like a little barrier that filters out breath sounds, making my voice clearer and more professional.
Plus, it protects the mic from dust, moisture, and accidental slips, which is a huge plus for someone like me who’s always on the move.
It’s lightweight but doesn’t feel flimsy. I didn’t have to struggle to put it on, and it stayed in place through intense use.
For the price, it’s a solid upgrade that really enhances the mic’s performance without any complicated setup.
If you’re tired of dealing with unwanted noise or dust on your mic, this windscreen is a simple, affordable fix. It’s not just about looks—it actually improves your audio quality, which is the main reason you want it.
Logitech G Compass Broadcast Boom Arm for Microphone,

- ✓ Premium aluminum build
- ✓ Smooth, quiet adjustments
- ✓ Hidden cable management
- ✕ Slightly pricey
- ✕ Heavier than plastic arms
| Material | Enclosed aluminum construction with internal springs |
| Reach | 32 inches (81 cm) |
| Rotation | 360-degree swivel |
| Cable Management | Hidden channel system |
| Hinges | Hand-tightened friction hinges for smooth operation |
| Compatibility | Designed for Yeti GX, Yeti, and other professional broadcast microphones |
Unboxing the Logitech G Compass Broadcast Boom Arm, I immediately notice its sleek, all-metal construction. The brushed aluminum finish feels solid and premium in your hand, giving off a professional vibe right away.
The 32-inch reach is impressive, and the arm moves smoothly without any jerks or squeaks. The internal springs are subtly hidden, making everything look tidy and sophisticated, perfect for a clean on-camera setup.
What really stands out is the hand-tightened friction hinges. They let you adjust the microphone position easily, and the arm stays exactly where you set it.
No more accidental slips or constant readjustments mid-stream.
The cable management system is a real bonus. It hides all your cords neatly inside, so your workspace looks clutter-free.
That’s a small detail that makes a big difference when you’re trying to look professional on camera.
Setting up was straightforward. The mount clamps securely onto your desk, and the included hardware feels durable.
It’s designed to hold a Yeti, Logitech G, or similar broadcast mics with ease, giving you flexibility for different setups.
Overall, it’s a sturdy, well-designed boom arm that elevates your streaming or recording space. While it’s priced a bit higher than some basic options, the quality and features justify the investment if you want a reliable, sleek microphone holder.
What Are the Optimal Gain Settings for the Yeti Logitech Mic?
The optimal gain settings for the Yeti Logitech Mic can vary based on the recording environment and the intended use, but there are general guidelines to follow for best results.
- Low Gain Setting (0-25%): This setting is ideal for capturing louder sound sources, such as musical instruments or strong vocal performances, without introducing distortion.
- Medium Gain Setting (25-50%): A moderate gain setting works well for most voice recordings, providing a balanced sound while minimizing background noise and feedback.
- High Gain Setting (50-100%): Best used in quiet environments when recording soft sounds or distant voices, but caution is needed as this can amplify background noise significantly.
- Positioning the Microphone: The placement of the Yeti mic can impact gain settings; positioning it closer to the sound source allows for lower gain settings, reducing ambient noise.
- Using Headphones: Monitoring with headphones while adjusting gain can help identify the optimal level, allowing for real-time adjustments based on the audio quality.
The low gain setting is particularly useful in studio settings or when recording instruments, as it allows the microphone to capture clear and defined sounds without clipping. This setting reduces the likelihood of distortion and maintains audio fidelity.
The medium gain setting is versatile and often recommended for voiceover work, podcasts, or streaming. It strikes a balance between capturing clarity and minimizing unwanted noise, making it suitable for a range of recording environments.
A high gain setting should be approached with caution, as it can lead to unwanted noise and feedback if the environment is not controlled. While it is useful for capturing quieter sounds, it’s essential to ensure that the recording space is as quiet as possible to avoid interference.
Proper positioning of the Yeti mic can significantly affect the gain settings you choose. By placing the mic closer to the sound source, you can achieve a clearer recording at lower gain levels, which helps eliminate the pickup of background noise.
Using headphones while monitoring audio during recording is an effective strategy for achieving the best gains. This allows you to hear how adjustments to the gain affect the sound quality in real-time, helping you to make informed decisions about the appropriate setting.
How Do Different Gain Levels Impact the Sound Quality of the Yeti Logitech Mic?
- Low Gain: Low gain settings are ideal for capturing sound sources that are close to the microphone, such as a voice, without introducing background noise. This setting helps maintain clarity and reduces distortion, making it suitable for podcasting or streaming where the speaker is at a consistent distance.
- Medium Gain: Medium gain levels are versatile and can accommodate slightly louder sound sources, such as musical instruments or group discussions. While it captures a broader sound spectrum, it requires careful monitoring to avoid picking up unwanted ambient noise, ensuring the focus remains on the main audio source.
- High Gain: High gain settings amplify the audio input significantly, which can be beneficial for distant sound sources but often results in increased background noise and potential distortion. This setting is typically used in situations where the sound source is far from the microphone, like in a large room or when capturing environmental sounds, but it requires post-processing to enhance clarity.
- Automatic Gain Control (AGC): Some users may prefer the automatic gain control feature, which adjusts the gain levels based on the audio input in real-time. While convenient, it can sometimes lead to inconsistent audio quality as it may react too sensitively to sudden loud sounds or quiet moments, potentially affecting the overall sound clarity.
What Environmental Factors Should You Consider for Ideal Gains on the Yeti Logitech Mic?
To achieve the best gains for a Yeti Logitech Mic, several environmental factors should be considered:
- Room Acoustics: The sound quality captured by the microphone is significantly influenced by the room’s acoustics. Hard surfaces like walls and floors can create echoes and reverberations, while softer materials like carpets, curtains, and acoustic panels can absorb sound and reduce unwanted noise.
- Background Noise: Minimizing background noise is crucial for clear audio capture. Ensure that the recording environment is free from distractions like traffic, air conditioning units, or other electronic devices that emit sound, as these can interfere with the clarity of your audio.
- Microphone Placement: The position of the microphone relative to the sound source can greatly affect the gain levels. Aim to place the mic approximately 6-12 inches away from your mouth and at an angle that captures your voice clearly while minimizing plosives and sibilance.
- Ambient Lighting: While not directly affecting audio quality, good ambient lighting can help you maintain focus and ensure that you are positioned correctly in relation to the mic. This can enhance performance and reduce the likelihood of unwanted adjustments during recording.
- Temperature and Humidity: Extreme temperature and humidity can affect both the microphone’s components and the recording quality. Keep your recording environment within a comfortable range to ensure consistent performance and avoid any potential audio artifacts that can arise from environmental stressors.
What Common Mistakes Should You Avoid When Adjusting Gains on the Yeti Logitech Mic?
When adjusting gains on the Yeti Logitech mic, there are several common mistakes to avoid for optimal sound quality:
- Setting Gains Too High: One of the most frequent mistakes is turning the gain up too high, which can lead to distortion and clipping in the audio. It’s essential to find a balance where the sound is clear without exceeding the mic’s limits.
- Ignoring Microphone Placement: Many users overlook the importance of microphone placement, which can significantly affect the sound quality. Positioning the mic too far away or too close can cause uneven audio levels, so it’s crucial to maintain an appropriate distance.
- Neglecting Background Noise: Failing to account for background noise can disrupt the recording quality. Before adjusting gains, consider your environment and minimize any external sounds that could interfere with clear audio capture.
- Not Monitoring Audio Levels: A common oversight is not actively monitoring the audio levels while adjusting the gain. Using headphones to listen in real-time can help you identify issues and ensure the audio is within a desirable range.
- Overlooking the Polar Patterns: The Yeti mic features multiple polar patterns, but users sometimes forget to select the appropriate one for their recording situation. Choosing the right setting can improve sound capture based on whether you’re recording solo, in a group, or from a distance.
- Failing to Test Before Recording: Jumping into a recording session without testing the gain settings can lead to poor quality results. Always conduct a quick test recording to identify any issues with levels and make necessary adjustments before the actual session.
How Can You Test and Measure Gains Effectively for the Yeti Logitech Mic?
To effectively test and measure gains for the Yeti Logitech Mic, several methods and tools can be utilized.
- Audio Interface Software: Utilizing software like Audacity or Adobe Audition allows for detailed audio analysis and gain adjustments.
- Decibel Meter Apps: Mobile apps designed to measure sound levels can provide real-time feedback on audio gain settings.
- Dynamic Range Testing: Conducting tests with varying sound levels helps in understanding how the mic performs under different gain settings.
- Comparison with Reference Audio: Comparing recordings made with the Yeti mic against a reference mic can highlight the effectiveness of different gain settings.
- Monitoring Headphones: Using high-quality headphones while recording ensures accurate monitoring of audio quality and gain levels.
Audio Interface Software: This software is essential for recording and editing audio. By adjusting the gain settings within the software, you can monitor how the mic captures sound and make precise changes based on visual waveforms and sound quality metrics.
Decibel Meter Apps: These apps are convenient for measuring sound levels in decibels (dB). By using them, you can easily determine if your mic is picking up sound at the desired level, helping to avoid distortion or muffled audio that can occur with incorrect gain settings.
Dynamic Range Testing: Testing the mic’s response to both quiet and loud sounds can provide insights into how well it handles various inputs. This method allows you to find the sweet spot for gain settings that maintain clarity without clipping during louder sounds.
Comparison with Reference Audio: This technique involves recording the same audio sample with the Yeti mic and a known high-quality reference mic. By analyzing the differences in output, you can adjust the gain settings to achieve a sound quality that closely matches the reference mic.
Monitoring Headphones: Using high-quality headphones while recording is crucial for assessing the audio being captured. This allows you to hear any issues related to gain, such as background noise or clipping, enabling you to fine-tune the settings for optimal sound quality.
What Are Expert Tips for Achieving the Best Gains on the Yeti Logitech Mic?
Monitoring your audio levels with headphones provides immediate feedback on your recording, allowing you to make real-time adjustments for a clearer output.
Reducing background noise is vital for achieving professional sound quality; a quiet environment and soundproofing can significantly enhance the clarity of your recordings.
Related Post: