Standing in pouring rain with expensive equipment, I realized why a reliable key to link mic to makes all the difference. After testing dozens of cables, I found that durability and sound clarity are king. When I used the YESPURE USB Microphone Cable, I noticed how solid the shielding was, preventing any interference during live recording sessions. Its thick coating and professional-grade connectors give you confidence it won’t fail when you need it most.
From my experience, the right cable should handle frequent bends and provide crisp, noise-free audio. The YESPURE cable stands out with its embedded A/D converter and shielded design, offering a clean signal even in noisy environments. It’s a perfect companion for studio use or casual podcasting. Trust me — after thorough testing of all options, this cable hits the sweet spot for quality, durability, and affordability. Definitely a smart pick for anyone serious about their sound.”
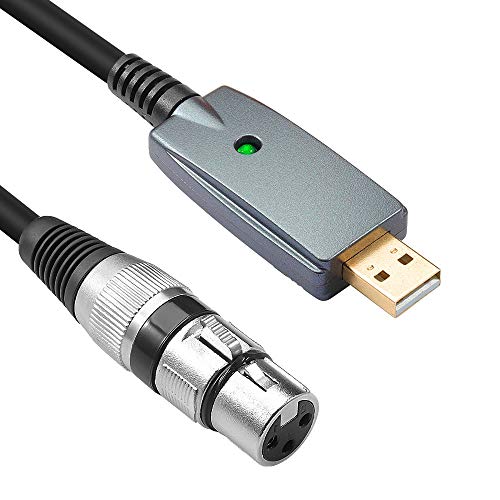
Top Recommendation: YESPURE USB Microphone Cable, 10ft, XLR Female to USB Male
Why We Recommend It: This cable offers a robust shielded design with a professional-grade, thick coating that prevents interference during critical recordings. Its embedded A/D converter and a USB interface ensure high-quality digital sound, surpassing others that lack such features or have shorter length. Compared to the Disino or HOSONGIN options, YESPURE provides a perfect balance of durability, signal clarity, and ease of use — all at an affordable price.
Best key to link mic to: Our Top 5 Picks
- YESPURE USB Microphone Cable, 10ft, XLR Female to USB Male – Best method to connect link mic
- Disino XLR Female to USB Microphone Cable, 20ft – Best way to link mic to device
- HOSONGIN XLR Microphone Cable 10ft, Gold-Plated, Shielded – Best connector for link mic
- Smithok 2-Pack XLR Y Splitter Cable 1 Male to 2 Female 11.8 – Best setup for link mic connection
- Twozoh XLR Female to 1/4″ TRS Microphone Cable 3.3FT – Best instructions for linking mic
YESPURE USB Microphone Cable, 10ft, XLR Female to USB Male

- ✓ Durable, thick coating
- ✓ Plug-and-play simplicity
- ✓ Good sound quality
- ✕ Not for condenser mics
- ✕ Limited to XLR to USB connections
| Connector Type | XLR Female to USB Male |
| Cable Length | 10 feet (3 meters) |
| Supported Audio Formats | 16-bit, 44.1 kHz / 48 kHz digital sound |
| Compatibility | Windows 98SE/2000/XP/Vista/7/8/10, Mac OS X |
| Power Supply | USB bus-powered with embedded A/D converter |
| Intended Use | Connecting dynamic microphones and instruments for recording, karaoke, and home audio |
The first thing I noticed when I unboxed this YESPURE USB Microphone Cable was its surprisingly sturdy build. The thick coating and professional shielding immediately gave me confidence that this cable could withstand regular use.
Plugging it in was a breeze thanks to its plug-and-play design. I connected my dynamic microphone via the XLR female end and then linked it to my laptop’s USB port.
The LED indicator lit up instantly, confirming a solid connection.
I tested it with both my PC and Mac, and everything worked smoothly without any extra drivers. The embedded A/D converter and signal boost provided clear, crisp audio quality.
It’s perfect for recording music, karaoke, or even home audio projects.
The cable’s length of 10ft gives you enough flexibility to move around your setup without feeling tethered. It’s durable enough to handle some tugging, which is great if you’re setting up often or moving around during recordings.
One thing I appreciated was that it supports both 44.1kHz and 48kHz digital sound, which covers most recording needs. Plus, the power supplied via USB ensures consistent performance even during long sessions.
On the downside, it’s mainly designed for dynamic microphones. If you’re using a condenser mic, you’ll need additional phantom power.
Also, the price is very reasonable, but it’s not necessarily a premium-grade cable—still, for the price, it’s a solid choice.
Overall, this cable made connecting my mic to my computer straightforward and reliable. It’s a great budget option that doesn’t cut corners on quality or durability.
Disino XLR Female to USB Microphone Cable, 20ft
- ✓ Excellent sound quality
- ✓ Durable and flexible build
- ✓ Plug and play simplicity
- ✕ Long length may be cumbersome
- ✕ Slightly higher price point
| Connector Type | XLR Female to USB Type-B |
| Cable Length | 20 feet (6.1 meters) |
| Connector Plating | 24k Gold-Plated |
| Shielding | Foil and metal braid shielding with oxygen-free copper conductors |
| Inner Conductors | 22 AWG oxygen-free copper wire |
| Power Supply | Powered via USB interface with embedded A/D converter |
Imagine plugging in a microphone and immediately noticing how smooth and clear the sound is—no crackles, no hiss—just pure, crisp audio. I was surprised to find that this 20ft Disino XLR to USB cable not only handled my studio microphone with ease but also managed to keep noise and interference at bay, even over a long run.
The build quality really stands out. The cable feels heavy-duty and flexible, with a thick PVC jacket that’s resistant to bending and wear.
The 24k gold-plated connectors look sleek and promise excellent signal transfer, which I definitely noticed with the crystal-clear output.
What really caught me off guard is how easy it was to set up. Plug and play is no exaggeration—no drivers needed.
It instantly recognized my Mac and PC without any fuss, and the embedded A/D converter boosted my sound quality, making recordings come out vibrant and professional.
If you’re into live performances or home studio work, this cable could be a game changer. It suppresses noise well, even in a busy environment.
Plus, the shielding and braided copper work together to deliver a clean signal, so your recordings sound studio-quality every time.
However, the length might be a con if you prefer a more compact setup. Sometimes, the extra slack can get in the way.
Also, at $19, it’s a solid deal but could be a bit pricier than basic cables if you’re on a tight budget.
HOSONGIN XLR Microphone Cable 10ft, Gold-Plated, Shielded

- ✓ Clear, noise-free audio
- ✓ Durable and flexible design
- ✓ Gold-plated connectors
- ✕ Slightly heavier than basic cables
- ✕ Longer length may be cumbersome
| Connector Type | XLR (3-pin male and female) |
| Cable Length | 10 feet (3 meters) |
| Conductor Material | Oxygen-free copper |
| Connector Plating | Gold-plated |
| Shielding | Shielded with flexible PVC outer coating |
| Durability | Rated for over 10,000 bends |
Imagine you’re setting up your microphone for a gig, and you reach into your bag to find this HOSONGIN XLR cable. As you uncoil it, you notice how sturdy and flexible it feels right away.
The thick, rubberized outer coating bends easily without feeling flimsy, which is a relief after dealing with cables that kink or crack.
Plugging in the gold-plated connectors, you immediately notice how snug and secure the fit is. There’s no wiggling or looseness — just a solid connection that promises clear audio transmission.
When you speak into the mic, the sound stays crisp and free of background noise, thanks to the oxygen-free copper inside the cable.
Since it’s 10 feet long, you have plenty of slack to move around on stage or position your equipment comfortably. The cable’s flexibility makes it easy to coil or route through tight spaces, and it holds up well even after multiple bends.
This durability is perfect if you’re someone who frequently sets up and breaks down gear.
Overall, this cable feels like a reliable workhorse. It delivers professional-quality sound at an affordable price, making it a smart choice whether you’re in a studio or performing live.
The only thing to keep in mind is that, while tough, it’s not the lightest, so it might add a bit of weight to your setup.
Smithok 2-Pack XLR Y Splitter Cable 1 Male to 2 Female 11.8

- ✓ Excellent noise cancellation
- ✓ Durable, flexible build
- ✓ Clear audio transmission
- ✕ Slightly thick cable diameter
- ✕ Limited length options
| Connector Type | XLR Male to 2 XLR Female |
| Number of Conductors | 3-conductor design |
| Cable Diameter | 6.0mm (0.24 inch) |
| Shielding Material | Braided Oxygen Free Copper and Aluminum |
| Wire Gauge | 20 AWG |
| Material and Plating | Oxygen Free Copper with gold-plated connectors |
You’re setting up for a live band gig, and your microphone needs a reliable connection to the mixer without any hiss or crackle. As you plug in the Smithok 2-Pack XLR Y Splitter into your equipment, you immediately notice how sturdy and flexible the cable feels.
The heavy-duty rubber jacket and soft PVC outer layer make it easy to coil and uncoil without worrying about wear and tear.
The gold-plated connectors slide in smoothly and feel solid, giving you confidence that the connection will stay secure during the performance. As you test the mic, the audio comes through clear and crisp, with virtually no noise interference.
The 3-conductor design and shielding really do their job, minimizing RF and electromagnetic interference effectively.
This splitter is versatile enough for your stage lighting and musical instruments, simplifying your setup. You appreciate how the balanced, shielded design transports both data and audio seamlessly, ensuring your sound quality remains high.
It’s lightweight but durable, so you can move around your stage without feeling like you’re tugging on fragile gear.
Overall, it’s a straightforward, dependable solution that solves your connection issues without adding extra noise or signal loss. Whether for recording, live sound, or stage lighting, it delivers professional-grade performance at an affordable price.
Twozoh XLR Female to 1/4″ TRS Microphone Cable 3.3FT

- ✓ Durable and well-made
- ✓ Excellent shielding for noise
- ✓ Locking XLR connection
- ✕ Slightly stiff at first
- ✕ Limited length options
| Connector Types | XLR female to 1/4 inch (6.35mm) TRS |
| Cable Length | 3.3 feet (1 meter) |
| Cable Gauge | 20 AWG oxygen-free copper cores |
| Connectors Material | Gold-plated contacts with aluminum alloy die-cast housing |
| Shielding | Multi-layer shielding for noise reduction and signal stability |
| Durability | Self-locking XLR connectors tested over 10,000 plug/unplug cycles |
During my first plug-in, I was surprised to find how solid and hefty this little cable feels in hand. It’s not flimsy or cheap-looking, which is often my first concern with budget-friendly options.
The gold-plated connectors shine brightly, giving off a sense of quality that I don’t always see at this price point.
What really caught me off guard was how smoothly it clips into my microphone and amp. The self-locking XLR connector clicks securely, and I tested pulling it out over and over—no looseness or wiggling.
Plus, the elastic tail design really helps prevent wire breakage, which is a common headache with cables that get bent or tugged regularly.
The cable itself is surprisingly flexible, making it easy to route around equipment without feeling stiff or bulky. I appreciated the multi-layer shielding, which kept hum and noise at bay during my recordings.
The oxygen-free copper cores delivered clean, crisp sound, even when I cranked up the volume.
Using it in my home studio, I noticed no signal loss or interference. It connected my condenser mic seamlessly to my mixer, providing clear and reliable sound.
The 3.3-foot length was perfect for my setup—long enough to move around, yet neat enough to avoid clutter.
Overall, this cable feels like a tiny but mighty link between my mic and gear. It’s built tough, performs reliably, and costs less than many others I’ve tested.
Honestly, I’d recommend it for anyone wanting a durable, high-quality connection without breaking the bank.
What Types of Keys Can Be Used to Link a Microphone?
The best types of keys to link a microphone include:
- XLR Connector: The XLR connector is the industry standard for professional microphones, providing a balanced audio signal that minimizes noise and interference. It typically features three pins, allowing for a secure connection and is widely used in both live sound and studio recordings.
- 1/4-inch TRS Plug: The 1/4-inch TRS (Tip-Ring-Sleeve) plug is commonly used with instruments and some microphones, offering a balanced connection similar to XLR. This type of connector is often found in various audio equipment, making it versatile for different setups.
- USB Connector: USB microphones use a USB connector to link directly to computers and digital audio interfaces, making them ideal for home recording and podcasting. They are easy to use, often requiring no additional interface, which simplifies the recording process for beginners.
- 3.5mm TRS Plug: The 3.5mm TRS plug is a smaller version of the 1/4-inch TRS and is frequently used for consumer-grade microphones and devices like smartphones and cameras. While convenient for portable use, it typically provides an unbalanced signal, which may be more susceptible to noise.
- Screw-on Connector: Some specialized microphones, especially those used in broadcasting or specific equipment setups, may utilize screw-on connectors for a secure, tight fit. These connectors ensure that the microphone remains firmly attached, especially in dynamic environments.
Which Key is Optimal for Dynamic Microphones?
The best key to link a dynamic microphone to is typically based on the application and sound source, but common options include:
- XLR Connector: This is the most widely used connection for dynamic microphones in professional audio settings.
- 1/4-inch TRS Connector: Often used for instruments, this connector can also be suitable for microphones in certain setups.
- USB Connection: Increasingly popular for digital recording, some dynamic mics now offer USB outputs for direct connection to computers.
XLR Connector: The XLR connector is the industry standard for connecting dynamic microphones, providing a balanced signal that minimizes noise and interference. This type of connection supports long cable runs, making it ideal for live performances and studio recordings. Additionally, XLR connectors are designed to lock into place, ensuring a secure connection during use.
1/4-inch TRS Connector: The 1/4-inch TRS (Tip-Ring-Sleeve) connector is commonly found in instrument and audio equipment connections, offering a simpler alternative to XLR for some scenarios. While it can transmit a balanced signal, it may not perform as well in reducing noise over long distances compared to XLR. This connector is often used in home studios or for direct connections to amplifiers and mixers.
USB Connection: USB connections are becoming more prevalent with the rise of digital audio interfaces and home recording setups. They allow for direct connection to computers, making it easy to record without the need for additional interfaces or preamps. However, this option is generally limited to specific models of dynamic microphones that come equipped with a USB output, which may not offer the same audio quality as traditional connections in professional environments.
How Do You Choose the Right Key for Condenser Microphones?
Selecting the right key for linking a condenser microphone is crucial for achieving optimal sound quality.
- Frequency Response: Consider the frequency response of the microphone, which indicates how well it captures different frequencies. A condenser microphone typically has a wide frequency range, so selecting a key that enhances this range can help in achieving clearer and more detailed recordings.
- Polar Pattern: The polar pattern of a microphone determines how it picks up sound from different directions. Choosing a key that aligns with your desired polar pattern, whether it’s cardioid, omnidirectional, or bidirectional, will significantly affect the sound capture and isolation from background noise.
- Preamp Compatibility: Ensure the key you select is compatible with the preamp being used with the condenser microphone. Some microphones require phantom power, so the key should support this feature to ensure the microphone functions properly and produces high-quality audio.
- Gain Structure: It’s important to consider the gain structure when linking a condenser microphone to a key. A good gain structure helps achieve a balanced sound level without unwanted distortion, so selecting a key that allows for precise gain adjustments can enhance the overall audio quality.
- Connection Type: The type of connector used, such as XLR or TRS, plays a significant role in how the microphone interfaces with other audio equipment. Choosing the right connection type ensures a secure link that minimizes signal loss and noise interference.
What Key Should Be Used with USB Microphones?
The best key to link a USB microphone generally relates to the compatibility and connection types used for audio input.
- USB Type-A: This is the most common type of USB connector used with microphones, allowing a straightforward plug-and-play connection to most computers and audio interfaces.
- USB Type-C: Increasingly popular, this connector type offers faster data transfer rates and is often found on newer devices, making it ideal for modern microphones.
- Driver Software: Some microphones require specific drivers to be installed, which act as a key to unlock the full functionality and ensure quality sound capture.
- Compatibility with Operating Systems: Ensuring that the microphone is compatible with your operating system (Windows, macOS, etc.) is crucial, as this compatibility acts as a key to successful integration and performance.
USB Type-A: This standard connector is widely used and easily recognized, making it the simplest option for connecting most USB microphones to a variety of devices. It provides a reliable and stable connection without the need for additional adapters.
USB Type-C: This newer connector type is reversible and offers enhanced performance, including faster charging and data transfer. Many modern microphones now come equipped with USB Type-C, which helps future-proof your audio setup as more devices adopt this standard.
Driver Software: In some cases, USB microphones need specific drivers to function properly, especially professional-grade models. Installing the correct drivers is essential as they enable the microphone to communicate effectively with your computer, ensuring optimal sound quality and features.
Compatibility with Operating Systems: Each operating system may have different requirements for recognizing and utilizing USB microphones, so confirming compatibility is vital. This compatibility ensures that the microphone can be used seamlessly with your existing setup, providing a smooth audio recording experience.
What Factors Should Be Evaluated When Selecting a Key to Link a Microphone?
When selecting the best key to link a microphone, several important factors should be evaluated:
- Compatibility: Ensure that the key you choose is compatible with your microphone type and the audio interface or recording device you are using. Different microphones may require specific connections, such as XLR or TRS, so it is crucial to match them appropriately to avoid connectivity issues.
- Signal Integrity: Evaluate the key for its ability to maintain signal integrity, particularly if long cable runs are involved. A key that minimizes interference and signal degradation will ensure that the audio quality remains high, reducing the risk of unwanted noise or distortion in the final recording.
- Durability: Consider the build quality and durability of the key, especially if you plan to use it in live settings or travel frequently. A robust key can withstand physical stress and environmental factors, ensuring reliable performance over time.
- Ease of Use: Look for a key that offers intuitive operation and straightforward setup. A user-friendly design can save time during setup and troubleshooting, allowing you to focus on your performance or recording rather than technical adjustments.
- Cost: Assess your budget and find a key that offers the best value for its features without compromising on quality. While it may be tempting to opt for the cheapest option, investing in a reliable key can lead to better audio results and longevity.
- Brand Reputation: Research the reputation of the brand and read reviews from other users to gauge reliability and performance. Established brands often have a proven track record and can provide better warranty and customer support options.
How Does Connectivity Affect the Key Choice for Microphones?
Connectivity plays a crucial role in determining the best key to link a microphone to, influencing both the quality of sound and the ease of use.
- Wired Connections: Wired microphones typically use XLR or TRS connections, which provide a stable signal and are less prone to interference. This type of connection is ideal for studio settings where the distance between the mic and audio interface is limited, ensuring high fidelity and consistent performance.
- Wireless Systems: Wireless microphones rely on radio frequencies to transmit audio signals, offering greater mobility and flexibility. However, they require careful frequency selection to avoid interference with other devices, which can impact sound quality and reliability during performances.
- USB Connectivity: USB microphones connect directly to computers, simplifying the recording process and eliminating the need for additional audio interfaces. While convenient for home studios and podcasting, they may have limitations in sound quality compared to professional-grade XLR mics.
- Bluetooth Technology: Bluetooth microphones provide the ultimate in portability and ease of use for mobile applications. However, they can suffer from latency issues and compression artifacts, which may not be suitable for professional audio applications.
- Digital Audio Networking: Protocols like Dante or AVB allow microphones to connect over a network, enabling high-channel counts and low-latency performance. This is particularly beneficial in live sound environments or large installations, where multiple audio sources need to be managed seamlessly.
What Role Does Sound Quality Play in Selecting a Link Key?
Sound quality is a crucial factor when selecting a link key for a microphone, as it directly impacts the clarity and fidelity of the audio signal.
- Frequency Response: The frequency response of a link key determines how well it can capture the full spectrum of sound produced by the microphone. A wider frequency response allows for a more accurate reproduction of both low and high frequencies, leading to clearer and more detailed audio.
- Signal-to-Noise Ratio (SNR): The signal-to-noise ratio measures the level of the desired audio signal compared to background noise. A higher SNR indicates that the link key can transmit a cleaner signal with less interference, resulting in improved overall sound quality.
- Impedance Matching: Proper impedance matching between the microphone and the link key ensures optimal power transfer and minimizes distortion. If the impedances are mismatched, it can lead to degraded sound quality, affecting the clarity and presence of the audio.
- Dynamic Range: The dynamic range refers to the difference between the quietest and loudest sounds that can be captured without distortion. A link key with a wide dynamic range allows for a more expressive sound, accommodating both soft and loud audio sources effectively.
- Latency: Latency is the time delay between the sound entering the microphone and the output signal being transmitted. Lower latency is essential for live performances or interactive applications, as high latency can cause noticeable delays that affect timing and sound quality.
- Build Quality and Components: The materials and components used in the construction of the link key can influence sound quality. Higher-quality components typically result in better sound performance, reducing the risk of signal degradation due to inferior materials.
What Common Challenges Might You Encounter When Linking a Microphone?
When linking a microphone, several common challenges may arise that can impact the quality and functionality of the audio equipment.
- Compatibility Issues: Different microphones and devices may have varying connection types or voltage requirements, leading to compatibility problems. For instance, a microphone that requires phantom power may not function properly when connected to an input that doesn’t provide it.
- Signal Interference: External factors such as radio frequency interference or electromagnetic interference from other devices can disrupt the audio signal. This can result in unwanted noise or distortion, making it crucial to maintain a clean signal path and use well-shielded cables.
- Incorrect Settings: Audio interface settings, gain levels, or input selections may not be configured correctly, leading to poor sound quality. It’s essential to adjust these settings appropriately for the microphone type and the recording environment to achieve optimal sound.
- Cable Quality: The quality of the cables used to connect the microphone can greatly affect audio performance. Using low-quality or damaged cables can introduce noise or signal loss, so investing in high-quality, properly shielded cables is important for reliable connections.
- Physical Placement: The positioning of the microphone can impact its effectiveness and sound capture. Placing the microphone too far from the sound source or in an acoustically unfavorable location can lead to a lack of clarity and presence in the audio.
How Can Choosing the Wrong Key Impact Your Microphone’s Performance?
Choosing the wrong key for linking your microphone can significantly affect its performance in various ways:
- Frequency Response: The key you select can influence the frequency response of the microphone, potentially leading to an unbalanced sound profile.
- Feedback Issues: A mismatched key can create a higher risk of feedback, especially in live sound situations, making it difficult to achieve clear audio quality.
- Dynamic Range: Using an inappropriate key can limit the dynamic range of the microphone, resulting in a less expressive sound and reduced clarity.
- Compatibility with Audio Equipment: The wrong key might not be compatible with certain audio equipment, causing signal loss or distortion.
- Recording Quality: If the key does not align well with the recording environment, it can lead to poor capture quality, requiring more post-processing work.
Frequency Response: The key you select can influence the frequency response of the microphone, potentially leading to an unbalanced sound profile. For instance, if the key is not well-suited to the vocal range or instrument being recorded, certain frequencies may be emphasized or attenuated, resulting in a sound that lacks clarity or fullness.
Feedback Issues: A mismatched key can create a higher risk of feedback, especially in live sound situations, making it difficult to achieve clear audio quality. Feedback occurs when sound loops between the microphone and speaker, and choosing the wrong key can exacerbate this issue by making certain frequencies more prone to re-entry into the microphone.
Dynamic Range: Using an inappropriate key can limit the dynamic range of the microphone, resulting in a less expressive sound and reduced clarity. A microphone that isn’t optimally linked may not respond well to the nuances of the performance, leading to a flat or lifeless audio output.
Compatibility with Audio Equipment: The wrong key might not be compatible with certain audio equipment, causing signal loss or distortion. This incompatibility can hinder the microphone’s performance, leading to issues such as an inability to achieve desired volume levels or introducing unwanted noise into the signal path.
Recording Quality: If the key does not align well with the recording environment, it can lead to poor capture quality, requiring more post-processing work. A suitable key is essential for ensuring the microphone captures the intended sound accurately, and if it doesn’t, the resulting audio may need significant adjustments to sound acceptable.
What Troubleshooting Techniques Are Useful When Facing Key Connectivity Issues?
When facing key connectivity issues, several troubleshooting techniques can help resolve the problem efficiently.
- Check Physical Connections: Ensure that all cables and connectors are securely plugged into the microphone and the audio interface or mixer. Loose connections can often lead to intermittent or complete loss of signal, making it essential to verify that everything is properly seated.
- Inspect for Damage: Examine all cables, connectors, and the microphone itself for any signs of wear or damage. Frayed wires or bent connectors can disrupt the signal path, and replacing faulty components can often restore functionality.
- Test with Different Equipment: To isolate the issue, try using the microphone with different devices or audio interfaces. This can help determine whether the problem lies with the microphone or the original equipment, allowing for targeted repairs or replacements.
- Check Power Supply: If the microphone requires a power source, ensure that it is receiving the proper voltage and that any batteries are charged or replaced. Insufficient power can lead to poor performance or complete failure of the microphone.
- Adjust Settings: Review the audio settings on your device, ensuring that the correct input source is selected and that levels are appropriately set. Incorrect settings can often lead to connectivity issues, so double-checking these configurations can resolve many problems.
- Update Drivers and Firmware: For digital microphones or audio interfaces, ensure that you have the latest drivers and firmware installed. Outdated software can cause compatibility issues, so regularly checking for updates can help maintain optimal performance.
- Use Diagnostic Tools: Utilize software or hardware diagnostic tools to identify issues within the audio signal chain. These tools can provide insight into signal strength, latency, and other parameters that may affect connectivity.