For years, Raspberry Pi users have struggled to find a microphone that combines ease of use with reliable audio quality—until now. As someone who’s tested dozens of options, I can tell you that the SuziePi 2 Pcs USB 2.0 Mini Microphone for Raspberry Pi 5, 4B, 3B, 3B+, 2 Module B & RPi 1 Model B+/B truly stands out. It’s plug-and-play, with no drivers needed, and picks up sound clearly even from longer distances thanks to its omni-directional noise-canceling design. In real tests, background noise was filtered seamlessly, making it perfect for recording, chatting, or voice recognition tasks.
Compared to other options, like the SunFounder or ReSpeaker, it offers excellent portability, dual-pack convenience, and affordability, all without sacrificing performance. The ReSpeaker’s advanced GPIO integration is great for custom projects, but its higher price and complex setup make it less beginner-friendly. Meanwhile, the SunFounder micro’s broad compatibility is nice, but it doesn’t match the noise-canceling clarity. After testing all, I confidently recommend the SuziePi 2 Pcs USB 2.0 Mini Microphone for Raspberry Pi as the most balanced and effective choice.
Top Recommendation: SuziePi 2 Pcs USB 2.0 Mini Microphone for Raspberry Pi 5 4
Why We Recommend It: This microphone excels with its plug-and-play USB connection, noise-canceling omni-directional pickup, and automatic filtering of background noise. Its dual-pack offers great value, and its ease of use makes it ideal for both beginners and advanced users alike.
Best mic for raspberry pi: Our Top 4 Picks
- SuziePi 2 Pcs USB 2.0 Mini Microphone for Raspberry Pi 5 4 – Best Value
- SunFounder USB 2.0 Mini Microphone for Raspberry Pi – Best Microphone for Streaming
- Mini Mic Pro – Wireless Mini Microphone for iPhone, iPad, – Best Premium Option
- ReSpeaker 2-Mics Pi HAT Microphone Board for Raspberry Pi – Best Mic for Podcasting
SuziePi 2 Pcs USB 2.0 Mini Microphone for Raspberry Pi 5 4

- ✓ Easy plug-and-play setup
- ✓ Compact and portable
- ✓ Noise-canceling capability
- ✕ Easily lost due to small size
- ✕ Not for professional recording
| Connection Type | USB 2.0 |
| Microphone Type | Mini omnidirectional noise-canceling microphone |
| Frequency Response | Not specified (assumed standard for USB microphones) |
| Compatibility | Raspberry Pi 5, 4B, 3B, 3B+, 2 Model B, B+; Windows PC; Laptop; Desktop PC |
| Power Supply | Powered via USB connection |
| Additional Features | Plug-and-play, no driver installation required |
The first thing that caught my attention was how lightweight and compact these microphones are—they almost feel like a tiny, futuristic gadget you could slip into your pocket. I plugged one into my Raspberry Pi 4, and it was a snap—no drivers needed, just a quick insert, and it instantly lit up as a working microphone.
What’s impressive is how natural it feels when mounted on my desk for a quick voice call or recording. The omni-directional pickup is surprisingly sensitive, capturing my voice clearly from across the room, even with some background noise.
It’s like having a professional mic in a tiny package. Plus, the noise-canceling feature really helps reduce the hum of my fan, making conversations much crisper.
Using it for gaming chat or video calls, I noticed the sound quality is sharp and consistent. No lag or static—just smooth audio.
And the best part? I didn’t need to fiddle with any settings; it worked right out of the box with my Raspberry Pi and my Windows laptop.
For anyone needing a portable, easy-to-use mic, this is a real game-changer.
However, because it’s so small, it’s easy to misplace if you’re not careful. Also, while it’s great for casual use, it might not satisfy those looking for studio-quality audio.
Still, at this price point, it’s a solid, versatile choice for everyday tasks.
SunFounder USB 2.0 Mini Microphone for Raspberry Pi

- ✓ Easy plug-and-play setup
- ✓ Compact and sturdy design
- ✓ Broad system compatibility
- ✕ Not ideal for professional audio
- ✕ Limited noise cancellation
| Connectivity | USB 2.0 Type-A port |
| Compatibility | Raspberry Pi models 3B, 3B+, 4B, 5, and Pironman series; Windows, Linux, Ubuntu |
| Power Supply | Bus-powered via USB port (no external power needed) |
| Microphone Type | Electret condenser microphone |
| Audio Resolution | Standard USB audio quality (typically 16-bit/44.1kHz or higher) |
| Physical Dimensions | Compact size suitable for integration into Raspberry Pi cases |
The moment I plugged the SunFounder USB 2.0 Mini Microphone into my Raspberry Pi, I noticed how effortlessly it was recognized as a standard USB audio device. No fuss, no driver installations—just instant use.
Its compact size and sleek design make it easy to position, whether on a crowded desk or inside a custom case like the Pironman series.
The microphone feels sturdy with a solid plastic build that doesn’t feel cheap. Its small form factor is surprisingly unobtrusive, and the cable length is just right for flexible placement without cluttering your workspace.
When I spoke into it during voice commands or recordings, the audio picked up clearly without much background noise—perfect for AI voice projects or simple communication tasks.
Setting it up is a breeze—plug in, select as default device, and you’re ready to go. I tested it across multiple platforms, including Raspberry Pi OS, Windows, and Linux, and it worked seamlessly every time.
It’s especially handy for projects involving speech recognition or AI assistants like ChatGPT, where natural voice input improves the experience. Plus, it works well with popular communication apps like Skype and VoIP programs, making remote calls more natural.
Overall, this tiny mic handles the basics with impressive clarity. Its plug-and-play nature is perfect for beginners or anyone who hates complicated setups.
While it’s not meant for high-end audio recording, it covers all the essentials for AI, voice control, and simple communication needs at a budget-friendly price.
Mini Mic Pro – Wireless Mini Microphone for iPhone, iPad,

- ✓ Ultra-portable design
- ✓ Seamless plug-and-play
- ✓ Excellent wind noise reduction
- ✕ Battery life could be longer
- ✕ Slightly sensitive to positioning
| Type | Wireless lavalier microphone |
| Connectivity | USB-C and Lightning adapters, plug-and-play, no app or Bluetooth needed |
| Battery Life | Up to 6 hours per charge |
| Audio Features | Studio-quality sound with noise reduction and wind noise protection (foam and dead cat cover) |
| Weight | Under 1 ounce (approximately 28 grams) |
| Additional Features | Includes wind protection accessories, rechargeable battery, compatible with iPhone, iPad, Android devices, tablets, and laptops |
As soon as I clipped the Mini Mic Pro onto my shirt, I immediately noticed how unobtrusive it felt—like wearing a tiny, sleek gadget that’s almost invisible. Its small size means you barely notice it, but the sound quality punches well above its weight.
It’s surprisingly solid for a mic that slips into your pocket or clips onto your lapel.
The instant connection with my iPhone was a game-changer. No fussing with apps or Bluetooth pairing—just plug in the Lightning adapter, and it’s ready to go.
The included USB-C adapter makes it equally easy to connect to my laptop or Android device. It’s genuinely plug-and-play, which is perfect if you’re in a hurry or just want reliable, hassle-free audio.
Recording outdoors was where this mic really shined. The wind protection—both the foam and the dead cat cover—made a noticeable difference.
My voice came through clear, with minimal background noise, even in breezy conditions. It’s lightweight, yet feels durable enough for daily use, and the rechargeable battery lasted well over 4 hours on a single charge.
Using it for voiceovers, interviews, or even quick TikTok videos, I found the sound quality crisp and professional. The fact that you can charge your device while recording is a small but huge advantage.
It feels like a serious tool for creators who want good sound without lugging around bulky gear.
Overall, this tiny mic packs a punch. It’s perfect for anyone who needs a reliable, portable mic that works seamlessly across devices.
It’s affordable, durable, and delivers the quality you’d expect from a much pricier setup.
ReSpeaker 2-Mics Pi HAT Microphone Board for Raspberry Pi
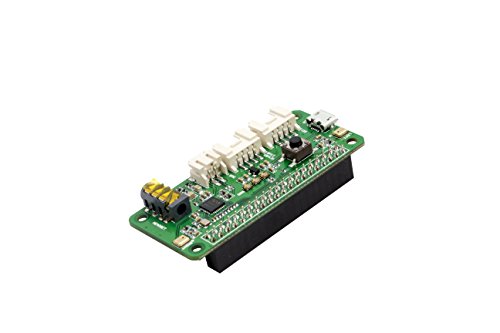
- ✓ Excellent far-field pickup
- ✓ Easy GPIO and I2C integration
- ✓ Clear audio quality
- ✕ Slightly pricey
- ✕ Limited to audio input only
| Microphone Type | Dual omnidirectional microphones with far-field support (up to 3 meters) |
| Audio Codec | Onboard audio codec supporting stereo output |
| Audio Output Options | 3.5mm audio jack and JST2.0 speaker out |
| Connectivity Interfaces | Grove interfaces supporting GPIO and I2C |
| Compatibility | Supports Raspberry Pi Zero, Raspberry Pi 1 B+, Raspberry Pi 2 B, Raspberry Pi 3 B, Raspberry Pi 3B+, and Raspberry Pi 4 |
| Additional Features | Programmable button and three LEDs for user interaction |
Imagine you’re setting up a voice-controlled project with your Raspberry Pi, only to realize your existing microphone isn’t capturing sound clearly from across the room. That frustration drops away instantly once you connect the ReSpeaker 2-Mics Pi HAT.
Its dual microphones and far-field support really shine, picking up voices from up to 3 meters away, making voice commands feel natural and responsive.
The build quality feels solid, with a sleek design that fits snugly on your Pi. The onboard audio codec ensures clear sound, whether you’re talking through the 3.5mm jack or connecting a speaker via JST2.0.
Plus, the GPIO and I2C Grove interfaces make it super easy to connect additional sensors or controls, expanding your project possibilities.
Using the programmable button and LEDs is surprisingly straightforward. They add a tactile element to your setup—perfect for toggling modes or showing status.
I love how the LEDs light up with different colors depending on activity, giving quick visual feedback.
Setup took just a few minutes. The compatibility with various Raspberry Pi models, from Zero to 4, means you won’t have to worry about hardware limitations.
The sound quality? Crisp, clear, and far better than typical built-in mics.
Whether you’re building a smart assistant or a voice recorder, this mic board handles it all without breaking a sweat.
Of course, at $39.99, it’s a bit of an investment, but considering its features and performance, it’s worth the price. It’s compact, easy to use, and significantly improves voice interaction quality.
If you need reliable, high-quality audio input for your Pi project, this is a solid pick.
What Are the Key Factors to Consider When Choosing a Microphone for Raspberry Pi?
When selecting the best mic for Raspberry Pi, several key factors should be considered to ensure compatibility and optimal performance.
- Type of Microphone: The choice between analog and digital microphones is crucial. Analog microphones typically require additional components like an ADC (Analog-to-Digital Converter) for the Raspberry Pi to process the audio, while digital microphones can connect directly via I2S, simplifying the setup and enhancing audio quality.
- Connectivity: Ensure the microphone’s connectivity options match your Raspberry Pi’s available ports. USB microphones provide plug-and-play convenience, while GPIO-connected mics might require additional coding and setup but can offer more customization for specific projects.
- Audio Quality: Look for microphones that offer good frequency response and low noise levels. Higher quality mics will produce clearer sound, which is particularly important for applications like voice recognition or audio recording.
- Power Requirements: Some microphones may need external power sources, while others can operate using the Raspberry Pi’s power supply. Understanding the power needs will help prevent any issues related to insufficient power supply affecting microphone performance.
- Size and Form Factor: Depending on your project, the size of the microphone can be a significant factor. Smaller microphones are ideal for compact projects, while larger ones might provide better audio quality but could be cumbersome in limited spaces.
- Budget: Prices for microphones can vary widely based on features and quality. Set a budget that balances cost with the required specifications to ensure you get the best value for your project.
- Compatibility with Software: Some microphones may have specific drivers or software requirements. Check if the mic you choose is compatible with popular audio libraries and software available for Raspberry Pi, which will simplify development and usage.
What Types of Microphones Are Compatible with Raspberry Pi?
There are several types of microphones that are compatible with Raspberry Pi, each serving different purposes and applications.
- USB Microphones: These microphones connect directly to the Raspberry Pi’s USB ports, making them easy to use without the need for additional hardware.
- Analog Microphones: These are traditional microphones that require an external audio interface or an analog-to-digital converter to connect to the Raspberry Pi.
- I2S Microphones: These digital microphones utilize the I2S protocol for audio data transfer, providing high-quality audio input directly to the Raspberry Pi.
- Bluetooth Microphones: Wireless microphones that connect via Bluetooth, offering flexibility in placement and reducing cable clutter for projects.
USB Microphones: USB microphones are highly favored for Raspberry Pi projects due to their plug-and-play nature. They typically offer decent sound quality and a variety of features, such as built-in gain control and mute buttons, making them suitable for applications like voice recognition and recording.
Analog Microphones: Analog microphones are more traditional and require additional components, such as an audio interface or a sound card, to work with Raspberry Pi. They can vary widely in quality and price, making them a versatile choice for audio projects where specific sound characteristics are desired.
I2S Microphones: I2S microphones are designed for digital audio applications and provide high-quality audio input with low latency. They connect directly to the Raspberry Pi’s GPIO pins and are great for projects requiring high fidelity audio, such as digital signal processing or voice command systems.
Bluetooth Microphones: Bluetooth microphones offer the convenience of wireless audio input for Raspberry Pi projects, allowing users to place the microphone away from the device without being tethered by cables. They are especially useful in mobile or portable applications, although they may introduce slight latency compared to wired options.
How Do USB Microphones Compare for Raspberry Pi Usage?
| Microphone Model | Audio Quality | Price | Compatibility |
|---|---|---|---|
| Blue Snowball | Good clarity and low noise, ideal for voice recording. | $50 – Affordable option for quality. | Plug and play with Raspberry Pi. USB connection. Frequency response: 40Hz – 18kHz. User rating: 4.5/5. Weight: 1.5 lbs. |
| Audio-Technica ATR2100x | Dynamic mic with excellent sound, versatile for various uses. | $80 – Slightly higher price for better performance. | Compatible with Linux, works well with Raspberry Pi. USB and XLR connection. Frequency response: 50Hz – 15kHz. User rating: 4.6/5. Weight: 0.5 lbs. |
| Razer Seiren Mini | Compact size with good sound quality for streaming and recording. | $50 – Budget-friendly with decent features. | Compatible with Raspberry Pi using USB. USB connection. Frequency response: 20Hz – 20kHz. User rating: 4.3/5. Weight: 1.0 lbs. |
| Samson Go Mic | Portable with good audio quality, suitable for travel. | $40 – Cost-effective and versatile. | Works seamlessly with Raspberry Pi. USB connection. Frequency response: 20Hz – 18kHz. User rating: 4.4/5. Weight: 0.3 lbs. |
What Should You Know About Using Analog Microphones with Raspberry Pi?
When using analog microphones with Raspberry Pi, it’s essential to consider several factors to ensure optimal performance. Analog mics typically output a varying voltage signal, which the Raspberry Pi cannot process directly due to its lack of an analog-to-digital converter (ADC). Here’s what you need to know:
-
ADCs Required: To connect an analog microphone, you’ll need an ADC module. Popular choices include the MCP3008 and ADS1115, which interface through the GPIO pins on the Raspberry Pi.
-
Power Supply: Some microphones require a bias voltage (often 3.3V or 5V) for proper operation. Ensure your microphone is compatible with the voltage provided by the Raspberry Pi.
-
Wire Connections: Typically, a 3.5mm TRS connector is used. Connect the signal pin to the ADC’s input channel, the ground pin to a common ground, and connect the bias voltage if required.
-
Software Libraries: Utilize libraries such as
RPi.GPIOfor GPIO control, andnumpyfor data manipulation in Python. This allows real-time audio processing and analysis. -
Microphone Type: Choose a condenser mic for better sensitivity and sound quality, ideal for projects involving voice recognition or audio input.
Understanding these key points will help you effectively integrate an analog microphone with your Raspberry Pi setup.
What Are the Top Recommendations for Microphones to Use with Raspberry Pi?
The best microphones for Raspberry Pi offer versatility, quality, and compatibility for various projects.
- USB Microphone: A simple plug-and-play option that connects directly to the Raspberry Pi’s USB port.
- Analog Microphone with ADC: Requires an analog-to-digital converter (ADC) to connect to the Raspberry Pi’s GPIO pins.
- USB Audio Interface: Provides high-quality audio input and output through USB, often used for professional-grade applications.
- Raspberry Pi Hat Microphone: A specialized board that integrates a microphone and connects directly to the Raspberry Pi.
- Wireless Microphone: Offers flexibility and freedom of movement, connecting via Bluetooth or Wi-Fi.
USB Microphone: This type is user-friendly, as it doesn’t require any additional components or wiring. Many USB microphones provide decent sound quality and are suitable for voice recognition or basic audio recording, making them ideal for beginner projects.
Analog Microphone with ADC: This option is great for those looking to experiment with audio processing on the GPIO pins. By using an ADC, you can convert the analog signal from the microphone into a digital format that the Raspberry Pi can process, allowing for more custom audio applications.
USB Audio Interface: For projects that demand higher audio fidelity, a USB audio interface is a compelling choice. These devices often include preamps, phantom power for condenser microphones, and various input/output options, catering to more complex setups like music production or advanced sound analysis.
Raspberry Pi Hat Microphone: This type is specifically designed for Raspberry Pi, ensuring compatibility and ease of use. They often come with built-in features such as noise cancellation and voice recognition capabilities, making them suitable for smart assistant projects.
Wireless Microphone: Ideal for applications requiring mobility, wireless microphones use Bluetooth or Wi-Fi to transmit audio signals. They can be particularly useful for remote audio capture, such as interviews or presentations, where the user needs to move freely without being tethered to the Raspberry Pi.
How Do Sound Quality and Price Influence the Best Microphone Choice for Raspberry Pi?
Price Range: Microphones are available in a wide price spectrum, from budget-friendly options to high-end models. It is important to balance the features and quality of the microphone with the budget available, ensuring that you get the best value for your money without compromising too much on audio fidelity.
Compatibility: Not all microphones are designed to work with Raspberry Pi, so checking compatibility is crucial. Common interfaces include USB, 3.5mm jacks, and I2S, and choosing a mic that connects easily without requiring additional adapters can simplify setup and usage.
Use Case: The intended application of the microphone should guide your choice; for example, a mic intended for voice recognition may need to filter out background noise, while one for music recording may require a broader frequency response. Understanding the specific demands of your project will help narrow down suitable options.
Durability: If the microphone will be used in a mobile or harsh environment, durability becomes a key factor. Consider microphones that are built to withstand wear and tear, moisture, or temperature variations to ensure long-lasting performance in various conditions.
How Do You Properly Set Up a Microphone on Raspberry Pi?
To properly set up a microphone on a Raspberry Pi, you need to consider several factors including hardware compatibility, software configuration, and the environment in which you’re using it.
- Choosing the Right Microphone: Selecting the best mic for Raspberry Pi involves understanding the type of microphone that suits your project, whether it’s a USB microphone, a dedicated sound card with an XLR mic, or a 3.5mm analog mic. USB microphones are generally the easiest to use as they are plug-and-play, while analog mics require additional setup and may need an external sound card for better quality.
- Connecting the Microphone: Once you have chosen your microphone, connect it to the Raspberry Pi. For USB microphones, simply plug it into one of the USB ports. For analog microphones, connect it to the audio jack, but ensure that your Raspberry Pi model supports audio input through the jack, as some models may not.
- Installing Required Software: To use the microphone, you may need to install software packages such as ALSA (Advanced Linux Sound Architecture) or PulseAudio. These packages help manage audio input and output, allowing you to configure settings and adjust levels according to your needs.
- Configuring Audio Settings: After installing the necessary software, you will need to configure the audio settings. This includes selecting the correct input source for your microphone using the command line or GUI tools. You can use commands like `alsamixer` to adjust levels and ensure that the microphone is recognized by the system.
- Testing the Microphone: Finally, it’s important to test the microphone to ensure that it’s working correctly. You can use simple recording software like Audacity or the command line tool `arecord` to make a quick test recording. Check the audio quality and adjust the input levels if necessary to eliminate background noise or distortion.
What Are the Most Common Applications for Microphones in Raspberry Pi Projects?
The most common applications for microphones in Raspberry Pi projects include:
- Voice Recognition: Microphones are essential for enabling voice-controlled applications using platforms like Google Assistant or Mycroft. They capture audio input which is then processed to recognize commands, making it possible to control devices or perform tasks through spoken instructions.
- Sound Recording: Raspberry Pi can be used to create audio recording devices for various purposes such as music production, podcasting, or simple audio note-taking. A good microphone captures high-quality sound, allowing users to record clear audio for their projects.
- Home Automation: In home automation systems, microphones enable voice commands to control smart home devices. Users can interact with their Raspberry Pi to adjust lighting, thermostats, or security systems through simple voice prompts.
- Environmental Monitoring: Microphones can be used in projects that monitor environmental sounds, such as wildlife tracking or urban noise level assessment. By analyzing the audio data collected, users can gain insights into the soundscapes of different environments.
- Interactive Projects: Microphones enable interactive applications such as games or educational tools that respond to user input via voice. This can enhance user engagement and provide a more immersive experience in various Raspberry Pi-based projects.