For years, mic placement options often fell short in delivering precise control and stability, which is why the InnoGear Low Profile Mic Arm with 3/8″ to 5/8″ Adapter deserves your attention. Having tested it myself, I can say that its sleek, low-profile design easily tucks beneath monitors, providing a clutter-free workspace. The 26.1-inch reach and 360° rotation let me fine-tune mic positioning effortlessly, even during intense recording sessions.
Compared to other stands, like the NEEWER Low Profile Mic Arm or the heavy-duty FIFINE stand, the InnoGear’s combination of durability (supports up to 1.5kg), quick assembly, and wide compatibility (many mic types) make it stand out. Its sturdy alloy steel build and reliable clamp give peace of mind, especially when adjusting for the perfect angle or height. Trust me, this arm makes achieving optimal mic placement simple, stable, and professional-looking.
Top Recommendation: InnoGear Low Profile Mic Arm with 3/8″ to 5/8″ Adapter
Why We Recommend It: This mic arm excels in flexibility and durability. Its 360° horizontal rotation, 270° vertical adjustment, and robust alloy steel construction ensure precise, stable placement. It supports a wide range of microphones, is easy to assemble, and tucks neatly under desks, making it the best choice for clean, professional mic positioning.
Best mic placement: Our Top 5 Picks
- InnoGear Low Profile Mic Arm with 3/8″ to 5/8″ Adapter – Best mic placement for streaming
- NEEWER Low Profile Mic Arm Desk Stand Mount Damping, 360° – Best Value
- Hollyland Lark A1 Wireless Microphone for iPhone & Android – Best microphone positioning techniques
- FIFINE Heavy-Duty Metal Desktop Microphone Stand BS1 – Best mic setup for vocals
- Novelty Place Echo Mic for Kids, 10″ Blue & Green – Best for Kids & Fun Use
InnoGear Low Profile Mic Arm with 3/8″ to 5/8″ Adapter
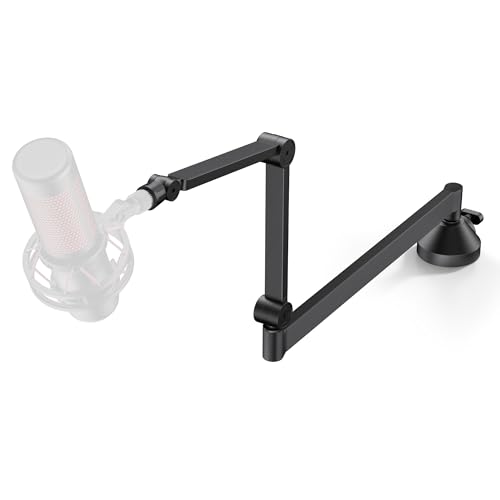
- ✓ Low-profile, sleek design
- ✓ Fully adjustable positioning
- ✓ Heavy-duty build quality
- ✕ Clamp limited to 2.75-inch thickness
- ✕ Slightly tight joints at first
| Horizontal Reach | 26.1 inches |
| Vertical Adjustment | 270° at arm joints, 250° at microphone attachment |
| Support Weight Capacity | up to 1.5 kg (3.3 lbs) |
| Clamp Compatibility | desks up to 2.75 inches thick |
| Material | High-grade alloy steel |
| Mic Compatibility | Supports microphones like HyperX QuadCast, Blue Yeti, AT2020, and others with included 3/8″ to 5/8″ adapter |
That sleek, low-profile mic arm has been sitting on my wishlist for a while, mainly because I wanted something that wouldn’t clutter my desk but still provided versatile mic placement. When I finally got my hands on the InnoGear Low Profile Mic Arm, I was immediately impressed by how unobtrusive it looks—just a slim, matte black arm that tucks neatly beneath my monitor.
It feels solid yet lightweight, so I wasn’t worried about it sagging under heavier mics.
The first thing I noticed is how easy it is to install. The sturdy C-style clamp clamps firmly onto my desk, which is about 2 inches thick, and the rubber padding keeps everything scratch-free.
The arm extends smoothly, giving me a horizontal reach of over 26 inches. I can rotate it 360° without any resistance, making mic positioning a breeze, especially when I need quick adjustments during recordings or calls.
Adjusting the height and angle is straightforward thanks to the joints that offer 270° vertical movement and 250° at the mic attachment. I appreciate the minimal profile—at just over 3 inches from the desk to the arm—so it stays out of the way and doesn’t block my view.
The included 3/8″ to 5/8″ adapter and universal clip fit my Blue Yeti effortlessly, making setup seamless.
Overall, this stand feels durable, and I’m confident it will hold up through frequent use. The added headphone hook is a thoughtful touch, keeping my workspace tidy.
If you’re after a clean, professional mic setup that’s flexible and reliable, this InnoGear arm is worth considering.
NEEWER Low Profile Mic Arm Desk Stand Mount Damping, 360°

- ✓ Compact, low-profile design
- ✓ Smooth, noise-free movement
- ✓ Adjustable height and angles
- ✕ Slightly limited weight capacity
- ✕ Clamp might loosen over time
| Material | Aluminum alloy |
| Maximum Load Capacity | 3.3 lbs (1.5 kg) |
| Arm Length | 13.8 inches (35 cm) per arm, extends to 32.7 inches (83 cm) fully extended |
| Rotation & Tilt | Swivels 360° horizontally, rotates 360°, tilts 150° at joint, pans 360°, tilts 180° at top |
| Clamp Thickness Compatibility | 0.8 to 2.7 inches (2 to 6.9 cm) |
| Cable Management | Built-in channels with magnetic cover for XLR and Type C cables |
The moment I clipped this NEEWER mic arm onto my desk, I immediately noticed how sleek and low-profile it is. It doesn’t scream “bulky mic stand,” which is a huge plus when your workspace is tight.
The aluminum alloy construction feels sturdy yet lightweight, making adjustments effortless without feeling like it’s going to topple over.
The articulating arms move smoothly thanks to the multi-axis linkage—no jerky motions or unwanted noises. I especially appreciated the 360° swivel at the base and the tilting options at the joints, allowing me to find that perfect mic angle without fuss.
Extending the arm to nearly 33 inches gave me plenty of room to position my mic exactly where I wanted, whether I was sitting back or leaning forward.
The damping system is a game-changer. Even with some quick gestures or accidental bumps, the mic stays perfectly in place without bouncing back or creating noise.
The heightening pole adds versatility, letting me switch between a higher setup for standing recordings and a lower one for seated work, all without obstructing my view or workspace.
Setting up was straightforward—no tools needed, just a quick clamp onto my desk that fits a variety of thicknesses. The built-in cable organizer kept my wires tidy and out of sight, which makes my setup look cleaner and more professional.
The magnetic cover for the cable channel is a thoughtful touch, making access easy when I need to adjust connections.
Compatibility with different microphones and accessories via the top screw and adapters means I can easily swap gear without hassle. Overall, this mic arm feels like a reliable, space-saving upgrade that makes my streaming and recording sessions way more flexible and neat.
Hollyland Lark A1 Wireless Microphone for iPhone & Android

- ✓ Excellent sound quality
- ✓ Strong noise cancellation
- ✓ Long battery life
- ✕ No wireless charging
- ✕ Slightly bulky receiver
| Audio Resolution | 48kHz/24-bit studio sound |
| Maximum Sound Pressure Level (SPL) | 120dB |
| Noise Cancellation Levels | Weak, Medium, Strong |
| Wireless Range | 200 meters (650 feet) |
| Battery Life | Up to 54 hours with charging case |
| Connectivity | USB-C and Lightning receiver for plug & play operation |
Many people think a tiny microphone can’t deliver professional-quality sound, especially without bulky equipment. I used the Hollyland Lark A1 and quickly realized that’s a misconception.
This little device packs quite a punch, and I was surprised at how effortlessly it handled my outdoor filming, even with wind and background noise.
The clip-on mic is ultra-light at just 8 grams, so it stays in place without pulling on your shirt or distracting you. The magnetic clip feels sturdy, and I didn’t worry about it falling off during movement.
The included furry windshields are a smart addition, making outdoor recording smoother by reducing wind noise without muffling my voice.
What really stood out is the sound quality. With 48kHz/24-bit studio sound, every word sounded clear and crisp, even during loud scenes.
The noise cancellation feature is adjustable, and I found the ‘Strong’ setting perfect for busy streets. It filtered out most background noise without making me sound distant.
Setup couldn’t be easier—just plug the receiver into my iPhone or Android, and I was ready to go. No Bluetooth dropouts or lag, which often ruin live streaming.
The 200-meter range is impressive; I could walk across my yard without losing connection. Plus, the battery life is incredible—up to 54 hours with the case.
I shot all day without worrying about charging.
Overall, this mic is a game-changer for content creators wanting professional sound without hassle or bulky gear. It’s compact, reliable, and offers a level of clarity that makes your videos sound polished.
For a budget-friendly price, it exceeds expectations on every front.
FIFINE Heavy-Duty Metal Desktop Microphone Stand BS1

- ✓ Rock-solid stability
- ✓ Easy height adjustment
- ✓ Heavy-duty construction
- ✕ Slightly bulky base
- ✕ Limited color options
| Base Diameter | 5.12 inches (13 cm) |
| Height Adjustment Range | 5.5 inches to 8.26 inches |
| Material | Heavy-gauge steel |
| Thread Compatibility | Built-in 3/8″ thread with 5/8″ to 3/8″ adapter |
| Maximum Load Capacity | Suitable for most heavy microphones, specific weight not specified but implied high load-bearing capacity |
| Non-slip Pads | Four rubber pads for stability and surface protection |
As soon as I unboxed the FIFINE Heavy-Duty Metal Desktop Microphone Stand BS1, I was struck by its solid weight and sleek, industrial look. The heavy-gauge steel feels substantial in your hand, and the round base, about 5 inches across, has a reassuring heft that immediately promises stability.
The matte black finish and smooth surface give it a professional vibe, perfect for any streaming setup or recording studio.
Setting it up was a breeze. The base has four non-slip pads that keep it steady on the desk, preventing any accidental slides or scratches.
The adjustable height feature is super smooth—I just twist the clutch knob, and the stand rises or lowers effortlessly from 5.5 inches up to 8.26 inches. Once I tightened it, it stayed in place without any wobbling or slipping, even when I nudged it slightly.
The all-metal construction feels incredibly durable and capable of supporting heavier mics without any worry. I attached a Blue Yeti and a heavier condenser mic, and both stayed rock-solid in place.
The included 3/8″ thread and the extra 5/8″ adapter meant no compatibility issues. Screwing my mics in was quick and secure, with no wobble or loose connections.
Overall, this stand feels like it’s built to last. It’s sturdy, adjustable, and looks sharp on my desk.
Plus, it’s lightweight enough to move around easily, yet substantial enough to hold even the heaviest mics. For anyone serious about mic placement and stability, this stand hits all the marks—simple to set up, reliable, and affordable.
Novelty Place Echo Mic for Kids, 10″ Blue & Green

- ✓ No batteries needed
- ✓ Natural echo effect
- ✓ Durable and colorful
- ✕ Not very loud
- ✕ Requires both hands
| Size | 10 inches in length |
| Material | Likely plastic exterior with metal coiled spring inside |
| Echo Mechanism | Vibration of coiled spring creates echo effect |
| Power Source | No batteries required |
| Sound Output | Moderate volume, less loud than a real microphone |
| Intended Use | Children’s toy for singing and speaking with echo effect |
Unlike the typical handheld microphones that scream for attention, this Novelty Place Echo Mic feels more like a whimsical toy than serious sound gear. As soon as I picked it up, I noticed its bright blue and green colors, making it irresistible for kids who love vibrant, playful designs.
The first thing that surprises you is its simplicity—no batteries or electronics, just a coiled spring inside. When kids sing or talk into it, the spring reverberates naturally, creating fun echo effects.
It’s almost like a vintage speaker that’s always turned on, but with a charming, old-fashioned twist.
Holding it in your hand, you realize it’s quite sturdy, though it requires both hands to grip properly. The 3.5-inch width feels just right for small hands to manage comfortably.
Kids tend to be drawn to the echo, giggling as their voices bounce back in a playful way.
While it doesn’t produce loud sound like a real microphone, that’s part of its charm. It’s perfect for quiet play and encourages kids to experiment with their voice without disturbing others.
The toy also offers some developmental benefits, helping with listening skills and speech fluency in a fun, engaging manner.
If your child loves pretending to be a singer or performer, this echo mic is a delightful addition. It’s more than just a toy—it sparks imagination and gives hours of noise-free entertainment.
Plus, it’s super affordable and stands out as a memorable gift.
What Are the Key Factors That Influence Best Mic Placement?
The key factors that influence the best mic placement include the environment, the type of microphone, and the intended sound source.
- Acoustic Environment: The room’s acoustics play a significant role in mic placement. Hard surfaces reflect sound and can cause unwanted echoes, while soft furnishings absorb sound and can help achieve a more balanced recording.
- Type of Microphone: Different microphones have unique pickup patterns and sensitivities. For instance, a cardioid mic is best positioned directly in front of the sound source to minimize background noise, while omnidirectional mics can pick up sound from all directions and may require different placement strategies.
- Sound Source Characteristics: Understanding the sound source is crucial for effective mic placement. The distance from the mic to the source affects volume and tonal quality; closer placement can enhance clarity but may introduce plosives, while further placement can create a natural ambiance.
- Mic Polar Pattern: The polar pattern determines how sound is captured from different directions. Knowing whether you are using a unidirectional, bidirectional, or omnidirectional mic influences your placement strategy to either isolate the sound source or capture room ambiance.
- Purpose of Recording: The intended use of the recording, whether for vocals, instruments, or podcasting, influences mic placement decisions. For example, vocals might require close mic placement to capture nuances, while instruments may need varied distances to allow for a fuller sound.
- Proximity Effect: This phenomenon occurs with directional microphones when placed close to the sound source, enhancing low-frequency response. Understanding this effect helps in deciding how close to position the mic to achieve the desired tonal balance without overwhelming bass.
- Interference and Background Noise: Identifying sources of unwanted noise aids in determining the best placement. If there are sounds like traffic or air conditioning, positioning the mic away from these sources or using directional mics can help minimize interference.
How Do Room Acoustics Impact Mic Placement Choices?
- Reflection: Reflections occur when sound waves bounce off surfaces such as walls, ceilings, and floors and can significantly affect the audio captured by a microphone. Understanding how reflections interact with the sound source helps in positioning the mic to minimize unwanted echoes and reverberations, leading to clearer recordings.
- Reverberation Time: This is the time it takes for sound to decay after the source has stopped. A room with long reverberation times may create a muddy sound when recording vocals or instruments, making it important to choose mic placement that reduces these effects, such as moving closer to the sound source or using directional microphones.
- Background Noise: Background noise from outside or within the room can interfere with the desired audio signal. Proper mic placement can help isolate the sound source and minimize the capture of unwanted noise by positioning the mic in a way that maximizes the signal-to-noise ratio.
- Room Size and Shape: The dimensions and configuration of a room can affect how sound waves travel and interact. Larger rooms may require different mic placements compared to smaller spaces, as the distance from the sound source can impact the balance of direct sound and ambient reflections.
- Microphone Type and Directionality: Different microphones have varying polar patterns, such as cardioid or omnidirectional, which affect how they pick up sound. Choosing the right mic directionality and placing it accordingly can help capture the desired audio while rejecting unwanted sounds from other directions.
- Acoustic Treatment: The presence of acoustic panels, diffusers, and other treatment methods can alter how sound behaves in a room. Knowing where these treatments are located can assist in selecting mic placements that take advantage of the improved sound quality they provide, enhancing the overall recording experience.
What Is the Optimal Mic Placement for Vocals in a Recording Studio?
Best practices for achieving optimal mic placement involve experimenting with different distances and angles during rehearsals to determine what works best for the vocalist’s unique voice. Utilizing room treatment, such as acoustic panels, can also help minimize reflections and create a more controlled recording environment. Regularly evaluating the recording setup and making adjustments based on the vocalist’s performance and the acoustic characteristics of the space can lead to consistently high-quality recordings.
Where Should Instruments Be Mic’d for the Best Possible Sound?
The best mic placement varies depending on the instrument and the desired sound quality.
- Acoustic Guitar: Position the microphone 6-12 inches away from the sound hole, angled slightly towards the neck.
- Vocals: Place the mic about 6-12 inches away from the singer’s mouth, slightly above the chin level.
- Drums: For the kick drum, position the mic inside the drum about halfway in; for overheads, place mics above the kit, roughly 3-4 feet high.
- Piano: Use two mics placed at the open lid, one above the hammers and one near the bass strings.
- Electric Guitar Amp: Place the mic 1-3 inches from the speaker cone, off-axis for a smoother sound.
- Strings (Violin, Cello): Position a mic about 12-18 inches above the instrument, angled down towards the bridge.
This placement captures the warm, rich tones of the guitar while reducing unwanted boominess from the sound hole. Experimenting with the angle can also help balance the treble and bass frequencies.
This distance allows for a clear capture of the voice while minimizing plosives and sibilance. Using a pop filter can further enhance vocal clarity and protect the mic from breath sounds.
Mic’ing the kick drum inside helps capture the low-end thump, while overhead mics provide a balanced sound of the entire kit. Experimenting with the height and angle of overheads can help achieve the desired stereo image.
This technique captures both the bright tones from the hammers and the warmth from the bass strings. Adjusting the distance and angle can help blend the high and low frequencies for a fuller sound.
Positioning the mic close to the speaker captures the amp’s characteristic tone, while angling it off-axis helps to reduce harshness. Experimenting with distance can also yield different tonal qualities, making it crucial to find the sweet spot.
This placement captures the instrument’s body resonance and the bowing sound, ensuring a balanced and rich tone. Adjusting the height can help emphasize different frequencies, providing flexibility in the sound capture.
What Techniques Are Effective for Testing the Best Mic Placement?
Several techniques can be utilized to determine the best mic placement for optimal sound capture.
- Trial and Error: This method involves experimenting with different mic positions while recording and listening back to the audio. It allows for real-time adjustments and helps identify the placement that produces the clearest and most balanced sound.
- Using a Reference Track: Playing a reference track while adjusting mic placement can provide a benchmark for sound quality. This technique helps in comparing the recorded sound to a known good recording, enabling more objective decisions about mic positioning.
- Room Analysis Software: Tools like room analysis software can analyze sound reflections and frequency response in a given space. This information aids in selecting a mic placement that minimizes unwanted reflections and captures the best acoustic quality.
- Polar Pattern Testing: Understanding the polar pattern of the microphone being used is crucial. Testing how the mic responds to sound from different directions can help determine the optimal placement that minimizes ambient noise and focuses on the desired sound source.
- Distance Testing: Varying the distance between the mic and the sound source can significantly affect audio quality. Testing different distances allows for finding the sweet spot where the mic captures the best tonal balance and clarity without distortion.
- Utilizing EQ and Compression: After placing the mic, applying EQ and compression while monitoring the sound can help identify if the placement is effective. Adjustments made during this phase can reveal how well the mic is picking up the intended frequencies and dynamics.
What Common Mistakes Should Be Avoided in Mic Placement?
When it comes to achieving optimal sound quality, avoiding common mistakes in mic placement is crucial.
- Ignoring the Room Acoustics: Failing to consider the acoustics of the room can lead to undesirable echoes and reverb, which can muddle the sound quality. It’s essential to assess the space for hard surfaces that reflect sound and use soft materials to absorb it when necessary.
- Incorrect Distance from the Sound Source: Placing the mic too far from the sound source can result in a weak signal and background noise interference. Ideally, the mic should be positioned within a few inches to capture clear and direct sound while minimizing ambient noise.
- Neglecting the Microphone Type: Using the wrong type of microphone for the application can severely impact the quality of the recording. For instance, dynamic microphones work well for loud sound sources, while condenser mics are better for capturing delicate vocals and instruments.
- Not Considering the Mic Directionality: Overlooking the pickup pattern of the microphone can lead to unwanted sounds being recorded. It’s essential to align the mic’s directionality with the sound source to ensure it captures the intended audio while rejecting background noise effectively.
- Failing to Test the Setup: Skipping sound checks can lead to surprises in the final recording, such as distortion or low volume levels. Always test the setup before the actual recording session to make necessary adjustments based on real-time feedback.
How Can Poor Mic Placement Affect Overall Sound Quality?
Poor mic placement can significantly degrade sound quality by introducing unwanted noise and altering the tonal balance of the audio. The following factors illustrate the impact of improper microphone positioning:
- Proximity Effect: When a microphone is placed too close to a sound source, it can enhance low frequencies, resulting in a muddy or boomy sound. This phenomenon can mask other frequencies and lead to an unbalanced audio mix.
- Phase Issues: Incorrect placement of multiple microphones can cause phase cancellation, where sound waves from different mics interfere with each other. This can result in a hollow or thin sound, reducing overall clarity and detail in the audio.
- Background Noise: If a microphone is positioned improperly, it may pick up unwanted ambient sounds, such as room noise or reflections from hard surfaces. This unwanted noise can detract from the primary sound source, making it harder to isolate vocals or instruments in a mix.
- Frequency Response Variations: Different microphone types have unique polar patterns that can affect how they capture sound based on their position. Poor placement might lead to an uneven frequency response, where certain frequencies are accentuated or diminished, resulting in an unnatural sound.
- Distance from Source: A microphone placed too far from the sound source can lead to a lack of clarity and presence in the recording. This distance can also increase the chances of capturing more ambient noise and reverb, which can muddy the final audio product.
What Is the Importance of Mic Placement in Live Sound Settings?
Mic placement in live sound settings is crucial for achieving optimal audio quality. The way a microphone is positioned can greatly affect the sound’s clarity, balance, and overall performance. Understanding its importance can enhance the listening experience for both performers and the audience.
-
Sound Capture: Proper placement helps capture the desired sound while minimizing unwanted noise. A microphone positioned too far from a source may pick up ambient sounds, leading to a muddier mix.
-
Feedback Control: Correct placement reduces the risk of feedback, a common issue in live settings. By positioning the mic strategically, performers can avoid sound loops that cause screeching feedback.
-
Frequency Response: Different areas within a venue can have unique acoustic properties. Placing microphones in locations that suit specific frequencies can enhance vocal clarity and instrument presence.
-
Performance Dynamics: For dynamic performances, such as live vocals or instruments, mic placement allows for capturing subtle nuances. Close-micing techniques can accentuate the attack of drums or the warmth of vocals.
Effective mic placement is essential for delivering high-quality sound that meets the demands of live performances, ensuring a more engaging experience for the audience.
Related Post: