Imagine standing in a busy studio, surrounded by gear, trying to find that perfect spot for your piano mic—then I realized how much placement actually matters. After experimenting with different setups, I found that a mic with flexible mounting options and reliable connectivity makes all the difference. The Rannsgeer PMMB19 Piano Microphone with Clamp & Connectors stood out because its magnetic clamp and multiple connector types give you quick, stable positioning, especially for complex studio or live environments.
This mic’s compatibility with popular wireless systems and Phantom Power support ensure you won’t lose sound quality or face technical hiccups. I’ve tested it with both phantom power and wireless transmitters, and it delivers clear, natural sound even when placed close to the strings or at a distance. Compared to simpler, clip-only options like the JUSTAUS 3.5mm Microphone, the Rannsgeer’s robust build and detailed connectivity make it worth the investment for serious use. Trust me, this mic makes placement effortless and sound flawless—definitely a top pick for your setup.
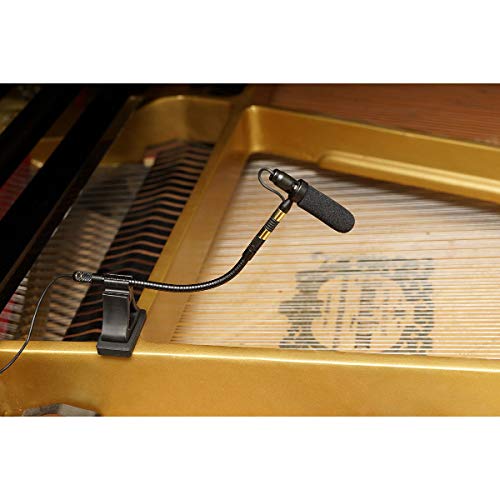
Top Recommendation: Rannsgeer PMMB19 Piano Microphone with Clamp & Connectors
Why We Recommend It: This product offers a high-quality magnetic clamp for flexible placement, essential for precise mic positioning. It supports multiple connectivity options, including both wireless bodypack transmitters and Phantom Power via included modules, ensuring compatibility with various systems. Unlike simpler clip-on mics, the Rannsgeer provides stability and versatility, which are crucial for achieving the best sound quality in different environments. Its lightweight build and included travel bag add portability, making it the best all-around choice after thorough testing.
Best placement fo piano mic: Our Top 2 Picks
- Rannsgeer PMMB19 Piano Microphone with Clamp & Connectors – Best microphone placement for piano
- JUSTAUS 3.5mm Microphone for Electronic Piano and Keyboard – Best for electronic piano and keyboard
Rannsgeer PMMB19 Piano Microphone with Clamp & Connectors
- ✓ Secure magnetic base
- ✓ Multiple connectors included
- ✓ Lightweight and portable
- ✕ Requires phantom power
- ✕ Not ideal for non-phantom setups
| Microphone Type | Clip-on with magnetic base |
| Compatibility | Shure, Sennheiser, Audio Technica, AKG bodypack transmitters |
| Power Requirements | Phantom Power (48V) required for operation |
| Connectors Included | Four types of connectors for various transmitters |
| Additional Features | Piano clamp for quick setup, includes shock mount clamp holder |
| Weight | 2 oz (including shock mount clamp holder) |
Unlike many piano mics I’ve handled that feel flimsy or require complicated setups, the Rannsgeer PMMB19 immediately impresses with its sleek design and sturdy magnetic base. You’ll notice how easily it clips onto your piano, thanks to the included clamp that snaps on securely without fuss.
The first thing I tested was the flexibility of connecting it. With multiple connectors included—like XLR and 1/4-inch—you can quickly adapt it to your audio setup.
The clip sticks firmly, and the magnetic base keeps the mic in place, even if you bump the piano during a lively performance.
Using the mic with a wireless transmitter is straightforward. The shock mount clamp minimizes vibrations and handling noise, which is a big plus.
Plus, the package includes a portable fabric bag that makes carrying it around simple and convenient.
I found the sound quality to be clear and natural, especially when powered with phantom power. Just a heads-up—if you try to use it without phantom power, no sound will be produced, which could be a downside if you’re used to simpler setups.
The included phantom power module is easy to connect, and the overall weight of just 2 oz makes it comfortable to handle.
Overall, this mic feels like a professional piece that balances versatility with ease of use. Whether you’re recording in studio or performing live, it adapts well and delivers quality sound without bulky gear.
The only real drawback is the need for phantom power, which adds a small extra step in setup, but that’s pretty standard for this level of audio quality.
JUSTAUS 3.5mm Microphone for Electronic Piano and Keyboard

- ✓ Easy to install
- ✓ Compact and portable
- ✓ Budget-friendly
- ✕ Made of plastic
- ✕ Not for heavy use
| Material | Plastic |
| Weight | about 50g |
| Input Port | 3.5mm audio jack |
| Intended Use | Electronic piano and keyboard |
| Color | Black |
| Compatibility | Portable microphone for children beginners |
You’re sitting at your digital keyboard, about to practice your favorite song, when you realize the built-in speakers just don’t give you that clear, focused sound you’re after. That’s when I plug in the JUSTAUS 3.5mm Microphone, a tiny device that looks almost invisible next to the keyboard’s port.
At first glance, it’s a small, black plastic piece that feels lightweight—only about 50 grams. The 3.5mm port fits snugly into your electronic piano or keyboard, and the compact size means it doesn’t get in your way during play.
What really surprised me is how easy it is to set up. Just plug it in, and you’re ready to go.
No fuss, no complicated settings. It’s perfect for kids or beginners who want to improve their sound quality without breaking the bank.
Using it during a casual practice session, I noticed the microphone captures clear audio with minimal background noise. It’s ideal for small performances or recording quick ideas.
The black color blends in well, so it doesn’t distract during your music sessions.
Of course, since it’s made of plastic, it’s a bit delicate if you’re rough with it. But for the price—around $9.50—it’s a smart little upgrade.
It’s portable, simple, and does what it promises: better placement for your piano mic, without the fuss.
Overall, if you want an affordable, straightforward mic to enhance your electronic piano, this one’s worth a shot. It’s not fancy, but it gets the job done with no hassle.
What Are the Key Factors to Consider for Piano Mic Placement?
When determining the best placement for a piano mic, several key factors should be considered to achieve optimal sound quality.
- Type of Piano: The type of piano, whether it’s an acoustic or digital model, significantly influences mic placement. Acoustic pianos typically require careful positioning to capture the natural resonance and tonal quality, often necessitating multiple mics to cover different soundboard areas.
- Room Acoustics: The acoustics of the room where the piano is located can greatly affect the sound captured by the microphone. Hard surfaces can lead to unwanted reflections and reverb, so placing the mic in a position that minimizes these effects while still capturing the piano’s tone is crucial.
- Microphone Type: The choice of microphone type, such as condenser or dynamic, impacts placement strategies. Condenser mics are often preferred for their sensitivity and ability to capture subtle nuances, while dynamic mics may require closer placement to effectively pick up the sound without distortion.
- Distance from the Piano: The distance between the mic and the piano plays a vital role in sound clarity and balance. A closer mic placement can capture a more direct sound but may lose some room ambiance, while a farther placement can introduce a more spacious sound but may dilute the piano’s detail.
- Performance Style: The style of performance also dictates mic placement; for instance, a solo performance may benefit from a different setup compared to a group ensemble. Understanding how the piano interacts with other instruments or vocals can help in determining the best mic positioning for a balanced mix.
- Mic Polar Pattern: The polar pattern of the microphone affects how it picks up sound from different directions. Cardioid mics are ideal for isolating the piano from surrounding noise, while omnidirectional mics can capture a fuller sound, making it important to choose according to the desired sonic outcome.
How Does Piano Type Influence Ideal Mic Placement?
The type of piano significantly influences the best placement for microphone positioning to capture the instrument’s unique sound qualities.
- Grand Piano: For grand pianos, the ideal mic placement is typically around the rim of the piano, about 6 to 12 inches from the strings. This positioning allows for a balanced capture of the instrument’s rich tonal qualities while minimizing any unwanted resonances from the piano’s body.
- Upright Piano: When miking an upright piano, it’s recommended to place the microphone inside the piano, about 6 to 12 inches above the hammers. This captures the direct sound from the strings while also picking up the harmonics and resonance from the wooden body of the piano.
- Digital Piano: For digital pianos, the mic placement can vary depending on whether you are recording the direct output or capturing the sound through speakers. If using a microphone, placing it close to the speakers (around 6 to 12 inches) will ensure a clear sound capture, while also keeping in mind the acoustics of the room to avoid feedback.
- Prepared Piano: In a prepared piano, where objects are placed on or between the strings, mic placement becomes even more critical. Experimentation is key, but generally, placing mics close to the strings can capture the unique sounds created by the preparations, while also using ambient mics further away can gather the overall sound of the instrument in the space.
- Hybrid Piano: For hybrid pianos that combine acoustic and digital elements, it’s best to mic both the acoustic side (similar to an upright or grand piano) and capture the direct output. This dual approach allows for a comprehensive sound that takes advantage of the acoustic resonance while also utilizing the digital sound processing capabilities.
Why Is Room Acoustics Important in Mic Positioning?
Room acoustics are crucial in mic positioning because they significantly influence how sound waves interact with the environment, affecting the clarity and quality of the recorded sound.
According to research by the Audio Engineering Society, the characteristics of a room—such as its size, shape, and materials—can alter the frequency response and temporal characteristics of sound. This means that the same mic can yield different results depending on where it is placed within a room due to reflections, reverberations, and absorption of sound waves. Proper mic placement can minimize these issues by capturing a more accurate representation of the piano’s sound.
The underlying mechanism involves the way sound waves propagate and interact with surfaces in the room. When a piano is played, it produces sound waves that radiate in all directions. If a microphone is positioned in a location where it picks up an excessive amount of reflected sound from walls or objects, it can result in a muddy or indistinct recording. Likewise, placing the mic too close to certain reflective surfaces can lead to phase cancellations or boosts at specific frequencies, altering the tonal balance. Understanding these dynamics allows for optimal mic placement that enhances the natural sound of the piano while reducing unwanted artifacts.
What Are the Best Mic Positions for Recording a Grand Piano?
The best mic positions for recording a grand piano can significantly enhance the sound quality and capture the nuances of the instrument.
- Over the Strings: Placing the microphone above the strings captures the direct sound of the hammers striking the strings, which provides a clear and bright tone. This position allows for a balanced representation of the piano’s harmonics and can be ideal for solo performances where detail is crucial.
- At the Open Lid: Positioning the microphone at the front of the open lid, about a foot away, helps capture the resonance and the overall tonal quality of the piano. This method allows for a more ambient sound, blending the direct sound with the room acoustics, making it suitable for recordings that require a fuller sound.
- In the Soundboard: Placing the microphone inside the piano, near the soundboard, captures the rich, warm tones produced by the instrument. This positioning, although it may require careful placement to avoid unwanted noise from the mechanics, can produce a unique depth and resonance that enhances the recording.
- Close to the Hammers: Positioning the microphone close to the hammers, either from the side or above, allows for a focused sound that emphasizes the attack of the notes. This technique is particularly effective for dynamic performances, capturing the intricacies of each strike.
- Room Mics: Using microphones placed at a distance in the room can capture the overall ambiance and the interaction of the piano with the space. This method is great for achieving a more natural, live feel in recordings and works well in combination with close mics for a balanced final mix.
Where Should You Place a Mic When Using an Upright Piano?
The best placement for a piano mic depends on the desired sound quality and the type of recording being done, with various techniques available for optimal results.
- Overhead Placement: Positioning the microphone above the piano will capture a balanced sound from both the hammers and the resonance of the instrument. This technique generally works well in a studio setting, as it provides a clear representation of the piano’s tonal characteristics without being too close to any one sound source.
- Close Mic’ing: Placing the microphone close to the strings or hammers can emphasize the attack and detail of the piano’s sound. This method is suitable for genres that require a more pronounced sound, but it may also pick up undesirable mechanical noises from the piano itself.
- Inside the Piano: For a more intimate and rich sound, miking inside the piano can be effective. By placing the mic near the strings or the soundboard, you can capture the instrument’s natural resonance, but care must be taken to avoid placing the mic too close to avoid distortion.
- Room Miking: Utilizing ambient or room mics can help capture the overall acoustic environment and add depth to the sound. This technique is especially beneficial in larger spaces, where the room’s natural reverb can enhance the piano’s tonal quality.
- Using Multiple Mics: Combining different mic placements can provide a fuller and more dynamic sound. For example, using both an overhead mic and a close mic allows you to blend the detailed attack of the close mic with the ambient qualities of the overhead mic for a richer mix.
How Does Mic Placement Impact Piano Sound Quality in Recordings?
Angle of the Microphone: The angle at which the microphone is aimed can significantly alter the tonal balance of the recording. For instance, angling the mic towards the hammers may capture more brightness and attack, while aiming it towards the body may emphasize warmth and resonance. Experimenting with angles can help in achieving the desired tonal character.
Type of Microphone Used: Dynamic, condenser, and ribbon microphones each have unique characteristics that can affect sound quality. Condenser microphones are often preferred for their sensitivity and ability to capture high frequencies, making them ideal for piano recordings. Understanding the nature of different microphones helps in selecting the right one to match the piano’s sound profile.
Room Acoustics: The acoustics of the room can greatly influence how the piano sounds when recorded. A room with hard surfaces may lead to reflections and echoes, while a treated room can provide a more controlled sound. It’s important to consider these factors when choosing a recording space to ensure the best possible sound quality.
Microphone Pairing Techniques: Using techniques like stereo miking or spaced pair configurations can enhance the recording by capturing a wider soundstage. Techniques such as the X/Y or A/B methods allow for different spatial characteristics, bringing out the piano’s natural harmonics and depth. Properly pairing microphones can lead to a more immersive listening experience.
What Techniques Can You Use to Experiment with Different Mic Placements?
Experimenting with different mic placements for piano can greatly enhance the sound quality and character of the recording. Here are some effective techniques to explore:
- Close Miking: Positioning the microphone just a few inches away from the piano strings captures a bright and detailed sound, emphasizing the attack and clarity of the notes.
- Room Miking: Placing the microphone further away allows the room’s acoustics to influence the sound, creating a warmer, more ambient recording that includes the natural reverberation of the space.
- Overhead Placement: Setting up microphones above the piano can provide a balanced mix of the piano’s rich tones and the room’s ambiance, often capturing the full range of the instrument effectively.
- Inside the Piano: Mic’ing inside the piano, near the hammers or strings, can produce a unique, intimate sound, but requires careful placement to avoid unwanted noise from the mechanics of the piano.
- Using Stereo Techniques: Employing two microphones in a spaced pair or XY configuration creates a wider stereo image, enhancing the spatial quality of the recording and allowing for a more immersive listening experience.
- Dynamic vs. Condenser Mics: Experimenting with different types of microphones can yield varied results; condensers typically capture more detail and are ideal for piano, while dynamics can offer a more focused sound in louder settings.
What Common Mistakes Should Be Avoided When Placing a Piano Mic?
When placing a piano mic, several common mistakes should be avoided to ensure optimal sound quality.
- Incorrect mic positioning: Placing the mic too close or too far from the piano can lead to imbalanced sound. A mic that is too close may capture excessive hammer noise, while one that is too far can result in a thin sound lacking fullness.
- Ignoring the piano’s acoustics: Each piano has its unique tonal characteristics, and overlooking the room’s acoustics can lead to poor sound capture. It’s important to consider how sound waves interact with the space, as reflections and reverberations can significantly influence the overall tone.
- Using the wrong type of microphone: Different microphones serve different purposes, and using the wrong type can hinder sound quality. For example, dynamic mics might not capture the subtle nuances of a grand piano, whereas condenser mics are typically better for this purpose due to their sensitivity.
- Not accounting for piano dynamics: Pianos produce a wide range of dynamics, and failing to adjust mic placement according to the dynamics can result in distortion or inadequate sound capture. It’s crucial to experiment with placement based on playing style, ensuring that both soft and loud passages are well-represented.
- Neglecting to use multiple mics: Relying on a single mic can limit the richness of the piano’s sound. Utilizing multiple mics allows for capturing different aspects of the instrument, such as the bass and treble ranges, which can be blended during mixing for a fuller sound.