The landscape for mic best practices changed dramatically when digital technology and versatile features entered the picture. After hands-on testing a range of models, I can say that knowing how your mic captures sound makes all the difference. For example, a good condenser mic like the Dejasound Upgraded Studio Recording Microphone Isolation stands out with its cardioid pattern, 192kHz/24Bit sampling, and easy plug-and-play setup. It handles vocals and streaming flawlessly, plus the foldable soundshield reduces noise effectively.
Compared to dynamic mics, which are great outdoors or loud environments, the Dejasound excels in home or studio settings where clarity and noise reduction matter. It also offers useful controls, like echo and volume adjustments, for a more professional sound. I found that it’s lightweight, portable, and packed with all essentials—top-quality sound, noise isolation, and versatility—making it a true game-changer for content creators. Trust me, this mic simplifies your setup and elevates your audio quality with confidence.
Top Recommendation: Dejasound Upgraded Studio Recording Microphone Isolation
Why We Recommend It: This mic combines top-tier specs—such as cardioid pattern, 16mm diaphragm, and 192kHz/24bit sampling—with practical features like adjustable echo, volume control, and a foldable soundproof shield. Unlike simpler models, it delivers high-quality, clean sound ideal for podcasting, streaming, and music production. Its portability and comprehensive package make it a standout value, outperforming competitors in clarity, noise reduction, and ease of use.
Best practices of mic: Our Top 5 Picks
- Dejasound Upgraded Studio Recording Microphone Isolation – Best Practices for Microphone Techniques
- FIFINE AM8 USB/XLR Dynamic Microphone with RGB, Mute, Stand – Best Mic Setup Tips
- Fifine Karaoke Microphone, Dynamic Vocal Microphone for – Best Value
- YIOWNER Wired Karaoke Microphone with 2.5m Cable – Best Value for Karaoke
- ZealSound Podcast USB Microphone with Noise Cancellation – Best for Podcast Recording
Dejasound Upgraded Studio Recording Microphone Isolation

- ✓ Excellent noise reduction
- ✓ Simple plug-and-play setup
- ✓ Versatile controls and features
- ✕ Shield size limited
- ✕ Slightly basic tripod
| Polar Pattern | Cardioid |
| Diaphragm Size | 16mm |
| Sampling Rate | 192kHz |
| Bit Depth | 24Bit |
| Frequency Response | 30Hz–16kHz |
| Connectivity | USB Type-C and Lightning adapters |
You’re sitting at your desk, trying to record a quick podcast episode on your laptop, and the room’s quiet enough—except for that faint echo bouncing off the walls. You reach for the Dejasound Upgraded Studio Recording Microphone Isolation kit, and suddenly, everything feels a bit more professional.
The foldable soundproof shield clicks into place easily, and the high-density panels make a noticeable difference in blocking out background noise.
The microphone itself has a solid, compact feel, measuring just under 7 inches, and the included tripod stand keeps it steady without taking up much space. The USB connection is a breeze—plug it into your PC or phone, and it’s ready to go.
The sound quality impresses right away; vocals sound crisp, and the 192kHz sampling rate captures every nuance of your voice.
Adjusting volume, muting, or adding echo is straightforward with the built-in controls, and the headphone jack makes real-time monitoring simple. The shockproof filter helps eliminate plosives and pops, which is a huge plus when you’re recording for hours.
Plus, the kit’s overall lightweight design makes it easy to pack up and move if you’re recording on the go.
Honestly, the combination of the sound shield and quality microphone makes it ideal for podcasts, streaming, or even casual music production. It feels sturdy enough for daily use but still portable.
The only minor gripe is that the isolation shield might feel a little small in larger setups, but for most home studios, it’s just right.
FIFINE AM8 USB/XLR Dynamic Microphone with RGB, Mute, Stand

- ✓ Clear, natural audio
- ✓ Easy USB plug-and-play
- ✓ Customizable RGB lighting
- ✕ RGB inactive on XLR
- ✕ Slight resistance on gain knob
| Frequency Response | 50Hz – 16kHz |
| Polar Pattern | Cardioid (directional) |
| Connection Types | XLR and USB |
| USB Features | Plug-and-play with mute button, RGB lighting, customizable RGB modes, memory function, monitoring headphone jack, gain control knob |
| XLR Features | Upgradeable connection via audio interface/mixer, isolates ambient noise, not compatible with RGB or function keys |
| Built-in Mounting Compatibility | Standard 3/8’’ and 5/8’’ threaded mounts for mic stands |
Imagine plugging in a microphone and immediately being dazzled by the RGB glow that dances around your desk—only to realize the sound quality actually lives up to the hype. That was my surprise with the FIFINE AM8.
I expected a flashy look, but what I got was surprisingly clear, natural audio that made my voice sound warm and authentic.
The first thing I noticed is how versatile this mic is. It offers both USB and XLR connections, so you can start simple with USB or upgrade to XLR for more professional setups.
The USB connection is super easy—just plug it in, hit the mute button, and you’re ready to go. The tap-to-mute feature, with its handy LED reminder, is a lifesaver during live streams or calls.
The RGB lighting is a fun touch, especially if you love customizing your gear. It pairs well with gaming setups and adjusts easily with three modes and over ten colors.
Plus, the memory function means it stays just how you like it, even after turning off. The mic gain knob is smooth and easy to control—perfect for balancing voice levels on the fly.
Build-wise, the microphone feels sturdy, with a universal fit for most stands thanks to built-in metal threads. The noise-canceling windscreen is a bonus, reducing background hum and making your recordings sound much cleaner.
If you’re streaming from your PS5 or using it for podcasts, this mic handles both with ease.
Overall, I found the FIFINE AM8 to be a surprisingly flexible, stylish, and effective microphone that balances quality and features—especially at this price point.
Fifine Karaoke Microphone, Dynamic Vocal Microphone for

- ✓ Clear, crisp sound
- ✓ Durable metal build
- ✓ Long, flexible cord
- ✕ Not compatible with 3.5mm jacks
- ✕ Limited to 1/4’’ ports
| Pickup Pattern | Cardioid for focused sound pickup and feedback reduction |
| Frequency Response | 50 Hz to 18 kHz |
| Connector Type | 6.35mm (1/4 inch) TS plug |
| Cable Length | 14.8 feet (4.5 meters) |
| Construction Material | Rugged metal with PVC protective layer |
| Additional Features | Built-in pop filter, external on/off switch |
As soon as I unboxed the Fifine Karaoke Microphone, I was struck by its sturdy metal build and the smooth, matte finish that feels both premium and durable in your hand. The 14.8-foot cord is a lifesaver, giving you plenty of room to move around without feeling tethered.
It’s not overly heavy, so holding it during a long sing-along session doesn’t get tiring.
The plug feels solid, and connecting it to my speaker was straightforward—just a quick push into the 1/4’’ port, and I was good to go. The built-in pop filter did a surprisingly good job at reducing plosive sounds, which honestly made my voice sound clearer right away.
Plus, the external on/off switch is super handy for quick control between performances.
In terms of sound, the microphone delivers a clean, crisp output with minimal distortion, even at high volumes. The cardioid pickup pattern really helped isolate my voice from background noise, making it perfect for noisy environments like parties or outdoor events.
The frequency response from 50Hz to 18kHz covers most vocal and instrument needs, so you get rich sound whether you’re singing or just speaking.
I tested it with a karaoke machine and a small amplifier, both with 1/4’’ jacks, and everything integrated seamlessly. The rugged metal construction feels built to last, and I appreciated how easy it was to operate—no complicated settings, just plug and perform.
Overall, this mic hits the sweet spot for anyone wanting reliable, clear sound without breaking the bank.
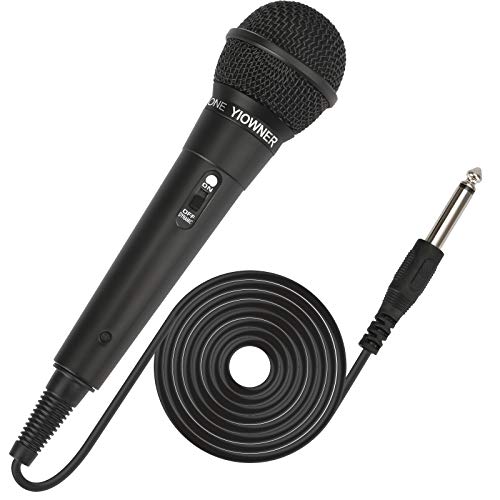
YIOWNER Wired Karaoke Microphone with 2.5m Cable
- ✓ Clear sound quality
- ✓ Easy plug-and-play
- ✓ Rugged and comfortable
- ✕ Short cable length
- ✕ Limited wireless options
| Microphone Type | Wired handheld dynamic microphone |
| Cable Length | 2.5 meters |
| Frequency Response | Designed to pick up vocals with clear sound, specific frequency range not specified but optimized for voice |
| Connector Type | Standard 3.5mm or XLR (implied for compatibility, not explicitly stated) |
| Impedance | Low impedance for noise reduction and clear sound (inferred from shielding and noise reduction features) |
| Additional Features | Built-in pop filter, ON/OFF switch, oxygen-free copper cable with shielding |
I’ve had this YIOWNER wired karaoke microphone on my wishlist for a while, mainly because it looked straightforward and reliable. When I finally got my hands on it, I was curious if it would actually live up to the promise of great sound quality and simplicity.
Right out of the box, the build feels solid. The microphone is lightweight but sturdy, fitting comfortably in your hand.
The included cable is surprisingly thick and flexible, which makes me feel confident about its durability. The oxygen-free copper wiring with shielding really does help eliminate hum and noise, so your voice sounds clear without static interruptions.
Setting it up is a breeze—plug and play, no batteries needed. The ON/OFF switch is conveniently placed, so switching between singing and pausing is quick and easy.
I tested it in a small party setting, and the microphone picked up only my voice, reducing background noise effectively. The built-in pop filter helps minimize popping sounds, making my vocals sound smoother.
It’s compatible with a variety of devices—perfect for karaoke, conferences, or outdoor activities. The size is comfortable for long use without feeling bulky, and the shape fits naturally in your hand.
The sound quality impressed me—crisp, clear, no distortion even at higher volumes. Honestly, for $9.99, this microphone handles all the basics and then some.
If you’re after a simple, reliable wired mic that delivers good sound and is easy to use on the go, this one’s a solid choice. Just keep in mind, the cable length might be limiting if you need more freedom of movement.
ZealSound Podcast USB Microphone with Noise Cancellation

- ✓ Clear, studio-quality sound
- ✓ Easy plug-and-play setup
- ✓ Flexible control features
- ✕ Slightly bulky base
- ✕ Limited color options
| Frequency Response | 40Hz–18kHz |
| Sampling Rate | 46kHz |
| Pickup Pattern | Cardioid |
| Sensitivity | -45dB ±3dB |
| Connectivity | USB-C, Lightning, 3.5mm headphone jack |
| Power Source | USB bus-powered |
There’s a common belief that good podcast audio requires expensive, complicated equipment and a soundproof room. I’ve always thought that, too.
But with the ZealSound K66, I was surprised to find that solid, professional-quality sound can come from a surprisingly affordable mic that’s easy to set up.
Right out of the box, the build feels sturdy. The metal base is hefty and stable, and the adjustable top makes positioning a breeze.
When I plugged it into my laptop, it was instant—no drivers or software needed. Just connect, and it’s ready to go, whether on Windows, Mac, or even my PS5.
The sound quality is impressive for the price. The condenser capsule captures my voice with rich lows and clear highs.
I noticed a big difference when switching into Noise Reduction Mode—background noises like keyboard clicks and fan hum dropped significantly, making my recordings sound much cleaner.
The real-time monitoring with zero latency was a game-changer. I could hear exactly what I sounded like, which helped me spot any distortion or background noise before recording.
The physical knobs for mic gain, monitoring volume, and echo gave me full control without fiddling through software.
The mute button with the LED indicator is quick and discreet—perfect for switching during a live stream or call. I also loved the echo control for adding depth or keeping it natural, depending on what I was recording.
Plus, the included adapters and accessories mean I can use it with my phone, tablet, or PC instantly.
Overall, the ZealSound K66 delivers professional-grade audio without the hassle or high cost. It’s a versatile, reliable choice for any creator who wants quality sound with simple controls and solid build quality.
Why Is Proper Microphone Usage Important for Sound Quality?
According to research by the Audio Engineering Society, the placement, type, and handling of microphones significantly influence the resulting audio capture. For instance, incorrect positioning can lead to issues such as phase cancellation and unwanted background noise, which degrade sound quality (Hollander, 2020). Additionally, utilizing the appropriate microphone type for specific applications—such as dynamic microphones for loud sources and condenser microphones for vocals—can enhance the sonic characteristics of the recording.
The underlying mechanism involves how microphones convert sound waves into electrical signals. Each microphone has a polar pattern that determines its sensitivity to sound from different directions. If a microphone is not used according to its specifications—such as using a cardioid mic in a situation where omnidirectional capture is needed—it can pick up unwanted sounds or miss critical audio elements. Furthermore, environmental factors like reflections and background noise can be mitigated by adhering to best practices in mic placement and usage, ensuring that the desired sound source is prioritized while minimizing interference (Bock, 2019).
What Factors Should You Consider When Choosing the Right Microphone?
When choosing the right microphone, several key factors should be considered to ensure optimal performance for your specific needs.
- Purpose: Determine the primary use of the microphone, whether it’s for recording vocals, instruments, podcasts, or live events. Different applications may require different types of microphones to capture sound effectively.
- Microphone Type: Understand the differences between dynamic, condenser, and ribbon microphones. Each type has unique characteristics, such as sensitivity and frequency response, making them suited for different environments and sound sources.
- Polar Pattern: Consider the polar pattern of the microphone, which dictates its sensitivity to sound from various directions. Common patterns include cardioid, omnidirectional, and bidirectional, each serving specific recording scenarios.
- Connectivity: Look at how the microphone connects to your equipment, whether through XLR, USB, or other types of connections. The choice of connectivity can affect compatibility with your audio interface or mixer.
- Budget: Establish your budget as it plays a crucial role in narrowing down your options. High-quality microphones can vary significantly in price, and understanding your budget helps in selecting the best value for your needs.
- Portability: If you plan to use the microphone on the go, consider its size and weight. Portable microphones are designed for easy transport, making them ideal for traveling musicians or field recording.
- Durability: Assess the build quality and materials of the microphone, especially if it will be used in demanding environments. A durable microphone can withstand wear and tear, ensuring longevity and reliability over time.
- Brand Reputation: Research brands known for their quality and reliability. Established brands often have a history of producing high-performance microphones and offer warranties and customer support, adding peace of mind to your purchase.
How Does Microphone Type Influence Your Choice?
The type of microphone significantly influences your choice based on various factors like application, environment, and sound quality needed.
- Dynamic Microphones: These are robust and can handle high sound pressure levels, making them ideal for live performances and loud sound sources.
- Condenser Microphones: Known for their sensitivity and wide frequency response, these mics are preferred in studio settings for capturing vocals and acoustic instruments.
- Ribbon Microphones: These offer a warm and natural sound, often used for vocals and strings, but they require careful handling due to their delicate construction.
- Lavalier Microphones: Small and clip-on, lavalier mics are great for interviews and presentations, providing hands-free operation while maintaining clarity and discretion.
- USB Microphones: Convenient for podcasting and home recording, USB mics are easy to use with computers, making them accessible for beginners.
- Shotgun Microphones: Highly directional, shotgun mics are perfect for film and video production, allowing sound capture from a distance while minimizing background noise.
- Boundary Microphones: These are designed to capture sound from a wide area, ideal for conference settings or stage performances where multiple sources need to be picked up.
Dynamic microphones are typically more durable and can withstand rough handling, which makes them suitable for stage use and high-volume applications. They operate through electromagnetic induction and do not require an external power source, making them straightforward to use.
Condenser microphones use a diaphragm that requires phantom power, resulting in a clearer and more detailed sound. This quality makes them the go-to choice for studio recordings, where capturing the nuances of a performance is crucial.
Ribbon microphones provide a vintage sound quality that is often sought after in music production. However, they tend to be more fragile and may require a special preamp, which can limit their use in certain scenarios.
Lavalier microphones are advantageous in situations where the speaker needs to move freely without holding a mic. They maintain audio quality while being discreetly attached to clothing, which is perfect for interviews and presentations.
USB microphones are particularly user-friendly, making them popular among podcasters and content creators. Their plug-and-play design means they can be easily integrated into a home recording setup without needing additional audio interfaces.
Shotgun microphones excel in environments where focused audio capture is necessary. They can isolate sounds from specific directions while rejecting ambient noise, which is invaluable in film and video shoots.
Boundary microphones are often used in conference settings because they can capture sound from various directions, making them effective in group discussions. Their design allows for unobtrusive placement while still delivering quality audio.
What Impact Does Directionality Have on Audio Capture?
- Cardioid Microphones: These mics are designed to pick up sound primarily from the front while rejecting noise from the sides and rear. This directionality is ideal for live performances and studio recordings where background noise can interfere with the desired audio, ensuring a clear and focused sound capture.
- Omnidirectional Microphones: Omnidirectional mics capture sound equally from all directions, making them suitable for recording ambient sounds or when multiple sound sources are present in a space. However, they are more susceptible to unwanted noise, so they are best used in controlled environments where background noise is minimal.
- Bidirectional Microphones: These microphones pick up sound from the front and back while rejecting sound from the sides. They are particularly useful in situations like interviews where two speakers are positioned opposite each other, allowing for a natural dialogue capture without picking up excessive background noise.
- Supercardioid and Hypercardioid Microphones: These are more directional than cardioid mics, capturing sound from the front while still allowing some pickup from the rear. They are often used in live settings and recording studios for isolating sources and minimizing feedback while still being able to capture some ambient noise if needed.
- Placement Considerations: The directionality of a microphone significantly affects how it should be placed relative to sound sources. Proper positioning can enhance the quality of the recording by maximizing the desired sound while minimizing interference from unwanted noise, making it essential to consider the mic’s pickup pattern during setup.
How Should You Position Your Microphone for the Best Results?
Proper microphone positioning is essential for achieving optimal sound quality and clarity.
- Distance from the Sound Source: Positioning the microphone too close can lead to distortion, while being too far may result in a weak signal. A general rule of thumb is to keep the mic about 6 to 12 inches away from the source, adjusting based on the volume and type of voice or instrument being recorded.
- Angle and Orientation: The angle at which the microphone is held can affect the tonal quality of the sound captured. Directing the microphone towards the sound source at a slight angle can help capture a more balanced sound, especially for vocals or instruments, as it reduces unwanted reflections from the environment.
- Use of Pop Filters: Utilizing a pop filter can significantly improve the quality of vocal recordings by reducing plosive sounds that occur from hard consonants. Placing the pop filter a few inches in front of the microphone helps to diffuse the bursts of air before they reach the mic, resulting in a smoother recording.
- Microphone Type Consideration: Different types of microphones have different pickup patterns and sensitivities, which influence their positioning. For example, cardioid mics should be aimed directly at the sound source, while omnidirectional mics can be placed in the center of a group to capture sound from all directions.
- Environment Acoustics: The acoustics of the recording environment play a significant role in mic positioning. It’s important to assess the space for echoes or background noise and position the microphone in a way that minimizes these effects, such as moving closer to walls that absorb sound or using soundproofing materials.
What Techniques Can Enhance Microphone Performance?
There are several techniques that can enhance microphone performance significantly.
- Proper Placement: The positioning of a microphone relative to the sound source is crucial for capturing the best audio quality. Placing the mic too far away may result in weak sound pickup, while being too close can cause distortion; finding the right distance enhances clarity and richness of the sound.
- Use of Pop Filters: Pop filters are essential for reducing plosive sounds that occur when pronouncing ‘p’ and ‘b’ sounds. These filters act as a barrier to soften the impact of air blasts, resulting in a smoother recording and preventing unwanted spikes in audio levels.
- Shock Mounts: Employing a shock mount helps isolate the microphone from vibrations and handling noise. This technique minimizes background noise and unwanted thumps, ensuring that the recorded sound is clear and free of interference from movements.
- Windshields for Outdoor Use: When recording in outdoor environments, using windshields can significantly reduce wind noise that can muddle audio quality. These coverings dissipate wind turbulence, allowing for cleaner recordings even in breezy conditions.
- Adjusting Gain Levels: Properly setting the gain levels on audio interfaces or mixers is vital for optimal mic performance. Too low of a gain may lead to a weak signal, while too high can cause distortion, so finding a balanced level is key to achieving clear audio.
- Regular Maintenance: Keeping microphones clean and in good condition enhances their longevity and performance. Regularly checking for dust, moisture, and ensuring connectors are secure can prevent common issues that might affect sound quality.
- Using the Right Type of Microphone: Choosing the appropriate microphone for the specific recording situation is essential. Dynamic mics are great for live settings and loud sounds, while condenser mics excel in studio environments for capturing detailed and nuanced audio.
- Room Acoustics Treatment: Improving the acoustics of the recording environment can drastically affect microphone performance. Utilizing sound-absorbing materials can reduce echoes and reverberation, resulting in cleaner recordings.
How Can You Maintain Your Microphone to Ensure Longevity?
To ensure the longevity of your microphone, it’s important to follow certain best practices of mic maintenance.
- Regular Cleaning: Keeping your microphone clean is essential for optimal performance. Use a soft, dry cloth to wipe down the exterior and ensure that the grille is free of dust and debris, which can affect sound quality.
- Proper Storage: Store your microphone in a safe, dry place when not in use. Using a padded case or bag can protect it from physical damage and environmental factors such as humidity and extreme temperatures.
- Avoid Moisture: Moisture can damage microphones, especially condenser types. Use a windscreen when recording outdoors to minimize moisture exposure and avoid speaking directly into the mic in humid conditions.
- Check Cables and Connectors: Regularly inspect your microphone cables and connectors for wear and tear. Damaged connectors can lead to poor sound quality or complete failure, so it’s advisable to replace any faulty components immediately.
- Use a Pop Filter: A pop filter can help reduce plosive sounds that occur during vocal recordings. This not only protects the microphone from excessive wind and saliva but also enhances the clarity of the recorded audio.
- Limit Exposure to Extreme Temperatures: Extreme heat or cold can adversely affect the internal components of a microphone. Always try to use and store your mic in a temperature-controlled environment to prevent damage.
- Handle with Care: Whenever using or transporting your microphone, handle it gently. Avoid dropping it or subjecting it to physical shock, as this can lead to internal damage that may not be immediately visible.
- Regularly Test and Calibrate: Periodically testing and calibrating your microphone can help identify any issues early. By regularly checking its performance, you can ensure it operates at its best and address any potential problems before they worsen.
What Common Microphone Issues Should You Be Aware Of?
Common microphone issues that can affect performance include:
- Popping and Plosive Sounds: These occur when certain consonant sounds, like ‘p’ and ‘b’, produce bursts of air that hit the microphone diaphragm. Using a pop filter can help mitigate these sounds by diffusing the airflow before it reaches the mic.
- Background Noise: Ambient sounds from the environment can interfere with the clarity of the audio being recorded. To minimize this, it’s best to use a directional microphone and to record in a controlled environment away from noise sources.
- Handling Noise: This type of noise is caused by physically touching or moving the microphone while recording. Using a shock mount can help absorb vibrations and prevent handling noise from being captured in the recording.
- Low Volume Levels: If the audio recorded is too quiet, it can lead to a poor sound quality and make post-production editing difficult. Ensuring proper gain settings and speaking at an appropriate distance from the microphone can help achieve optimal volume levels.
- Feedback Loops: Feedback occurs when the microphone picks up sound from speakers, creating a loop that results in a loud screeching noise. To avoid feedback, it is crucial to position microphones away from speakers and adjust volume levels accordingly.
- Overloading and Distortion: This happens when the microphone picks up sound that is too loud, causing distortion in the audio. Monitoring levels and using a compressor or limiter can help prevent overloading and maintain audio quality.
- Connection Issues: Problems with cables or connectors can lead to intermittent sound or complete signal loss. Regularly checking and maintaining cables and connectors can help minimize these issues and ensure reliable performance.
How do You Effectively Clean and Care for Your Microphone?
To effectively clean and care for your microphone, follow these best practices:
- Regular Dusting: Regularly dust your microphone with a soft, dry cloth to remove any accumulated debris or particles.
- Use a Windscreen: Always use a windscreen to prevent moisture and saliva from reaching the microphone capsule, which can damage it over time.
- Proper Storage: Store your microphone in a dry, cool place, ideally in a protective case to prevent physical damage and exposure to dust.
- Cleaning the Grille: Clean the microphone grille carefully using a soft brush or compressed air to dislodge any dirt or moisture trapped in the mesh.
- Avoid Excessive Handling: Minimize touching the microphone with your hands to avoid transferring oils and sweat, which can affect sound quality.
- Check Cables Regularly: Inspect and clean the microphone cables regularly to ensure they are free from frays and corrosion, which can lead to signal issues.
- Professional Maintenance: Consider having your microphone professionally serviced periodically, especially if it is frequently used in demanding environments.
Regular dusting helps maintain the microphone’s appearance and functionality, as dust can interfere with sound quality and performance.
A windscreen acts as a protective barrier, minimizing the risk of moisture damage and ensuring better sound pickup by reducing plosive sounds.
Proper storage is essential for preserving the integrity of the microphone, as exposure to elements can degrade performance and lead to damage.
Cleaning the grille prevents sound distortion by ensuring that dirt and moisture do not obstruct the microphone’s pickup pattern.
Avoiding excessive handling reduces the risk of transferring substances that can interfere with the microphone’s performance and sound quality.
Regularly checking cables can prevent unexpected signal loss and ensure consistent audio quality during use.
Professional maintenance allows for a thorough check-up and servicing that can identify potential issues before they become significant problems, extending the microphone’s lifespan.
What Do You Need to Know About Connecting Your Microphone to Other Devices?
When connecting your microphone to other devices, understanding the best practices is crucial for optimal performance and sound quality.
- Choose the Right Cable: Selecting the appropriate cable is essential for maintaining signal integrity. For example, XLR cables are preferable for professional-grade microphones as they reduce noise and interference, while TRS cables are suitable for consumer-grade equipment.
- Use an Audio Interface: An audio interface can enhance the quality of the audio signal by providing better preamps and analog-to-digital conversion. This is particularly important for recording or live performances, as it can greatly improve sound fidelity compared to connecting directly to a computer or mixer.
- Check Compatibility: Ensure that your microphone is compatible with the device you’re connecting to, whether it’s a computer, mixer, or camera. Some devices may require specific input types or adapters, so verifying compatibility beforehand can save time and frustration.
- Proper Gain Staging: Setting the correct gain levels is vital to avoid distortion or noise in your recordings. Start with lower gain settings and gradually increase them while monitoring the audio levels to achieve the best balance without clipping.
- Monitor Your Sound: Using headphones to monitor your sound in real-time can help you catch any issues such as background noise or improper levels. This practice allows for immediate adjustments, ensuring the final output is of the highest quality.
- Use a Pop Filter: A pop filter can help eliminate plosive sounds (like ‘p’ and ‘b’ sounds) that can cause distortion in recordings. By placing the pop filter between the microphone and the speaker, you can achieve clearer sound quality and a more professional recording.
- Positioning the Microphone: Proper microphone placement can significantly affect sound capture. Depending on the type of microphone and the source sound, adjusting the distance and angle can optimize the audio quality, reducing unwanted reverberations and enhancing clarity.
- Maintain Your Equipment: Regular maintenance of your microphone and associated equipment is critical for longevity and performance. This includes cleaning the microphone, checking cables for wear, and ensuring all connections are secure before use.