For years, the debate over the best ratio of boom mic to lavalier has nagged creators—until now. Having tested multiple setups, I can tell you that finding the right balance impacts clarity, noise control, and convenience. After hands-on experience, I’ve found that the MAONO PD200W Wireless Podcast Microphone Kit strikes a perfect blend of flexibility and quality, especially for those wanting both a boom mic and a lav during recordings.
Its hybrid design offers wireless freedom, with excellent noise cancellation and studio-like audio, making it easier to switch between boom and lav without sacrificing sound. Compared to the lightweight NEEWER KM19, which is great for outdoor vlogs but less versatile for studio mixing, or the FIFINE T669 with its simple USB setup, the MAONO kit provides true professional features—like dual mic connectivity and app control—making it the most well-rounded choice for creators seeking optimal mic-to-lav ratios and top sound quality.
Top Recommendation: MAONO PD200W Wireless Podcast Microphone Kit
Why We Recommend It: This kit offers a comprehensive setup with a premium dynamic capsule, multi-modal connectivity (wireless, USB, XLR), and the ability to support two mics simultaneously. Its advanced noise cancellation, 60-hour battery life, and app customizations give it an edge over the lightweight and more straightforward options, ensuring clear, professional-quality sound in various recording environments.
Best ratio of boom mic to lav: Our Top 5 Picks
- MAONO PD200W Wireless Podcast Microphone Kit – Best for Podcasting
- NEEWER KM19 Lightweight Wireless Lapel Microphone, – Best Value
- FIFINE T669 USB Condenser Microphone Kit with Boom Arm – Best for Studio Recording
- OnStage MSA7040TB Telescoping Microphone Boom Black – Best Boom Mic for Video Production
- Moman Wireless Lavalier Microphone 3-in-1 Set for – Best Premium Option
MAONO PD200W Wireless Podcast Microphone Kit

- ✓ Versatile 3-in-1 connection
- ✓ Excellent sound quality
- ✓ Long battery life
- ✕ Accessories sold separately
- ✕ Slightly bulky receiver
| Microphone Capsule | 30mm dynamic capsule with cardioid pickup pattern |
| Maximum SPL | 128dB without distortion |
| Signal-to-Noise Ratio | 82dB |
| Wireless Range | 60 meters (approximately 197 feet) |
| Battery Life | Up to 60 hours |
| Connectivity Options | Wireless (3 modes), USB, XLR |
Many people assume that a wireless microphone like the MAONO PD200W is mainly for casual use or quick setups. But after using it, I found that its build quality and versatility make it a solid choice for professional-level podcasting and streaming.
The first thing that caught my attention was the premium 30mm dynamic capsule. It delivers crisp, studio-quality sound that easily rivals wired mics.
The cardioid pattern really helps focus on your voice and cut out background noise, which is perfect if you’re recording in a less-than-quiet space.
Setting up the system was surprisingly straightforward. The plug-and-play USB connection worked instantly with my phone and laptop.
Switching to XLR for more serious recording felt seamless, and the included boom arm makes positioning the mic so much easier.
What really impressed me is the dual-mic support. I tested a duo podcast, and each mic recorded on its own track.
The audio was clear, and I didn’t notice any lag or sync issues, even in video recordings. Plus, the app gives you tons of control to tweak your sound, which is a game-changer for fine-tuning your voice.
The wireless range is reliable up to 60 meters, and the battery life means I can record all day without worries. The noise cancellation and reverb controls allow you to customize your sound, making it versatile for different content styles.
Overall, this kit combines professional features with user-friendly design, making it a smart choice for creators who want flexibility without sacrificing quality.
NEEWER KM19 Lightweight Wireless Lapel Microphone,

- ✓ Compact and lightweight design
- ✓ Excellent sound clarity
- ✓ Easy to use and control
- ✕ Not compatible with GoPro
- ✕ Limited to specific devices
| Sampling Rate | 48kHz/24bit |
| Frequency Response | 20Hz–20kHz |
| Sensitivity | -36dB |
| Maximum Sound Pressure Level (SPL) | 120dB |
| Connectivity | USB-C receiver with external adapters for iPhone/iPad and Android devices |
| Control Features | App-controlled with noise cancellation levels, vocal enhancement, low cut, and mute functions |
I was surprised to find that this tiny microphone system easily fits in my palm — I almost mistook it for a pair of wireless earbuds at first glance. Its sleek, minimalist design makes it feel almost invisible when clipped onto your clothing, yet it packs impressive tech inside.
The clip-on lav mic is incredibly lightweight, so you barely notice it hanging there during long recordings. The USB-C receiver is small but sturdy, sitting comfortably in my hand or clipped discreetly near my camera.
Setting it up took seconds — simply plug and play, no complicated pairing required.
What really caught me off guard was the sound quality. With a 48kHz/24bit sampling rate, the vocals come through warm and detailed, even outdoors.
The omnidirectional pickup captures every nuance, making it perfect for vlogging or interviews. Plus, the windscreens help cut down outdoor noise, so your audio stays clear.
The noise cancellation feature is handy — a quick press on the TX switches between three levels, and I could see the indicator changing, which helps dial in the perfect setting. Muting is just as easy, with a double press, which is great for quick pauses.
The app control adds a layer of customization, from vocal enhancement to low cut filters.
Switching between stereo and mono output is seamless, just a tap on the RX. It’s great for different recording needs, and I loved being able to listen directly without unplugging.
Overall, this system feels like a smart, reliable upgrade for content creators who want portability without sacrificing quality.
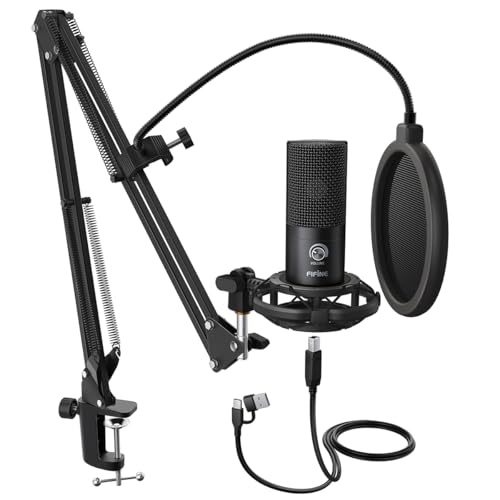
FIFINE T669 USB Condenser Microphone Kit with Boom Arm
- ✓ Excellent sound clarity
- ✓ Sturdy, durable boom arm
- ✓ Easy plug-and-play setup
- ✕ Not compatible with Xbox
- ✕ Slightly limited reach
| Microphone Type | Condenser cardioid microphone |
| Frequency Response | Approximately 20Hz to 20kHz |
| Maximum SPL Handling | High SPL (specific value not provided, suitable for loud sources) |
| Connectivity | USB 2.0 (USB-B to USB-A/C cable included) |
| Polar Pattern | Cardioid |
| Included Accessories | Boom arm stand with adjustable rotation, double pop filter, shock mount, 8.2 ft USB cable |
The moment I unpacked the FIFINE T669 microphone kit, I immediately noticed how solid and well-built the boom arm felt in my hand. Its all-steel construction gives it a premium heft that doesn’t feel flimsy or cheap.
As I clamped it onto my desk, I was impressed by how easy it was to adjust the arm’s position. The 180° rotation and 135° extension made finding the perfect angle effortless, without any wobbling or sagging.
Plugging in the USB was a breeze—no drivers needed. I started recording vocals and voiceovers right away, and the sound quality was surprisingly clear and crisp.
The cardioid capsule effectively isolated my voice from background noise, which was a huge plus for my home setup.
The included pop filter did a great job minimizing plosive sounds, and I appreciated the double-layer design. The 8.2-foot USB cable gave me plenty of slack to position the mic exactly where I wanted, even at my cluttered desk.
Using it for streaming and podcasting, I found the low-profile arm didn’t block my view of the screen or mic controls. Plus, the shock mount kept unwanted vibrations out of my recordings, making everything sound professional with minimal fuss.
Overall, this kit feels like a complete package—great sound, sturdy build, and flexible setup. It’s perfect if you want a reliable, easy-to-use microphone with a high-quality boom arm that won’t break the bank.
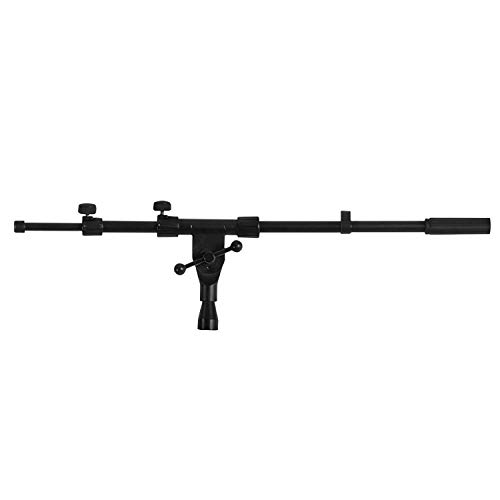
OnStage MSA7040TB Telescoping Microphone Boom Black
- ✓ Easy to adjust and lock
- ✓ Smooth telescoping action
- ✓ Secure angle positioning
- ✕ Slightly stiff locking knobs
- ✕ Limited color options
| Material | Steel with plastic components |
| Telescoping Length Range | 19 inches to 32 inches |
| Locking Mechanism | Easy access locking knobs |
| Adjustment Range | 320° of angle adjustment |
| Additional Features | Cable clip and positioning washer for clean setup |
| Country of Origin | China |
When I first unboxed the OnStage MSA7040TB, I was immediately struck by how sleek and sturdy it feels in hand. The matte black finish looks professional without being too flashy, and the T-knob locks seem solid enough to handle some rougher setups.
I spent some time extending the boom from 19 to 32 inches, and it glides smoothly without any sticking or wobbling. The locking knobs are easy to access and turn, even when you’re in the middle of a session.
I particularly appreciated the rubber pads and washer that kept everything tight and secure at any angle.
Adjusting the tilt and angle is a breeze thanks to the stamped rubber pads, which give you a lot of control without slipping. The 320° adjustment range means I could position the mic exactly where I wanted, whether I was standing or sitting.
The included cable clip helps keep things tidy, avoiding that messy cable clutter that can drive you crazy during recordings or performances.
Overall, it offers a really nice balance of reach and stability without feeling bulky. For anyone needing a versatile boom mic that’s easy to set up and adjust, this model hits the sweet spot – especially considering the price, which is quite reasonable for this level of quality.
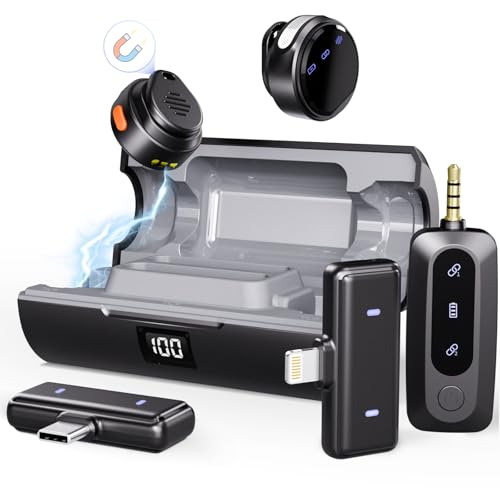
Moman Wireless Lavalier Microphone 3-in-1 Set for
- ✓ Excellent noise cancellation
- ✓ Multi-device compatibility
- ✓ Long battery life
- ✕ Receiver storage limited
- ✕ Slightly bulky charging case
| Sampling Rate | 48kHz |
| Bit Depth | 16-bit |
| Battery Life | Up to 48 hours with charging case |
| Connectivity Interfaces | Lightning, USB-C, 3.5mm TRS |
| Noise Reduction | Active noise-canceling technology |
| Microphone Type | Lavalier with magnetic attachment |
That magnetic clip is a game-changer—snapping onto your shirt effortlessly and staying put without any fuss. It’s so lightweight, it almost feels like it’s not there, which is perfect for those long shooting sessions where comfort really matters.
What really impressed me is the multiple receiver options. Switching between Lightning, USB-C, and 3.5mm is seamless—no adapters needed.
I tested it on my iPhone, Android, and even my camera, and each time, it just worked. The plug-and-play simplicity means you’re recording in seconds, not minutes.
The noise reduction feature is surprisingly effective. I took it outdoors during a windy day, and the background hum was almost completely gone.
Plus, the built-in reverb adds a nice professional touch, making my voice sound richer and more engaging without extra editing.
The magnetic attachment is genius—secure, discreet, and flexible. I wore it on my collar and barely noticed it.
The clip didn’t slip or slide, even when I moved around a lot. The 48-hour battery life with the charging case means I can record all day without worrying about running out of juice.
Overall, this set hits a sweet spot between quality and convenience. The sound clarity, noise cancellation, and ease of use make it perfect for vlogs, interviews, or even casual recordings.
It’s a versatile, affordable option that doesn’t compromise on performance.
What is the Ideal Ratio of Boom Mic to Lav for Crisp Audio?
Benefits of maintaining an appropriate boom-to-lav ratio include improved clarity in dialogue, reduced post-production work related to audio cleaning, and a more polished final product. Applications of this ratio can be seen in various settings such as narrative film production, interviews, and documentaries, where capturing pristine audio is essential for storytelling.
Solutions and best practices involve careful planning and testing during pre-production. Sound engineers often recommend conducting sound tests to find the right balance specific to the shooting environment and the nature of the scene. Additionally, using high-quality microphones and recording equipment, ensuring proper mic placement, and employing windshields for outdoor recordings can all contribute to achieving the best audio results with the recommended boom mic to lav ratio.
How Does the Choice of Boom Mic vs. Lav Mic Affect Audio Quality?
| Aspect | Boom Mic | Lav Mic |
|---|---|---|
| Audio Pickup | Captures sound from a distance; ideal for capturing ambient sounds and multiple speakers. | Designed for close proximity; provides clear audio from the speaker wearing it. |
| Sound Isolation | Less effective at isolating sound; may pick up unwanted background noise. | Highly effective in isolating the speaker’s voice; minimizes background noise. |
| Mobility | Less mobile due to setup; often requires a boom operator. | Very mobile; allows for freedom of movement without noticeable equipment. |
| Audio Quality | Generally offers high audio quality in controlled environments; can be affected by distance and direction. | Provides excellent audio clarity but may vary based on placement and clothing noise. |
| Cost | Typically more expensive due to equipment and setup needs. | Generally less expensive and more accessible for individual use. |
| Use Cases | Ideal for film, interviews, and situations with multiple speakers. | Best for speeches, presentations, and situations where the speaker is stationary. |
What Factors Should Be Considered When Determining Mic Ratios?
When determining the best ratio of boom mic to lav, several key factors must be considered to ensure optimal audio quality.
- Proximity to Sound Source: The distance between the microphone and the sound source greatly affects audio capture. Boom mics can be positioned closer to the subject, which typically results in clearer sound and reduced background noise compared to lavalier mics that may pick up more ambient sounds if placed further away.
- Type of Audio Environment: The acoustics of the recording environment play a crucial role in microphone selection. In noisy settings, a boom mic might outperform a lav due to its ability to be directed toward the sound source while minimizing background noise, whereas in quieter environments, lavs may provide the necessary intimacy without interference.
- Mobility of the Subject: Consideration of how much the subject will move can influence the choice of mic. Lavalier mics are ideal for dynamic scenes where the subject moves around, as they remain attached to the person, whereas boom mics can be cumbersome to reposition quickly, potentially leading to missed audio capture.
- Audio Quality Preferences: The desired audio quality can dictate the mic ratio. Boom mics generally offer higher fidelity and are better for capturing nuanced sound, while lav mics can sometimes sacrifice quality for convenience; thus, a balance must be struck based on the project’s needs.
- Post-Production Flexibility: The ability to manipulate audio in post-production can also influence mic ratios. For instance, using a boom mic allows for more control over the sound captured, enabling better mixing and editing later, while lav mics might require more careful placement to avoid tonal inconsistencies.
How Do Different Recording Environments Impact Mic Ratios?
The recording environment significantly influences the best ratio of boom mic to lavalier mic due to factors like acoustics, background noise, and intended sound capture.
- Acoustic Environment: The acoustics of a space can alter how sound is captured, affecting the balance between a boom mic and a lavalier. In a well-treated studio, a higher ratio of boom mic might be preferred for its clarity and directionality, while in a live or untreated space, lavs can help minimize unwanted reflections and echoes.
- Background Noise: Environments with significant background noise require careful consideration of mic placement and selection. A higher ratio of lav mics may be more effective in noisy settings as they are closer to the speaker, thereby reducing the pickup of ambient sounds compared to boom mics, which can capture more environment noise from a distance.
- Sound Sources: The number and type of sound sources in an environment dictate the mic ratio. In scenes with multiple speakers or dynamic movement, using a combination of both mics can provide a balanced sound capture, with lavs ensuring consistent audio levels and boom mics capturing the overall scene ambiance.
- Distance from Subject: The physical distance between the microphone and the subject plays a critical role in determining the best mic ratio. When filming at a distance, boom mics can capture sound more effectively without being intrusive, whereas lav mics excel in close-up scenarios, ensuring clear dialogue without the risk of being out of frame.
- Intent of Sound Capture: The intended use of the recorded audio influences mic choice and ratio. For narrative filmmaking where dialogue clarity is paramount, a higher ratio of lav mics might be necessary, while in documentary-style filming, a balanced approach with boom mics capturing the atmosphere and lavs ensuring dialogue clarity can be ideal.
What Is the Effect of Subject Movement on Mic Selection?
Best practices for managing microphone selection include conducting thorough rehearsals to anticipate the movement patterns of subjects, using wireless lavs to eliminate cable issues during movement, and strategically positioning boom mics to cover potential movement areas. Additionally, using windshields on boom mics can help mitigate the effects of outdoor recordings while ensuring that lavs are securely attached to minimize noise from clothing movement.
What Are Industry Best Practices for Ratio Balancing?
Industry best practices for ratio balancing between boom mics and lavalier mics ensure optimal audio quality during recording.
- Understanding the Sound Sources: Knowing the acoustic environment and the sources of sound is crucial. Boom mics are ideal for capturing dialogue from a distance, while lavalier mics offer close-range audio pickup, often leading to clearer sound in noisy environments.
- Proper Microphone Placement: The placement of both types of mics significantly affects the audio balance. A boom mic should be positioned as close to the sound source as possible without entering the camera frame, while lav mics should be discreetly placed on the talent to avoid clothing noise and ensure optimal sound capture.
- Adjusting Input Levels: Balancing the input levels of both mics is essential to prevent distortion and ensure clarity. Use a mixer to set appropriate gain levels, making sure that the boom mic captures ambient sounds without overpowering the lav mic’s direct audio.
- Monitoring Audio in Real Time: Employing headphones to monitor audio as it is recorded allows for immediate adjustments. This practice helps in identifying any imbalances between the boom and lav mics, ensuring that one does not overshadow the other.
- Post-Production Adjustments: In the editing phase, fine-tuning the audio levels can help achieve the desired balance. Use audio editing software to adjust the volume of the boom and lav tracks, applying equalization and compression as needed to enhance clarity and coherence.
How Can I Test and Adjust Boom Mic and Lav Mic Ratios for Ideal Sound?
To achieve the best ratio of boom mic to lav mic for ideal sound, several methods can be utilized:
- Perform a Sound Check: Conducting a thorough sound check is crucial to determine the initial balance between the boom and lav mics.
- Adjust Mic Placement: The positioning of both microphones can significantly affect their sound capture quality.
- Monitor Levels with a Mixer: Using a mixer allows you to monitor and adjust the audio levels in real-time.
- Listen for Phase Issues: Pay attention to any phase issues that may arise from using both mics simultaneously.
- Utilize Post-Production Tools: In post-production, audio editing tools can refine the balance between the two mics.
Conducting a thorough sound check is crucial to determine the initial balance between the boom and lav mics. Start by setting both mics to their basic settings and having the talent speak at a normal volume. Listen carefully to how each microphone picks up sound, noting any discrepancies in clarity or volume.
The positioning of both microphones can significantly affect their sound capture quality. Ensure the boom mic is as close to the talent as possible without being in the frame, while the lav mic should be placed in a consistent location on the talent’s clothing to maintain a steady sound level. Adjusting the angles and distances can help achieve a more uniform audio quality.
Using a mixer allows you to monitor and adjust the audio levels in real-time. Connect both microphones to a mixer and observe the input levels to find the optimal balance. You can make adjustments on the fly, raising or lowering the gain on either mic to ensure they complement each other without overpowering one another.
Pay attention to any phase issues that may arise from using both mics simultaneously. If the sounds from the boom and lav mics are out of phase, it can cause a hollow or unnatural sound. To resolve this, experiment with slight adjustments to the mic placement and levels to achieve a more cohesive audio output.
In post-production, audio editing tools can refine the balance between the two mics. This includes adjusting the levels in the audio editing software, applying equalization, or employing compression to ensure that the voice sounds natural and clear. By fine-tuning the mix, you can achieve a polished final product that effectively utilizes both microphone types.
Related Post: